TodoApi - Todo application with ASP.NET Core Blazor WASM, Minimal APIs and Authentication
Todo application with ASP.NET Core
![]()
This is a Todo application that features:
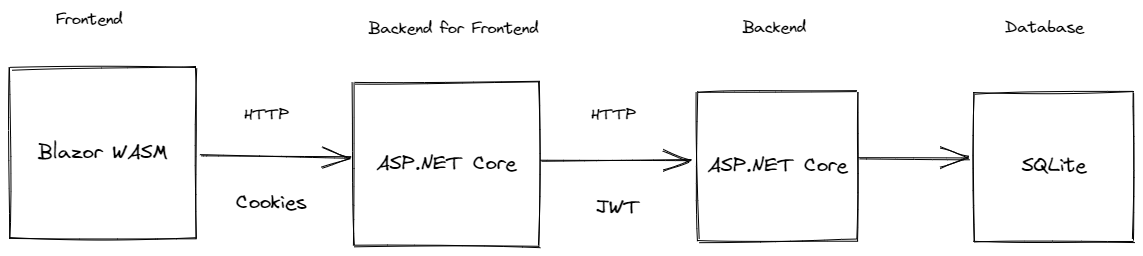
- Todo.Web - An ASP.NET Core hosted Blazor WASM front end application
- TodoApi - An ASP.NET Core REST API backend using minimal APIs
It showcases:
- Blazor WebAssembly
- Minimal APIs
- Using EntityFramework and SQLite for data access
- OpenAPI
- User management with ASP.NET Core Identity
- Cookie authentication
- JWT authentication
- Proxying requests from the front end application server using YARP's IHttpForwarder
- Rate Limiting
- Writing integration tests for your REST API
Prerequisites
.NET
Database
- Install the dotnet-ef tool:
dotnet tool install dotnet-ef -g - Navigate to the
TodoApifolder.- Run
mkdir .dbto create the local database folder. - Run
dotnet ef database updateto create the database.
- Run
- Learn more about dotnet-ef
JWT
-
To initialize the keys for JWT generation, run
dotnet user-jwtsin to TodoApi folder:dotnet user-jwts create
Running the application
To run the application, run both the Todo.Web/Server and TodoApi. Below are different ways to run both applications:
-
Visual Studio - Setup multiple startup projects by right clicking on the solution and selecting Properties. Select
TodoApiandTodo.Web.Serveras startup projects.
-
Visual Studio Code - Open up 2 terminal windows, one in Todo.Web.Server and the other in TodoApi run:
dotnet watch run -lp httpsThis will run both applications with the
httpsprofile. -
Tye - Install the global tool using the following command:
dotnet tool install --global Microsoft.Tye --version 0.11.0-alpha.22111.1Run
tye runin the repository root and navigate to the tye dashboard (usually http://localhost:8000) to see both applications running. -
Docker Compose - Open your terminal, navigate to the root folder of this project and run the following commands:
-
Build a docker image for the
TodoApidirectly from dotnet publish.dotnet publish ./TodoApi/TodoApi.csproj --os linux --arch x64 /t:PublishContainer -c Release -
Build a docker image for the
Todo.Web.Serverdirectly from dotnet publish.dotnet publish ./Todo.Web/Server/Todo.Web.Server.csproj --os linux --arch x64 /t:PublishContainer -c Release --self-contained true -
Generate certificate and configure local machine so we can start our apps with https support using docker compose.
Windows using Linux containers
set PASSWORD YourPasswordHere
dotnet dev-certs https -ep ${HOME}/.aspnet/https/todoapps.pfx -p $PASSWORD --trust
macOS or Linux
export PASSWORD=YourPasswordHere dotnet dev-certs https -ep ~/.aspnet/https/todoapps.pfx -p $PASSWORD --trust -
Change these variables below in the
docker-compose.ymlfile to match your https certificate and password.ASPNETCORE_Kestrel__Certificates__Default__PasswordASPNETCORE_Kestrel__Certificates__Default__Path
-
Run
docker-compose up -dto spin up both apps todo-api and todo-web-server plus jaeger and prometheus. -
Navigate to the Todo Web app https://localhost:5003.
-
Optional
Using the API standalone
The Todo REST API can run standalone as well. You can run the TodoApi project and make requests to various endpoints using the Swagger UI (or a client of your choice):

Before executing any requests, you need to create a user and get an auth token.
-
To create a new user, run the application and POST a JSON payload to
/usersendpoint:{ "username": "myuser", "password": "<put a password here>" } -
To get a token for the above user run
dotnet user-jwtsto create a JWT token with the same user name specified above e.g:dotnet user-jwts create -n myuser -
You should be able to use this token to make authenticated requests to the todo endpoints.
-
Learn more about user-jwts
Social authentication
In addition to username and password, social authentication providers can be configured to work with this todo application. By default it supports Github, Google, and Microsoft accounts.
Instructions for setting up each of these providers can be found at:
Once you obtain the client id and client secret, the configuration for these providers must be added with the following schema:
{
    "Authentication": {
        "Schemes": {
            "<scheme>": {
                "ClientId": "xxx",
                "ClientSecret": "xxxx"
            }
        }
    }
}
Or using environment variables:
Authentication__Schemes__<scheme>__ClientId=xxx
Authentication__Schemes__<scheme>__ClientSecret=xxx
Or using user secrets:
dotnet user-secrets set Authentication:Schemes:<scheme>:ClientId xxx
dotnet user-secrets set Authentication:Schemes:<scheme>:ClientSecret xxx
Other providers can be found here. These must be added to AuthenticationExtensions as well.
NOTE: Don't store client secrets in configuration!
External Authentication servers
Much like social authentication, this application also supports external Open ID connect (OIDC) servers. External authentication is treated like social authentication provider but that also produce access tokens that can be used with the TodoAPI. This needs to be configured like a social provider in the Todo.Web.Server application and an additional authentication scheme needs to be configured in the TodoAPI to accept JWT tokens issued by the auth server.
Here's what the flow looks like:

Here's how you would configure authentication:
{
  "Authentication": {
    "Schemes": {
      "<scheme>": {
      }
    }
  }
}
NOTE: Don't store client secrets in configuration!
Auth0
This sample has Auth0 configured as an OIDC server. It can be configured with the following schema:
{
  "Authentication": {
    "Schemes": {
      "Auth0": {
        "Audience": "<audience>",
        "Domain": "<domain>",
        "ClientId": "<client id>",
        "ClientSecret": "<client secret>"
      }
    }
  }
}
Here's an example of configuring the TodoAPI:
{
  "Authentication": {
    "Schemes": {
      "Auth0": {
        "ValidAudiences": [ "<your audience here>" ],
        "Authority": "<your authority here>"
      }
    }
  }
}
Learn more about the Auth0 .NET SDK here.
OpenTelemetry
TodoApi uses OpenTelemetry to collect logs, metrics and spans.
If you wish to view the collected telemetry, follow the steps below.
Metrics
- Run Prometheus with Docker:
docker run -d -p 9090:9090 --name prometheus -v $PWD/prometheus.yml:/etc/prometheus/prometheus.yml prom/prometheus
- Open Prometheus in your browser
- Query the collected metrics
Spans
- Configure environment variable
OTEL_EXPORTER_OTLP_ENDPOINTwith the right endpoint URL to enable.AddOtlpExporterbelowbuilder.Services.AddOpenTelemetryTracing, in theTodoApi/OpenTelemetryExtensions.csfile - Run Jaeger with Docker:
docker run -d --name jaeger -e COLLECTOR_ZIPKIN_HOST_PORT=:9411 -e COLLECTOR_OTLP_ENABLED=true -p 6831:6831/udp -p 6832:6832/udp -p 5778:5778 -p 16686:16686 -p 4317:4317 -p 4318:4318 -p 14250:14250 -p 14268:14268 -p 14269:14269 -p 9411:9411 jaegertracing/all-in-one:latest
- Open Jaeger in your browser
- View the collected spans
Logs
This app using structured logging and for this purpose we use Serilog
For setting up Serilog you should call AddSerilog on SerilogExtensions class and Add Serilog section with appropriate Options
  "Serilog": {
    "MinimumLevel": {
      "Default": "Information",
      "Override": {
        "Microsoft": "Warning",
        "Microsoft.Hosting.Lifetime": "Information"
      }
    }
  }
For collecting and searching logs there are 2 optional way, based on your needs in the production environment:
- Seq (Not Free in commercial use)
- Elasticsearch and Kibana (Free)
Seq
For using seq, we should enable it with setting SeqUrl value in the Serilog section of appsettings.json:
  "Serilog": {
     ...
    "SeqUrl": "http://localhost:5341",
     ...
  },
Also we should run seq server on docker-compose file, now seq is available on http://localhost:8081 and we can see logs out there.
Elasticsearch and Kibana
For using elasticsearch and kibana, we should enable it with setting ElasticSearchUrl value in the Serilog section of appsettings.json:
  "Serilog": {
     ...
    "ElasticSearchUrl": "http://localhost:9200",
     ...
  }
Also we should run Elasticsearch and Kibana on docker-compose file, now we can see our logs on kibana url http://localhost:5601 and
index name todoapi.
