reactjs-interview-questions - 排名前 500 的 ReactJS 面试问题和答案列表......编码练习题即将推出!
React 面试问答
如果你喜欢该项目,请单击⭐。高度赞赏拉取请求。关注我@SudheerJonna获取技术更新。

- 如果你真的想学习 React 并想超越基础知识,我推荐这门 React 课程
- 想在编码面试中取得好成绩并被你梦想中的公司录用吗?参加这个编码面试训练营
注意:此存储库特定于 ReactJS。请查看 Javascript 面试问题,了解核心 javascript 问题。
目录
核心 React
-
什么是 React?
React(又名React.js或ReactJS)是一个开源前端JavaScript库,用于构建可组合的用户界面,特别是对于单页应用程序。它用于以声明性方法处理基于组件的 Web 和移动应用程序的视图层。
React 由 Jordan Walke 创建,他是 Facebook 的软件工程师。React 于 2011 年和 2012 年分别在 Facebook 的 News Feed 和 Instagram 上首次部署。
-
React 进化背后的历史是什么?
ReactJS 的历史始于 2010 年 XHP 的创建。XHP 是一个 PHP 扩展,它改进了语言的语法,使 XML 文档片段成为有效的 PHP 表达式,主要目的是用于创建自定义和可重用的 HTML 元素。
此扩展的主要原则是使前端代码更易于理解,并帮助避免跨站点脚本攻击。该项目成功阻止了清理用户提交的恶意内容。
但是 XHP 有一个不同的问题,即动态 Web 应用程序需要多次往返服务器,而 XHP 并没有解决这个问题。此外,整个 UI 已重新呈现,以对应用程序进行微小更改。后来,React 的初始原型是 Jordan 以 FaxJ 为名创建的,灵感来自 XHP。最后,一段时间后,React 作为一个新的库被引入 JavaScript 世界。
注意:JSX 来源于 XHP 的理念
-
React 的主要特点是什么?
React 的主要特点是:
- 使用 JSX 语法,这是 JS 的语法扩展,允许开发人员在他们的 JS 代码中编写 HTML。
- 它使用虚拟 DOM 而不是真正的 DOM,因为真正的 DOM 操作很昂贵。
- 支持服务器端渲染,这对搜索引擎优化(SEO)很有用。
- 遵循单向或单向数据流或数据绑定。
- 使用可重用/可组合的 UI 组件来开发视图。
-
什么是JSX?
JSX 代表 JavaScript XML,它是 ECMAScript 的类似 XML 的语法扩展。基本上,它只是为函数提供了语法糖,为我们提供了 JavaScript 的表现力以及类似模板的 HTML 语法。
React.createElement(type, props, ...children)
在下面的示例中,文本 inside 标记作为 JavaScript 函数返回给 render 函数。
<h1>
export default function App() {
  return (
      <h1 className="greeting">{"Hello, this is a JSX Code!"}</h1>
  );
}
如果你不使用 JSX 语法,那么相应的 JavaScript 代码应该编写如下:
import { createElement } from 'react';

export default function App() {
  return createElement(
    'h1',
    { className: 'greeting' },
    'Hello, this is a JSX Code!'
  );
}
查看班级
class App extends React.Component {
  render() {
    return (
        <h1 className="greeting">{"Hello, this is a JSX Code!"}</h1>
    );
  }
}
注意:JSX 比 HTML 更严格
-
元素和组件有什么区别?
元素是一个普通对象,它描述了你希望以 DOM 节点或其他组件的形式在屏幕上显示的内容。元素可以在其道具中包含其他元素。创建一个 React 元素很便宜。元素一旦创建,就无法更改。
React Element 的 JavaScript 表示(没有 JSX)如下所示:
const element = React.createElement("div", { id: "login-btn" }, "Login");
这个元素可以使用 JSX 来简化
<div id="login-btn">Login</div>
上面的函数返回一个对象,如下所示:
React.createElement()
{
  type: 'div',
  props: {
    children: 'Login',
    id: 'login-btn'
  }
}
最后,此元素使用 呈现给 DOM。
ReactDOM.render()
而组件可以通过几种不同的方式声明。它可以是带有方法的类,也可以定义为函数。无论哪种情况,它都会将 props 作为输入,并返回一个 JSX 树作为输出:
render()
const Button = ({ handleLogin }) => (
  <div id={"login-btn"} onClick={handleLogin}>
    Login
  </div>
);
然后 JSX 被转译为函数树:
React.createElement()
const Button = ({ handleLogin }) =>
  React.createElement(
    "div",
    { id: "login-btn", onClick: handleLogin },
    "Login"
  );
-
如何在React中创建组件?
组件是在 React 中创建用户界面 (UI) 的构建块。有两种可能的方法可以创建组件。
-
功能组件:这是创建组件的最简单方法。这些是纯 JavaScript 函数,它们接受 props 对象作为第一个参数并返回 React 元素来呈现输出:
function Greeting({ message }) {
  return <h1>{`Hello, ${message}`}</h1>;
}
-
类组件:你还可以使用 ES6 类来定义组件。上面的函数组件可以写成一个类组件:
class Greeting extends React.Component {
  render() {
    return <h1>{`Hello, ${this.props.message}`}</h1>;
  }
}
-
-
何时使用类组件而不是函数组件?
添加 Hooks 后(即 React 16.8 及以上版本),始终建议在 React 中使用 Function 组件而不是 Class 组件。因为你也可以使用状态、生命周期方法和其他功能,这些功能仅在函数组件中的类组件中可用。
但是,即使使用类组件而不是函数组件也有两个原因。
- 如果你需要一个 React 功能,其 Function 组件等价物尚不存在,比如 Error Boundaries。
- 在旧版本中,如果组件需要状态或生命周期方法,则需要使用类组件。
注意:你也可以使用可重用的 react error boundary 第三方组件,而无需编写任何类。
上述库中错误边界的使用非常简单。
使用 react-error-boundary 时注意:ErrorBoundary 是一个客户端组件。你只能将可序列化的 prop 传递给它,或者在具有指令的文件中使用它。
"use client";
"use client";

import { ErrorBoundary } from "react-error-boundary";

<ErrorBoundary fallback={<div>Something went wrong</div>}>
  <ExampleApplication />
</ErrorBoundary>
-
什么是纯成分?
纯组件是针对相同状态和道具渲染相同输出的组件。在函数组件中,可以通过围绕组件的内存化 API 包装来实现这些纯组件。此 API 通过使用浅层比较来比较以前的 prop 和新的 prop,从而防止不必要的重新渲染。因此,这将有助于性能优化。
React.memo()
但同时,它不会将以前的状态与当前状态进行比较,因为当你再次设置相同的状态时,函数组件本身会默认阻止不必要的渲染。
记忆组件的句法表示如下所示,
const MemoizedComponent = memo(SomeComponent, arePropsEqual?);
下面是子组件(即 EmployeeProfile)如何防止重新渲染父组件(即 EmployeeRegForm)传递的相同道具的示例。
  import { memo, useState } from 'react';

  const EmployeeProfile = memo(function EmployeeProfile({ name, email }) {
    return (<>
          <p>Name:{name}</p>
          <p>Email: {email}</p>
          </>);
  });
  export default function EmployeeRegForm() {
    const [name, setName] = useState('');
    const [email, setEmail] = useState('');
    return (
      <>
        <label>
          Name: <input value={name} onChange={e => setName(e.target.value)} />
        </label>
        <label>
          Email: <input value={email} onChange={e => setEmail(e.target.value)} />
        </label>
        <hr/>
        <EmployeeProfile name={name}/>
      </>
    );
  }
在上面的代码中,电子邮件属性尚未传递给子组件。因此,不会对电子邮件道具更改进行任何重新渲染。
在类组件中,扩展
React.PureComponent而不是React.Component的组件成为纯组件。当 props 或状态发生变化时,PureComponent 会通过调用 lifecycle 方法对 props 和 state 进行浅层比较。shouldComponentUpdate()
注意:是一个高阶组件。
React.memo()
-
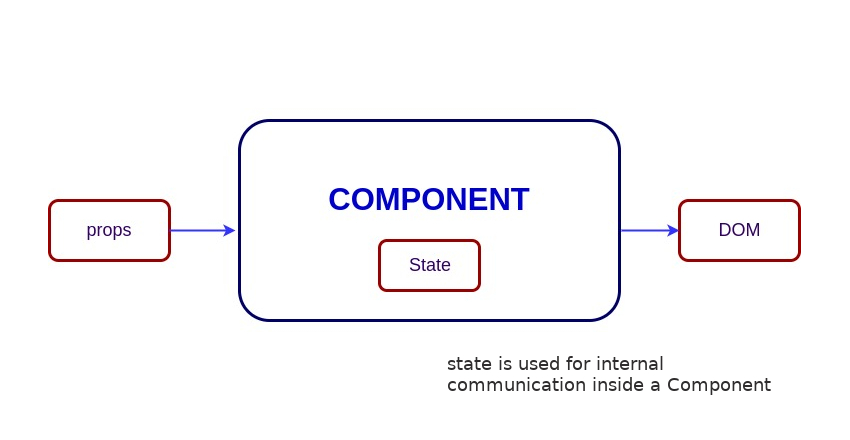
React 中的状态是什么?
组件的状态是一个对象,它包含一些信息,这些信息可能会在组件的生存期内发生变化。重要的一点是,每当状态对象发生变化时,组件就会重新呈现。始终建议使我们的状态尽可能简单,并尽量减少有状态组件的数量。
让我们以具有消息状态的用户组件为例。在这里,useState 钩子用于向 User 组件添加状态,它返回一个具有当前状态的数组和更新它的函数。
import React, { useState } from "react";

function User() {
  const [message, setMessage] = useState("Welcome to React world");

  return (
    <div>
      <h1>{message}</h1>
    </div>
  );
}
查看班级
import React from 'react';
class User extends React.Component {
  constructor(props) {
    super(props);

    this.state = {
      message: "Welcome to React world",
    };
  }

  render() {
    return (
      <div>
        <h1>{this.state.message}</h1>
      </div>
    );
  }
}
State 类似于 props,但它是私有的并且完全由组件控制,也就是说,在所有者组件决定传递它之前,任何其他组件都无法访问它。
-
React 中的道具是什么?
道具是组件的输入。它们是单个值或对象,其中包含一组值,这些值在创建时传递给组件,类似于 HTML 标记属性。在这里,数据从父组件向下传递到子组件。
React 中 props 的主要目的是提供以下组件功能:
- 将自定义数据传递给组件。
- 触发状态更改。
- 通过内部组件的方法使用。
this.props.reactProp
render()
例如,让我们创建一个具有 property 的元素:
reactProp
<Element reactProp={"1"} />
然后,这个(或你想出的任何)属性名称成为附加到 React 原生 props 对象的属性,该对象最初已经存在于使用 React 库创建的所有组件上。
reactProp
props.reactProp
例如,函数组件中 props 的用法如下所示:
import React from "react";
import ReactDOM from "react-dom";

const ChildComponent = (props) => {
  return (
    <div>
      <p>{props.name}</p>
      <p>{props.age}</p>
    </div>
  );
};

const ParentComponent = () => {
  return (
    <div>
      <ChildComponent name="John" age="30" />
      <ChildComponent name="Mary" age="25" />
    </div>
  );
};

props 对象的属性可以使用 ES6 (ECMAScript 2015) 的析构功能直接访问。上面的子组件可以简化,如下所示。
  const ChildComponent = ({name, age}) => {
      return (
        <div>
          <p>{name}</p>
          <p>{age}</p>
        </div>
      );
    };
查看班级
在基于类的组件中访问的 Props,如下所示 import React from "react";
import ReactDOM from "react-dom";
class ChildComponent extends React.Component {
render() {
return (
<div>
<p>{this.props.name}</p>
<p>{this.props.age}</p>
</div>
);
}
}
class ParentComponent extends React.Component {
render() {
return (
<div>
<ChildComponent name="John" age="30" />
<ChildComponent name="Mary" age="25" />
</div>
);
}
}-
state 和 props 有什么区别?
在 React 中,和 都是普通的 JavaScript 对象,用于管理组件的数据,但它们的使用方式不同,具有不同的特征。 由组件本身管理,可以使用该函数进行更新。与 props 不同,状态可以由组件修改,用于管理组件的内部状态。状态的更改会触发组件及其子组件的重新呈现。 (“properties”的缩写)由组件的父组件传递给组件,并且是 ,这意味着组件本身不能修改它们。props 可用于配置组件的行为并在组件之间传递数据。
state
props
state
setState()
props
read-only
-
为什么我们不应该直接更新状态?
如果尝试直接更新状态,则不会重新呈现组件。
//Wrong
this.state.message = "Hello world";
请改用方法。它计划对组件的状态对象进行更新。当状态更改时,组件会通过重新渲染来响应。
setState()
//Correct
this.setState({ message: "Hello World" });
注意:你可以在构造函数中或使用最新的 javascript 的类字段声明语法直接分配给状态对象。
-
回调函数作为参数的目的是什么?
setState()
当 setState 完成并渲染组件时,将调用回调函数。由于是异步的,因此回调函数用于任何 post 操作。
setState()
注意:建议使用 lifecycle 方法,而不是这个回调函数。
setState({ name: "John" }, () =>
  console.log("The name has updated and component re-rendered")
);
-
HTML 和 React 事件处理有什么区别?
以下是 HTML 和 React 事件处理之间的一些主要区别,
-
在 HTML 中,事件名称通常以小写形式表示为约定:
<button onclick="activateLasers()"></button>
而在 React 中,它遵循 camelCase 约定:
<button onClick={activateLasers}>
-
在 HTML 中,你可以返回以防止默认行为:
false
<a
  href="#"
  onclick='console.log("The link was clicked."); return false;'
/>
而在 React 中,你必须显式调用:
preventDefault()
function handleClick(event) {
  event.preventDefault();
  console.log("The link was clicked.");
}
-
在 HTML 中,你需要通过附加 While 来调用函数,而在 react 中,你不应该附加函数名称。(例如,请参阅第一点中的“activateLasers”功能)
()
()
-
-
如何在JSX回调中绑定方法或事件处理程序?
有 3 种可能的方法可以在类组件中实现此目的:
-
构造函数中的绑定:在 JavaScript 类中,默认情况下不绑定这些方法。同样的规则也适用于定义为类方法的 React 事件处理程序。通常我们在构造函数中绑定它们。
class User extends Component {
  constructor(props) {
    super(props);
    this.handleClick = this.handleClick.bind(this);
  }
  handleClick() {
    console.log("SingOut triggered");
  }
  render() {
    return <button onClick={this.handleClick}>SingOut</button>;
  }
}
-
公共类字段语法:如果你不喜欢使用绑定方法,则可以使用公共类字段语法来正确绑定回调。默认情况下,Create React App 启用此语法。
handleClick = () => {
  console.log("SingOut triggered", this);
};
<button onClick={this.handleClick}>SingOut</button>
-
回调中的箭头函数:可以直接在回调中使用箭头函数。
handleClick() {
    console.log('SingOut triggered');
}
render() {
    return <button onClick={() => this.handleClick()}>SignOut</button>;
}
注意:如果回调作为 prop 传递给子组件,则这些组件可能会执行额外的重新渲染。在这些情况下,最好使用考虑性能的公共类字段语法方法。
.bind()
-
-
如何将参数传递给事件处理程序或回调?
可以使用箭头函数来环绕事件处理程序并传递参数:
<button onClick={() => this.handleClick(id)} />
这相当于调用:
.bind
<button onClick={this.handleClick.bind(this, id)} />
除了这两种方法之外,你还可以将参数传递给定义为箭头函数的函数
<button onClick={this.handleClick(id)} />;
handleClick = (id) => () => {
  console.log("Hello, your ticket number is", id);
};
-
React 中的合成事件是什么?
SyntheticEvent
是围绕浏览器本机事件的跨浏览器包装器。它的 API 与浏览器的本机事件相同,包括 和 ,只是这些事件在所有浏览器上的工作方式相同。可以使用属性直接从合成事件访问本机事件。stopPropagation()
preventDefault()
nativeEvent
让我们以 BookStore 标题搜索组件为例,该组件能够获取所有本机事件属性
function BookStore() {
  handleTitleChange(e) {
    console.log('The new title is:', e.target.value);
    // 'e' represents synthetic event
    const nativeEvent = e.nativeEvent;
    console.log(nativeEvent);
    e.stopPropogation();
    e.preventDefault();
  }

  return <input name="title" onChange={handleTitleChange} />
}
-
什么是内联条件表达式?
你可以使用 if 语句或 JS 中可用的三元表达式来有条件地呈现表达式。除了这些方法之外,你还可以通过将任何表达式包装在大括号中,然后用 JS 逻辑运算符 .
&&
<h1>Hello!</h1>;
{
  messages.length > 0 && !isLogin ? (
    <h2>You have {messages.length} unread messages.</h2>
  ) : (
    <h2>You don't have unread messages.</h2>
  );
}
-
什么是“键”属性,在元素数组中使用它有什么好处?
A 是映射数组以呈现数据时应包含的特殊属性。Key prop 帮助 React 识别哪些项目已更改、添加或删除。
key
密钥在其同级中应该是唯一的。大多数情况下,我们使用数据中的 ID 作为键:
const todoItems = todos.map((todo) => <li key={todo.id}>{todo.text}</li>);
如果渲染项没有稳定的 ID,则可以使用项索引作为键作为最后的手段:
const todoItems = todos.map((todo, index) => (
  <li key={index}>{todo.text}</li>
));
注意:
- 如果项的顺序可能会更改,则不建议对键使用索引。这可能会对性能产生负面影响,并可能导致组件状态出现问题。
- 如果将列表项提取为单独的组件,则在列表组件上应用键而不是标记。
li
- 如果列表项上不存在 prop,则控制台中将出现警告消息。
key
- key 属性接受字符串或数字,并在内部将其转换为字符串类型。
-
refs有什么用?
ref 用于返回对元素的引用。在大多数情况下,应避免使用它们,但是,当你需要直接访问 DOM 元素或组件的实例时,它们可能很有用。
-
如何创建引用?
有两种方法
-
这是最近添加的方法。引用是使用 method 创建的,并通过属性附加到 React 元素。为了在整个组件中使用 refs,只需将 ref 分配给构造函数中的实例属性即可。
React.createRef()
ref
class MyComponent extends React.Component {
  constructor(props) {
    super(props);
    this.myRef = React.createRef();
  }
  render() {
    return <div ref={this.myRef} />;
  }
}
-
无论 React 版本如何,你都可以使用 ref 回调方法。例如,按如下方式访问搜索栏组件的输入元素:
class SearchBar extends Component {
  constructor(props) {
    super(props);
    this.txtSearch = null;
    this.state = { term: "" };
    this.setInputSearchRef = (e) => {
      this.txtSearch = e;
    };
  }
  onInputChange(event) {
    this.setState({ term: this.txtSearch.value });
  }
  render() {
    return (
      <input
        value={this.state.term}
        onChange={this.onInputChange.bind(this)}
        ref={this.setInputSearchRef}
      />
    );
  }
}
你还可以在使用闭包的函数组件中使用 refs。注意:你也可以使用内联 ref 回调,即使这不是推荐的方法。
-
-
什么是前向参考?
引用转发是一项功能,它允许某些组件获取它们收到的引用,并将其进一步传递给子组件。
const ButtonElement = React.forwardRef((props, ref) => (
  <button ref={ref} className="CustomButton">
    {props.children}
  </button>
));

// Create ref to the DOM button:
const ref = React.createRef();
<ButtonElement ref={ref}>{"Forward Ref"}</ButtonElement>;
-
在回调引用和 findDOMNode() 中哪个是首选选项?
最好使用回调引用而不是 API。因为阻止了将来 React 的某些改进。
findDOMNode()
findDOMNode()
使用的传统方法:
findDOMNode
class MyComponent extends Component {
  componentDidMount() {
    findDOMNode(this).scrollIntoView();
  }

  render() {
    return <div />;
  }
}
推荐的方法是:
class MyComponent extends Component {
  constructor(props) {
    super(props);
    this.node = createRef();
  }
  componentDidMount() {
    this.node.current.scrollIntoView();
  }

  render() {
    return <div ref={this.node} />;
  }
}
-
为什么 String Refs 是遗留的?
如果你以前使用过 React,你可能熟悉一个较旧的 API,其中属性是一个字符串,比如 ,而 DOM 节点被访问为 .我们建议不要这样做,因为字符串引用存在以下问题,并且被认为是遗留的。在 React v16 中删除了字符串引用。
ref
ref={'textInput'}this.refs.textInput
-
它们强制 React 跟踪当前正在执行的组件。这是有问题的,因为它使 react 模块具有状态,因此当 react 模块在捆绑包中复制时会导致奇怪的错误。
-
它们不可组合 — 如果库在传递的子项上放置了一个 ref,则用户不能在其上放置另一个 ref。回调引用是完全可组合的。
-
它们不适用于像 Flow 这样的静态分析。Flow 无法猜测框架使字符串 ref 出现在 上的魔力,以及它的类型(可能不同)。回调引用对静态分析更友好。
this.refs
-
它并不像大多数人所期望的那样使用“渲染回调”模式(例如)
class MyComponent extends Component {
  renderRow = (index) => {
    // This won't work. Ref will get attached to DataTable rather than MyComponent:
    return <input ref={"input-" + index} />;

    // This would work though! Callback refs are awesome.
    return <input ref={(input) => (this["input-" + index] = input)} />;
  };

  render() {
    return (
      <DataTable data={this.props.data} renderRow={this.renderRow} />
    );
  }
}
-
-
什么是虚拟 DOM?
虚拟 DOM (VDOM) 是真实 DOM 的内存表示形式。UI 的表示形式保存在内存中,并与“真实”DOM 同步。这是在调用渲染函数和在屏幕上显示元素之间发生的一个步骤。这整个过程称为和解。
-
虚拟 DOM 是如何工作的?
虚拟 DOM 只需三个简单的步骤即可完成。
-
每当任何基础数据发生更改时,整个 UI 都会以虚拟 DOM 表示形式重新呈现。

-
然后计算以前的 DOM 表示和新的 DOM 表示之间的差值。

-
一旦计算完成,真正的DOM将只更新实际更改的内容。

-
-
Shadow DOM 和 Virtual DOM 有什么区别?
Shadow DOM 是一种浏览器技术,主要用于在 Web 组件中确定变量和 CSS 的作用域。虚拟 DOM 是一个概念,由库在浏览器 API 之上的 JavaScript 实现。
-
什么是 React Fiber?
Fiber 是 React v16 中新的协调引擎或核心算法的重新实现。React Fiber 的目标是提高其对动画、布局、手势、暂停、中止或重用工作的能力等领域的适用性,并为不同类型的更新分配优先级;和新的并发原语。
-
React Fiber 的主要目标是什么?
React Fiber 的目标是提高其对动画、布局和手势等领域的适用性。它的主要功能是增量渲染:能够将渲染工作拆分为块并将其分散到多个帧上。
从文档
其主要目标是:
- 能够将可中断的工作分成块。
- 能够确定正在进行的工作的优先级、变基和重用。
- 能够在父子之间来回让步,以支持 React 中的布局。
- 能够从 render() 返回多个元素。
- 更好地支持错误边界。
-
什么是受控组件?
在后续用户输入时控制表单中的输入元素的组件称为受控组件,即每个状态突变都将具有关联的处理程序函数。
例如,要用大写字母写所有名称,我们使用 handleChange,如下所示,
handleChange(event) {
  this.setState({value: event.target.value.toUpperCase()})
}
-
什么是不受控制的组件?
不受控制的组件是在内部存储自己的状态的组件,你可以在需要时使用 ref 查询 DOM 以查找其当前值。这有点像传统的 HTML。
在下面的 UserProfile 组件中,使用 ref 访问输入。
name
class UserProfile extends React.Component {
  constructor(props) {
    super(props);
    this.handleSubmit = this.handleSubmit.bind(this);
    this.input = React.createRef();
  }

  handleSubmit(event) {
    alert("A name was submitted: " + this.input.current.value);
    event.preventDefault();
  }

  render() {
    return (
      <form onSubmit={this.handleSubmit}>
        <label>
          {"Name:"}
          <input type="text" ref={this.input} />
        </label>
        <input type="submit" value="Submit" />
      </form>
    );
  }
}
在大多数情况下,建议使用受控组件来实现表单。在受控组件中,表单数据由 React 组件处理。另一种选择是不受控制的组件,其中表单数据由 DOM 本身处理。
-
createElement 和 cloneElement 有什么区别?
JSX 元素将被转译为函数以创建 React 元素,这些元素将用于 UI 的对象表示。Whereas 用于克隆元素并向其传递新的道具。
React.createElement()
cloneElement
-
什么是 React 中的提升状态?
当多个组件需要共享相同的更改数据时,建议将共享状态提升到最接近的共同祖先。这意味着,如果两个子组件共享其父组件的相同数据,则将状态移动到父组件,而不是在两个子组件中维护本地状态。
-
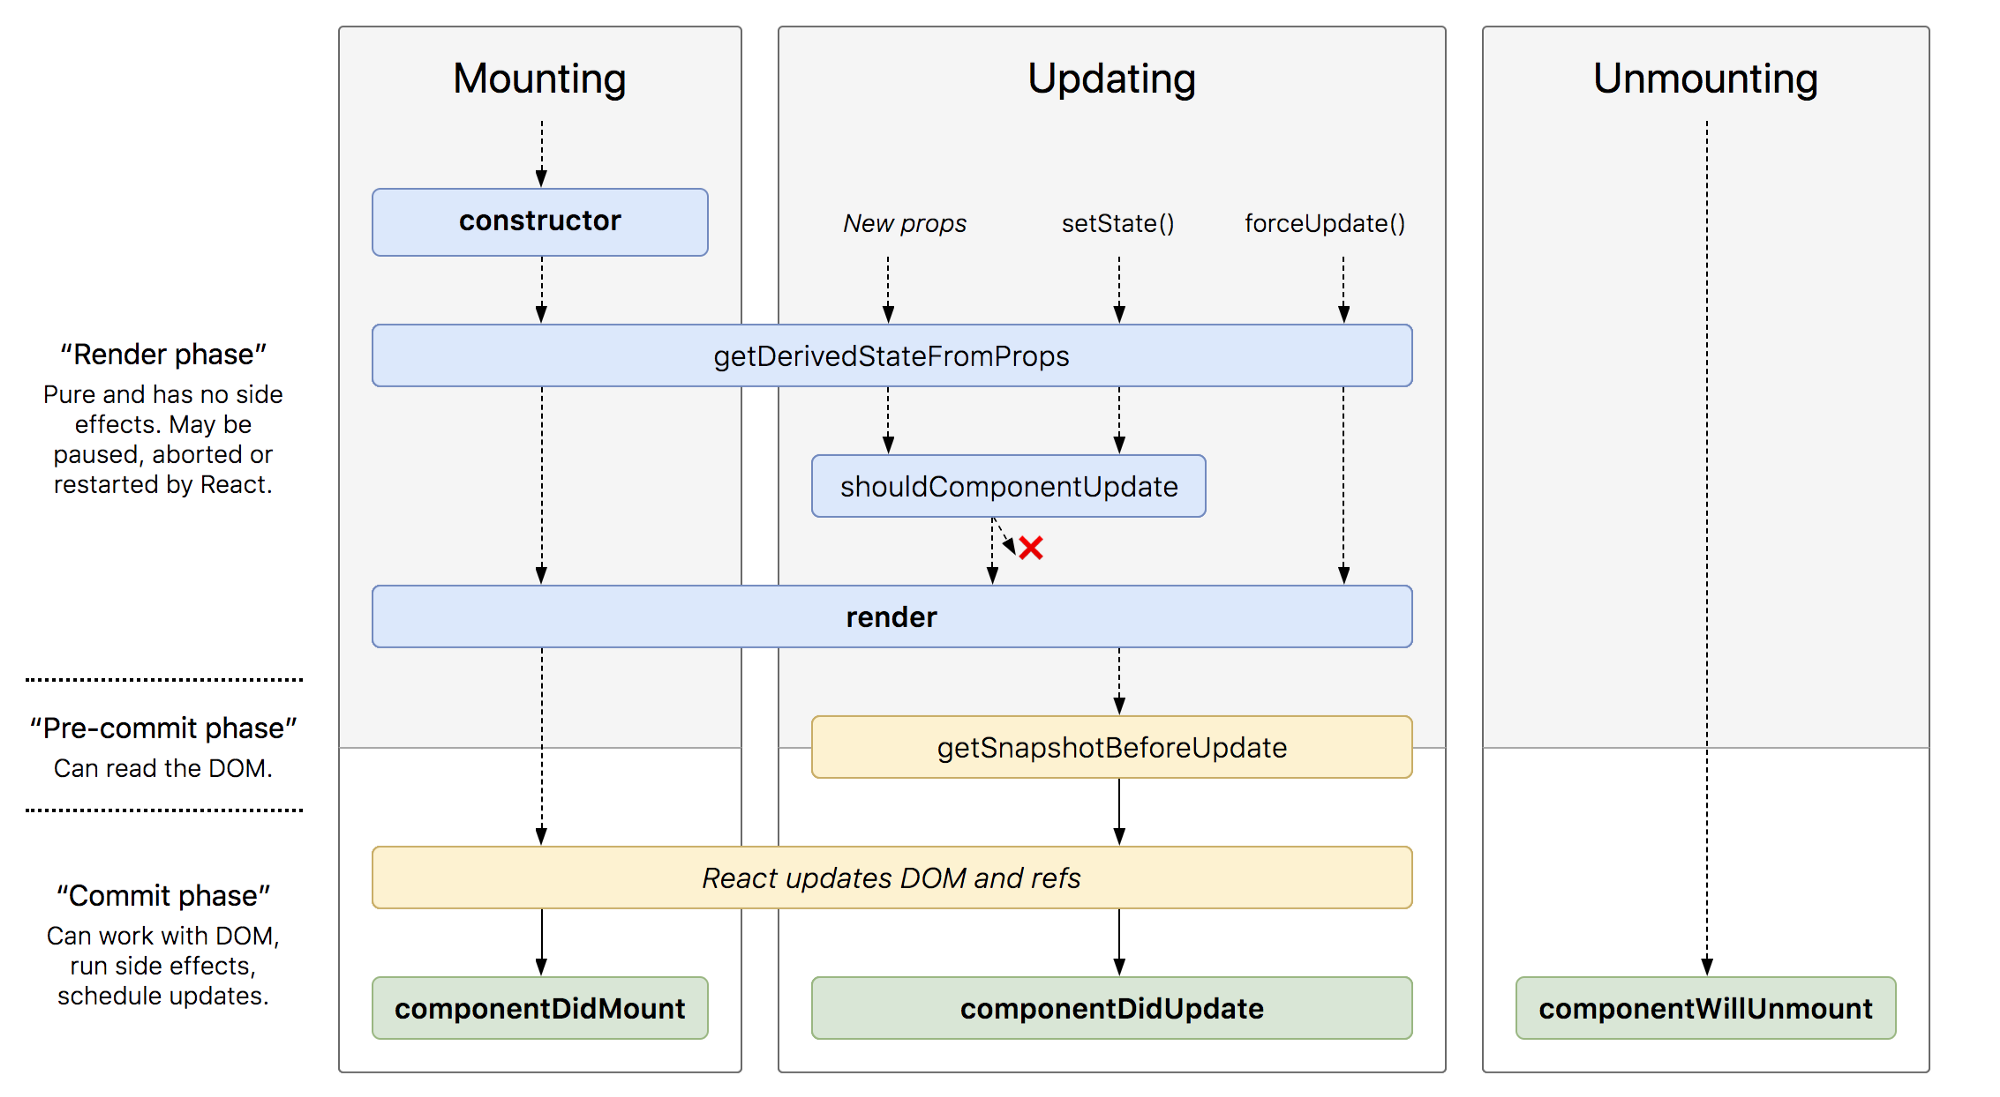
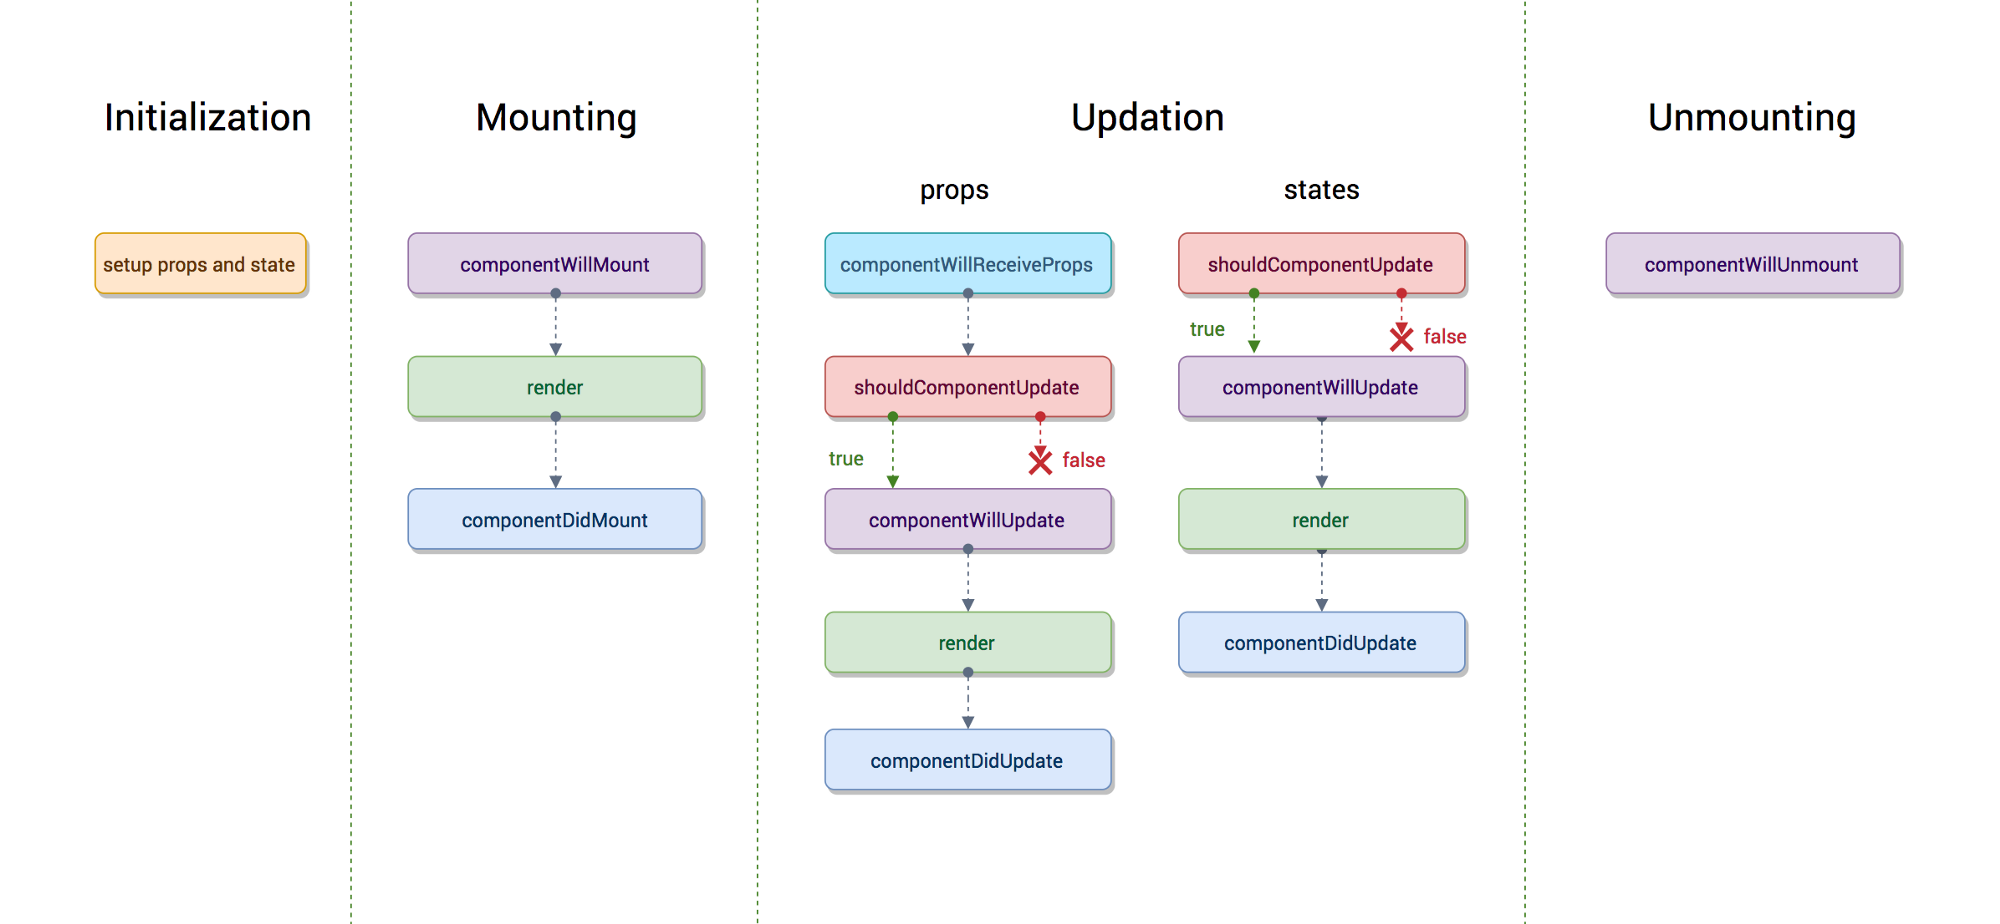
组件生命周期有哪些不同阶段?
组件生命周期有三个不同的生命周期阶段:
-
安装:该组件已准备好挂载到浏览器 DOM 中。此阶段涵盖从 、 、 和 生命周期方法进行初始化。
constructor()
getDerivedStateFromProps()
render()
componentDidMount()
-
更新:在此阶段,组件以两种方式进行更新,发送新道具并从 或 更新状态。此阶段包括 、 、 和 生命周期方法。
setState()
forceUpdate()
getDerivedStateFromProps()
shouldComponentUpdate()
render()
getSnapshotBeforeUpdate()
componentDidUpdate()
-
卸载:在最后一个阶段,不需要该组件,并且可以从浏览器 DOM 中卸载。此阶段包括生命周期方法。
componentWillUnmount()
值得一提的是,React 在对 DOM 进行更改时,内部有一个阶段的概念。它们分开如下
-
呈现该组件将渲染没有任何副作用。这适用于 Pure 组件,在此阶段,React 可以暂停、中止或重新启动渲染。
-
预提交在组件实际将更改应用于 DOM 之前,有一个时刻允许 React 通过 .
getSnapshotBeforeUpdate()
-
犯React 与 DOM 一起工作,并分别执行最终的生命周期,用于挂载、更新和卸载。
componentDidMount()
componentDidUpdate()
componentWillUnmount()
React 16.3+ 阶段(或交互式版本))
在 React 16.3 之前
-
-
React 的生命周期方法有哪些?
在 React 16.3 之前
- componentWillMount:在渲染之前执行,用于根组件中的应用级配置。
- componentDidMount:在第一次渲染后执行,这里应该发生所有 AJAX 请求、DOM 或状态更新,并设置事件侦听器。
- componentWillReceiveProps:当特定道具更新以触发状态转换时执行。
-
shouldComponentUpdate:确定是否更新组件。默认情况下,它返回 .如果确定组件在更新状态或道具后不需要渲染,则可以返回 false 值。这是提高性能的好地方,因为它允许你在组件收到新道具时防止重新渲染。
true
-
componentWillUpdate:在重新渲染组件之前执行,当有道具和状态更改确认时,返回 true。
shouldComponentUpdate()
- componentDidUpdate:大多数情况下,它用于更新 DOM 以响应 prop 或状态更改。
- componentWillUnmount:它将用于取消任何传出网络请求,或删除与组件关联的所有事件侦听器。
React 16.3+
-
getDerivedStateFromProps:在调用之前调用,并在每次渲染时调用。这适用于需要派生状态的罕见用例。如果你需要派生状态,值得一读。
render()
- componentDidMount:在首次渲染后执行,所有 AJAX 请求、DOM 或状态更新以及设置事件侦听器都应发生。
-
shouldComponentUpdate:确定是否更新组件。默认情况下,它返回 .如果确定组件在状态或道具更新后不需要渲染,则可以返回 false 值。这是提高性能的好地方,因为它允许你在组件收到新道具时防止重新渲染。
true
-
getSnapshotBeforeUpdate:在呈现的输出提交到 DOM 之前执行。此返回的任何值都将传递到 中。这对于从 DOM 捕获信息(即滚动位置)很有用。
componentDidUpdate()
-
componentDidUpdate:大多数情况下,它用于更新 DOM 以响应 prop 或状态更改。如果返回,则不会触发 。
shouldComponentUpdate()
false
- componentWillUnmount它将用于取消任何传出网络请求,或删除与组件关联的所有事件侦听器。
-
什么是高阶分量?
高阶组件 (HOC) 是获取组件并返回新组件的函数。基本上,它是一种源自 React 组合性质的模式。
我们称它们为纯组件,因为它们可以接受任何动态提供的子组件,但它们不会修改或复制其输入组件中的任何行为。
const EnhancedComponent = higherOrderComponent(WrappedComponent);
HOC 可用于许多用例:
- 代码重用、逻辑和引导抽象。
- 渲染劫持。
- 状态抽象和操作。
- 道具操作。
-
如何为 HOC 组件创建道具代理?
你可以使用 props 代理模式添加/编辑传递给组件的 prop,如下所示:
function HOC(WrappedComponent) {
  return class Test extends Component {
    render() {
      const newProps = {
        title: "New Header",
        footer: false,
        showFeatureX: false,
        showFeatureY: true,
      };

      return <WrappedComponent {...this.props} {...newProps} />;
    }
  };
}
-
什么是上下文?
Context 提供了一种通过组件树传递数据的方法,而不必在每个级别手动传递 props。
例如,经过身份验证的用户、区域设置首选项、UI 主题需要由许多组件在应用程序中访问。
const { Provider, Consumer } = React.createContext(defaultValue);
-
什么是儿童道具?
Children 是一个 prop (),它允许你将组件作为数据传递给其他组件,就像你使用的任何其他 prop 一样。放在组件的开始和结束标记之间的组件树将作为 prop 传递给该组件。
this.props.children
children
React API 中有几种方法可以使用此道具。这些包括 、 、 、 、 。
React.Children.map
React.Children.forEach
React.Children.count
React.Children.only
React.Children.toArray
儿童道具的简单用法如下,
const MyDiv = React.createClass({
  render: function () {
    return <div>{this.props.children}</div>;
  },
});

ReactDOM.render(
  <MyDiv>
    <span>{"Hello"}</span>
    <span>{"World"}</span>
  </MyDiv>,
  node
);
-
如何在React中写评论?
React/JSX 中的注释类似于 JavaScript 多行注释,但用大括号括起来。
单行注释:
<div>
  {/* Single-line comments(In vanilla JavaScript, the single-line comments are represented by double slash(//)) */}
  {`Welcome ${user}, let's play React`}
</div>
多行注释:
<div>
  {/* Multi-line comments for more than
   one line */}
  {`Welcome ${user}, let's play React`}
</div>
-
使用带有 props 参数的超级构造函数的目的是什么?
子类构造函数在调用该方法之前不能使用引用。这同样适用于 ES6 子类。传递 props 参数进行调用的主要原因是在子构造函数中进行访问。
this
super()
super()
this.props
传球道具:
class MyComponent extends React.Component {
  constructor(props) {
    super(props);

    console.log(this.props); // prints { name: 'John', age: 42 }
  }
}
不传递道具:
class MyComponent extends React.Component {
  constructor(props) {
    super();

    console.log(this.props); // prints undefined

    // but props parameter is still available
    console.log(props); // prints { name: 'John', age: 42 }
  }

  render() {
    // no difference outside constructor
    console.log(this.props); // prints { name: 'John', age: 42 }
  }
}
上面的代码片段揭示了仅在构造函数中有所不同。在构造函数外部也是如此。
this.props
-
什么是和解?
Reconciliation
是 React 更新浏览器 DOM 并使 React 工作速度更快的过程。React 使用 a,以便组件更新是可预测的和更快的。当组件更新时,React 会首先计算 DOM 的副本和副本之间的差异。 React 存储了一个名为 .当我们进行更改或添加数据时,React 会创建一个新的虚拟 DOM 并将其与前一个进行比较。此比较由 完成。 现在 React 将虚拟 DOM 与真实 DOM 进行了比较。它找出已更改的节点,并在 Real DOM 中仅更新已更改的节点,而其余节点保持不变。此过程称为对帐。diffing algorithm
real DOM
(Virtual DOM)
Virtual DOM
Diffing Algorithm
-
如何使用动态键名称设置状态?
如果你使用 ES6 或 Babel 转译器来转换 JSX 代码,那么你可以使用计算属性名称来完成此操作。
handleInputChange(event) {
  this.setState({ [event.target.id]: event.target.value })
}
-
每次渲染组件时调用函数的常见错误是什么?
你需要确保在将函数作为参数传递时未调用该函数。
render() {
  // Wrong: handleClick is called instead of passed as a reference!
  return <button onClick={this.handleClick()}>{'Click Me'}</button>
}
相反,传递函数本身,不带括号:
render() {
  // Correct: handleClick is passed as a reference!
  return <button onClick={this.handleClick}>{'Click Me'}</button>
}
-
惰性函数是否支持命名导出?
否,当前函数仅支持默认导出。如果要导入名为 exports 的模块,可以创建一个中间模块,将其重新导出为默认模块。它还可以确保树木摇晃继续工作并且不会拉动未使用的组件。 让我们以一个导出多个命名组件的组件文件为例,
React.lazy
// MoreComponents.js
export const SomeComponent = /* ... */;
export const UnusedComponent = /* ... */;
并重新导出中间文件中的组件
MoreComponents.js
IntermediateComponent.js
// IntermediateComponent.js
export { SomeComponent as default } from "./MoreComponents.js";
现在你可以使用惰性函数导入模块,如下所示,
import React, { lazy } from "react";
const SomeComponent = lazy(() => import("./IntermediateComponent.js"));
-
为什么 React 使用 over attribute?
className
class
该属性是 JavaScript 中的关键字,JSX 是 JavaScript 的扩展。这就是 React 使用 .传递一个字符串作为道具。
class
className
class
className
render() {
  return <span className={'menu navigation-menu'}>{'Menu'}</span>
}
-
什么是片段?
在 React 中,组件返回多个元素是一种常见的模式或做法。Fragments 允许你对子节点列表进行分组,而无需向 DOM 添加额外的节点。 你需要使用具有空标记 (<></>) 的任一或更短的语法。
下面是如何在 Story 组件中使用片段的示例。
function Story({title, description, date}) {
  return (
      <Fragment>
        <h2>{title}</h2>
        <p>{description}</p>
        <p>{date}</p>
      </Fragment>
    );
}
也可以在循环中呈现片段列表,并提供必需的 key 属性。
function StoryBook() {
  return stories.map(story =>
    <Fragment key={ story.id}>
      <h2>{story.title}</h2>
      <p>{story.description}</p>
      <p>{story.date}</p>
    </Fragment>
    );
}
通常,除非需要 key 属性,否则你不需要使用。较短语法的用法如下所示。
function Story({title, description, date}) {
  return (
      <>
        <h2>{title}</h2>
        <p>{description}</p>
        <p>{date}</p>
      </>
    );
}
-
为什么 fragments 比 container div 更好?
以下是更喜欢片段而不是容器 DOM 元素的原因列表,
- 片段速度更快,并且通过不创建额外的 DOM 节点而使用更少的内存。这只对非常大和深的树有真正的好处。
- 一些 CSS 机制,如 Flexbox 和 CSS Grid,具有特殊的父子关系,在中间添加 div 会使得很难保持所需的布局。
- DOM Inspector 不那么杂乱。
-
React 中的门户是什么?
Portal 是将子节点呈现到存在于父组件的 DOM 层次结构之外的 DOM 节点的推荐方法。
ReactDOM.createPortal(child, container);
第一个参数是任何可渲染的 React 子参数,例如元素、字符串或片段。第二个参数是 DOM 元素。
-
什么是无状态组件?
如果组件的行为与其状态无关,则它可以是无状态组件。你可以使用函数或类来创建无状态组件。但是,除非你需要在组件中使用生命周期钩子,否则你应该选择函数组件。如果你决定在这里使用功能组件,则有很多好处;它们易于编写、理解和测试,速度更快,你可以完全避免使用关键字。
this
-
什么是有状态组件?
如果组件的行为依赖于组件的状态,则可以将其称为有状态组件。这些有状态组件要么是带有钩子的函数组件,要么是类组件。
让我们以函数有状态组件为例,它根据 click 事件更新状态,
import React, {useState} from 'react';

const App = (props) => {
const [count, setCount] = useState(0);
handleIncrement() {
  setCount(count+1);
}

return (
  <>
    <button onClick={handleIncrement}>Increment</button>
    <span>Counter: {count}</span>
  </>
  )
}
查看班级
等效类有状态组件,其状态在“构造函数”中初始化。
class App extends Component {
  constructor(props) {
    super(props);
    this.state = { count: 0 };
  }

  handleIncrement() {
    setState({count: this.state.count + 1})
  }

  render() {
    <>
     <button onClick={() => this.handleIncrement}>Increment</button>
     <span>Count: {count}</span>
    </>
  }
}
-
如何在 React 中对 props 进行验证?
当应用程序在开发模式下运行时,React 会自动检查我们在组件上设置的所有道具,以确保它们具有正确的类型。如果类型不正确,React 将在控制台中生成警告消息。由于性能影响,它在生产模式下被禁用。强制道具用 定义。
isRequired
预定义的道具类型集:
PropTypes.number
PropTypes.string
PropTypes.array
PropTypes.object
PropTypes.func
PropTypes.node
PropTypes.element
PropTypes.bool
PropTypes.symbol
PropTypes.any
我们可以对组件进行如下定义:
propTypes
User
import React from "react";
import PropTypes from "prop-types";

class User extends React.Component {
  static propTypes = {
    name: PropTypes.string.isRequired,
    age: PropTypes.number.isRequired,
  };

  render() {
    return (
      <>
        <h1>{`Welcome, ${this.props.name}`}</h1>
        <h2>{`Age, ${this.props.age}`}</h2>
      </>
    );
  }
}
注意:在 React v15.5 中,PropType 被移到了库中。
React.PropTypes
prop-types
等效功能组件
import React from "react";
import PropTypes from "prop-types";

function User({ name, age }) {
  return (
    <>
      <h1>{`Welcome, ${name}`}</h1>
      <h2>{`Age, ${age}`}</h2>
    </>
  );
}

User.propTypes = {
  name: PropTypes.string.isRequired,
  age: PropTypes.number.isRequired,
};
-
React 的优势是什么?
以下是 React 的主要优势列表,
- 使用虚拟 DOM 提高应用程序的性能。
- JSX 使代码易于阅读和编写。
- 它在客户端和服务器端 (SSR) 上呈现。
- 易于与框架(Angular、Backbone)集成,因为它只是一个视图库。
- 使用 Jest 等工具轻松编写单元和集成测试。
-
React 的局限性是什么?
除了优点之外,React 也几乎没有限制,
- React 只是一个视图库,而不是一个完整的框架。
- 对于刚接触 Web 开发的初学者来说,有一个学习曲线。
- 将 React 集成到传统的 MVC 框架中需要一些额外的配置。
- 代码复杂性随着内联模板和 JSX 的增加而增加。
- 过多的小型组件会导致过度工程或样板。
-
React v16 中的错误边界是什么?
错误边界是捕获其子组件树中任何位置的 JavaScript 错误的组件,记录这些错误,并显示回退 UI,而不是崩溃的组件树。
如果类组件定义了一个名为 或 的新生命周期方法,则该类组件将成为错误边界:
componentDidCatch(error, info)
static getDerivedStateFromError()
class ErrorBoundary extends React.Component {
  constructor(props) {
    super(props);
    this.state = { hasError: false };
  }

  componentDidCatch(error, info) {
    // You can also log the error to an error reporting service
    logErrorToMyService(error, info);
  }

  static getDerivedStateFromError(error) {
    // Update state so the next render will show the fallback UI.
    return { hasError: true };
  }

  render() {
    if (this.state.hasError) {
      // You can render any custom fallback UI
      return <h1>{"Something went wrong."}</h1>;
    }
    return this.props.children;
  }
}
之后,将其用作常规组件:
<ErrorBoundary>
  <MyWidget />
</ErrorBoundary>
-
React v15 中如何处理错误边界?
React v15 为使用方法的错误边界提供了非常基本的支持。它已在 React v16 中重命名为。
unstable_handleError
componentDidCatch
-
静态类型检查的推荐方法有哪些?
通常我们使用 PropTypes 库(从 React v15.5 开始移动到包中)在 React 应用程序中进行类型检查。对于大型代码库,建议使用静态类型检查器,例如 Flow 或 TypeScript,它们在编译时执行类型检查并提供自动完成功能。
React.PropTypes
prop-types
-
包装有什么用?
react-dom
该包提供了特定于 DOM 的方法,这些方法可在应用的顶层使用。使用此模块不需要大多数组件。此包的一些方法是:
react-dom
render()
hydrate()
unmountComponentAtNode()
findDOMNode()
createPortal()
-
渲染方法的目的是什么?
react-dom
此方法用于将 React 元素渲染到提供的容器中的 DOM 中,并返回对组件的引用。如果 React 元素之前被渲染到容器中,它将对其执行更新,并且仅在必要时更改 DOM 以反映最新的更改。
ReactDOM.render(element, container, [callback])
如果提供了可选的回调,它将在组件渲染或更新后执行。
-
什么是 ReactDOMServer?
该对象使你能够将组件呈现为静态标记(通常在节点服务器上使用)。此对象主要用于服务器端呈现 (SSR)。以下方法可用于服务器和浏览器环境:
ReactDOMServer
renderToString()
renderToStaticMarkup()
例如,你通常运行基于 Node 的 Web 服务器(如 Express、happy 或 Koa),然后调用以将根组件呈现为字符串,然后将其作为响应发送。
renderToString
// using Express
import { renderToString } from "react-dom/server";
import MyPage from "./MyPage";

app.get("/", (req, res) => {
  res.write(
    "<!DOCTYPE html><html><head><title>My Page</title></head><body>"
  );
  res.write('<div id="content">');
  res.write(renderToString(<MyPage />));
  res.write("</div></body></html>");
  res.end();
});
-
如何在React中使用innerHTML?
该属性是 React 在浏览器 DOM 中使用的替代品。就像 一样,考虑到跨站点脚本 (XSS) 攻击,使用此属性是有风险的。你只需要将一个对象作为键传递,将 HTML 文本作为值传递。
dangerouslySetInnerHTML
innerHTML
innerHTML
__html
在此示例中,MyComponent 使用属性来设置 HTML 标记:
dangerouslySetInnerHTML
function createMarkup() {
  return { __html: "First · Second" };
}

function MyComponent() {
  return <div dangerouslySetInnerHTML={createMarkup()} />;
}
-
如何在 React 中使用样式?
该特性接受具有 camelCased 属性的 JavaScript 对象,而不是 CSS 字符串。这与 DOM 样式的 JavaScript 属性一致,效率更高,并防止了 XSS 安全漏洞。
style
const divStyle = {
  color: "blue",
  backgroundImage: "url(" + imgUrl + ")",
};

function HelloWorldComponent() {
  return <div style={divStyle}>Hello World!</div>;
}
样式键是 camelCased 的,以便与访问 JavaScript 中 DOM 节点上的属性保持一致(例如 )。
node.style.backgroundImage
-
React 中的事件有何不同?
在 React 元素中处理事件有一些语法差异:
- React 事件处理程序使用 camelCase 而不是小写字母命名。
- 使用 JSX,你可以传递一个函数作为事件处理程序,而不是字符串。
-
如果在构造函数中使用会发生什么?
setState()
当你使用 时,除了分配给对象状态之外,React 还会重新渲染组件及其所有子组件。你会收到如下错误:只能更新已挂载或挂载组件。因此,我们需要在构造函数中初始化变量。
setState()
this.state
-
索引作为键有什么影响?
键应该是稳定的、可预测的和唯一的,以便 React 可以跟踪元素。
在下面的代码片段中,每个元素的键将基于排序,而不是绑定到所表示的数据。这限制了 React 可以做的优化。
{
  todos.map((todo, index) => <Todo {...todo} key={index} />);
}
如果你将元素数据用于唯一键,假设 todo.id 对于这个列表是唯一的并且稳定,React 将能够重新排序元素,而无需重新评估它们。
{
  todos.map((todo) => <Todo {...todo} key={todo.id} />);
}
-
在方法中使用好吗?
setState()
componentWillMount()
是的,使用内部方法是安全的。但同时,建议避免在生命周期方法中进行异步初始化。 在挂载发生之前立即调用。它之前被调用,因此在此方法中设置状态不会触发重新渲染。避免在此方法中引入任何副作用或订阅。我们需要确保组件初始化的异步调用发生在 中,而不是 .
setState()
componentWillMount()
componentWillMount()
componentWillMount()
render()
componentDidMount()
componentWillMount()
componentDidMount() {
  axios.get(`api/todos`)
    .then((result) => {
      this.setState({
        messages: [...result.data]
      })
    })
}
-
如果在初始状态下使用道具会发生什么?
如果在未刷新组件的情况下更改了组件上的 props,则永远不会显示新的 prop 值,因为构造函数永远不会更新组件的当前状态。props 的状态初始化仅在首次创建组件时运行。
以下组件不会显示更新的输入值:
class MyComponent extends React.Component {
  constructor(props) {
    super(props);

    this.state = {
      records: [],
      inputValue: this.props.inputValue,
    };
  }

  render() {
    return <div>{this.state.inputValue}</div>;
  }
}
在 render 方法中使用 props 将更新值:
class MyComponent extends React.Component {
  constructor(props) {
    super(props);

    this.state = {
      record: [],
    };
  }

  render() {
    return <div>{this.props.inputValue}</div>;
  }
}
-
如何有条件地渲染组件?
在某些情况下,你希望根据某些状态呈现不同的组件。JSX 不渲染 或 ,因此仅当某个条件为 true 时,才可以使用条件短路来渲染组件的给定部分。
false
undefined
const MyComponent = ({ name, address }) => (
  <div>
    <h2>{name}</h2>
    {address && <p>{address}</p>}
  </div>
);
如果需要条件,请使用三元运算符。
if-else
const MyComponent = ({ name, address }) => (
  <div>
    <h2>{name}</h2>
    {address ? <p>{address}</p> : <p>{"Address is not available"}</p>}
  </div>
);
-
为什么我们在 DOM 元素上散布道具时需要小心?
当我们传播 props 时,我们会遇到添加未知 HTML 属性的风险,这是一种不好的做法。相反,我们可以将 prop destructing 与运算符一起使用,因此它只会添加所需的 prop。
...rest
例如
const ComponentA = () => (
  <ComponentB isDisplay={true} className={"componentStyle"} />
);

const ComponentB = ({ isDisplay, ...domProps }) => (
  <div {...domProps}>{"ComponentB"}</div>
);
-
你如何在 React 中使用装饰器?
你可以修饰类组件,这与将组件传递到函数中相同。装饰器是修改组件功能的灵活且可读的方式。
@setTitle("Profile")
class Profile extends React.Component {
  //....
}

/*
  title is a string that will be set as a document title
  WrappedComponent is what our decorator will receive when
  put directly above a component class as seen in the example above
*/
const setTitle = (title) => (WrappedComponent) => {
  return class extends React.Component {
    componentDidMount() {
      document.title = title;
    }

    render() {
      return <WrappedComponent {...this.props} />;
    }
  };
};
注意:装饰器是 ES7 中没有出现的功能,但目前是第 2 阶段的提案。
-
你如何记住一个组件?
有可用的记忆库,可用于函数组件。
例如,库可以记住另一个组件中的组件。
moize
import moize from "moize";
import Component from "./components/Component"; // this module exports a non-memoized component

const MemoizedFoo = moize.react(Component);

const Consumer = () => {
  <div>
    {"I will memoize the following entry:"}
    <MemoizedFoo />
  </div>;
};
更新:从 React v16.6.0 开始,我们有一个 .它提供了一个更高阶的组件,除非道具改变,否则它会记住组件。要使用它,只需在使用前使用 React.memo 包装组件即可。
React.memo
const MemoComponent = React.memo(function MemoComponent(props) {
  /* render using props */
});
OR;
export default React.memo(MyFunctionComponent);
-
如何实现服务器端渲染或 SSR?
React 已经具备了在 Node 服务器上处理渲染的能力。DOM 渲染器的特殊版本可用,它遵循与客户端相同的模式。
import ReactDOMServer from "react-dom/server";
import App from "./App";

ReactDOMServer.renderToString(<App />);
此方法将常规 HTML 输出为字符串,然后可以将其作为服务器响应的一部分放置在页面正文中。在客户端,React 会检测预渲染的内容,并无缝地从中断的地方继续。
-
如何在React中启用生产模式?
你应该使用 Webpack 的方法设置为 ,通过该方法可以去除 propType 验证和额外警告之类的内容。除此之外,如果你缩小代码,例如,Uglify的死代码消除,去掉仅开发代码和注释,它将大大减小你的捆绑包的大小。
DefinePlugin
NODE_ENV
production
-
什么是CRA及其好处?
CLI工具允许你快速创建和运行React应用程序,而无需配置步骤。
create-react-app
让我们使用 CRA 创建 Todo 应用程序:
# Installation
$ npm install -g create-react-app

# Create new project
$ create-react-app todo-app
$ cd todo-app

# Build, test and run
$ npm run build
$ npm run test
$ npm start
它包含了构建 React 应用所需的一切:
- React、JSX、ES6 和 Flow 语法支持。
- ES6 之外的附加语言,例如对象扩展运算符。
- 自动前缀 CSS,因此你不需要 -webkit- 或其他前缀。
- 一个快速的交互式单元测试运行程序,内置了对覆盖率报告的支持。
- 实时开发服务器,对常见错误发出警告。
- 一个构建脚本,用于将 JS、CSS 和图像捆绑到生产环境中,以及哈希和源映射。
-
挂载的生命周期方法顺序是什么?
在创建组件实例并将其插入到 DOM 中时,将按以下顺序调用生命周期方法。
constructor()
static getDerivedStateFromProps()
render()
componentDidMount()
-
React v16 中将弃用哪些生命周期方法?
以下生命周期方法将是不安全的编码实践,并且对于异步渲染会造成更多问题。
componentWillMount()
componentWillReceiveProps()
componentWillUpdate()
从 React v16.3 开始,这些方法都带有前缀别名,无前缀版本将在 React v17 中删除。
UNSAFE_
-
生命周期法的目的是什么?
getDerivedStateFromProps()
新的静态生命周期方法在组件实例化之后以及重新呈现之前调用。它可以返回一个对象来更新状态,或者指示新道具不需要任何状态更新。
getDerivedStateFromProps()
null
class MyComponent extends React.Component {
  static getDerivedStateFromProps(props, state) {
    // ...
  }
}
此生命周期方法涵盖了 的所有用例。
componentDidUpdate()
componentWillReceiveProps()
-
生命周期法的目的是什么?
getSnapshotBeforeUpdate()
新的生命周期方法在 DOM 更新之前调用。此方法的返回值将作为第三个参数传递给 。
getSnapshotBeforeUpdate()
componentDidUpdate()
class MyComponent extends React.Component {
  getSnapshotBeforeUpdate(prevProps, prevState) {
    // ...
  }
}
此生命周期方法涵盖了 的所有用例。
componentDidUpdate()
componentWillUpdate()
-
Hooks 会取代渲染道具和高阶组件吗?
渲染道具和高阶组件都只渲染一个子组件,但在大多数情况下,钩子是一种更简单的方法,可以通过减少树中的嵌套来实现这一目标。
-
建议的组件命名方式是什么?
建议通过引用来命名组件,而不是使用 。
displayName
用于命名组件:
displayName
export default React.createClass({
  displayName: "TodoApp",
  // ...
});
推荐的方法:
export default class TodoApp extends React.Component {
  // ...
}
也
const TodoApp = () => {
  //...
};
export default TodoApp;
-
组件类中方法的推荐顺序是什么?
建议的方法从挂载到渲染阶段的顺序:
-
static
方法 constructor()
getChildContext()
componentWillMount()
componentDidMount()
componentWillReceiveProps()
shouldComponentUpdate()
componentWillUpdate()
componentDidUpdate()
componentWillUnmount()
- 单击处理程序或事件处理程序,如 或
onClickSubmit()
onChangeDescription()
- 用于渲染的 getter 方法,如或
getSelectReason()
getFooterContent()
- 可选的渲染方法,如 或
renderNavigation()
renderProfilePicture()
render()
-
-
什么是开关元件?
切换组件是呈现多个组件之一的组件。我们需要使用 object 将 prop 值映射到组件。
例如,一个切换组件,用于根据 prop 显示不同的页面:
page
import HomePage from "./HomePage";
import AboutPage from "./AboutPage";
import ServicesPage from "./ServicesPage";
import ContactPage from "./ContactPage";

const PAGES = {
  home: HomePage,
  about: AboutPage,
  services: ServicesPage,
  contact: ContactPage,
};

const Page = (props) => {
  const Handler = PAGES[props.page] || ContactPage;

  return <Handler {...props} />;
};

// The keys of the PAGES object can be used in the prop types to catch dev-time errors.
Page.propTypes = {
  page: PropTypes.oneOf(Object.keys(PAGES)).isRequired,
};
-
为什么我们需要将函数传递给 setState()?
这背后的原因是这是一个异步操作。出于性能原因,React 批处理状态会发生变化,因此状态可能不会在调用后立即更改。这意味着你在调用时不应依赖当前状态,因为你无法确定该状态是什么。解决方法是将一个函数传递给 ,并将上一个状态作为参数。通过这样做,可以避免由于 的异步性质而导致用户在访问时获取旧状态值的问题。
setState()
setState()
setState()
setState()
setState()
假设初始计数值为零。在连续三次递增操作后,该值将仅递增 1。
// assuming this.state.count === 0
this.setState({ count: this.state.count + 1 });
this.setState({ count: this.state.count + 1 });
this.setState({ count: this.state.count + 1 });
// this.state.count === 1, not 3
如果我们将函数传递给 ,则计数会正确递增。
setState()
this.setState((prevState, props) => ({
  count: prevState.count + props.increment,
}));
// this.state.count === 3 as expected
(或)
为什么函数优先于对象?
setState()
React 可以将多个调用批处理到单个更新中以提高性能。由于 和 可以异步更新,因此不应依赖它们的值来计算下一个状态。
setState()
this.props
this.state
此计数器示例将无法按预期更新:
// Wrong
this.setState({
  counter: this.state.counter + this.props.increment,
});
首选方法是使用函数而不是对象进行调用。该函数将接收上一个状态作为第一个参数,并将应用更新时的 props 作为第二个参数接收。
setState()
// Correct
this.setState((prevState, props) => ({
  counter: prevState.counter + props.increment,
}));
-
什么是 React Mixins?
Mixin 是一种将组件完全分离以具有共同功能的方法。不应使用 Mixin,可以用更高阶的组件或装饰器代替。
最常用的 mixin 之一是 .你可能会在某些组件中使用它,以防止当 props 和 state 浅层等于之前的 props 和 state 时不必要的重新渲染:
PureRenderMixin
const PureRenderMixin = require("react-addons-pure-render-mixin");

const Button = React.createClass({
  mixins: [PureRenderMixin],
  // ...
});
-
为什么是反模式,正确的解决方案是什么?
isMounted()
主要用例是避免在卸载组件后调用,因为它会发出警告。
isMounted()
setState()
if (this.isMounted()) {
  this.setState({...})
}
在呼叫之前进行检查确实会消除警告,但它也违背了警告的目的。使用是一种代码气味,因为你检查的唯一原因是因为你认为在卸载组件后可能持有引用。
isMounted()
setState()
isMounted()
最佳解决方案是找到在卸载组件后可能调用的位置,并修复它们。这种情况最常见的原因是回调,当组件正在等待某些数据并在数据到达之前被卸载时。理想情况下,在卸载之前,应在 中取消任何回调。
setState()
componentWillUnmount()
-
React 支持哪些指针事件?
指针事件提供了处理所有输入事件的统一方法。在过去,我们有一个鼠标和相应的事件侦听器来处理它们,但现在我们有许多与鼠标无关的设备,例如带有触摸表面或笔的手机。我们需要记住,这些事件只能在支持指针事件规范的浏览器中工作。
React DOM 中现在提供了以下事件类型:
onPointerDown
onPointerMove
onPointerUp
onPointerCancel
onGotPointerCapture
onLostPointerCapture
onPointerEnter
onPointerLeave
onPointerOver
onPointerOut
-
为什么组件名称应以大写字母开头?
如果你使用 JSX 渲染你的组件,该组件的名称必须以大写字母开头,否则 React 会抛出一个错误作为无法识别的标签。此约定是因为只有 HTML 元素和 SVG 标签才能以小写字母开头。
class SomeComponent extends Component {
  // Code goes here
}
你可以定义名称以小写字母开头的组件类,但在导入时应使用大写字母。这里小写是可以的:
class myComponent extends Component {
  render() {
    return <div />;
  }
}

export default myComponent;
而在另一个文件中导入时,它应该以大写字母开头:
import MyComponent from "./myComponent";
React 组件命名有哪些例外?
组件名称应以大写字母开头,但此约定几乎没有例外。带有点的小写标记名称(属性访问器)仍被视为有效的组件名称。 例如,下面的标签可以编译成一个有效的组件,
     render() {
          return (
            <obj.component/> // `React.createElement(obj.component)`
          )
    }
-
React v16 是否支持自定义 DOM 属性?
是的。过去,React 习惯于忽略未知的 DOM 属性。如果你用 React 无法识别的属性编写 JSX,React 会跳过它。
例如,让我们看一下以下属性:
<div mycustomattribute={"something"} />
将使用 React v15 向 DOM 渲染一个空 div:
<div />
在 React v16 中,任何未知属性都将最终出现在 DOM 中:
<div mycustomattribute="something" />
这对于提供特定于浏览器的非标准属性、尝试新的 DOM API 以及与固执己见的第三方库集成非常有用。
-
constructor 和 getInitialState 有什么区别?
使用 ES6 类时,应在构造函数中初始化状态,使用 .
getInitialState()
React.createClass()
使用 ES6 类:
class MyComponent extends React.Component {
  constructor(props) {
    super(props);
    this.state = {
      /* initial state */
    };
  }
}
使用
React.createClass():const MyComponent = React.createClass({ getInitialState() { return { /* initial state */ }; }, });
注意:在 React v16 中已弃用并删除。请改用纯 JavaScript 类。
React.createClass()
-
是否可以在不调用 setState 的情况下强制组件重新渲染?
默认情况下,当组件的状态或属性发生变化时,组件将重新渲染。如果你的方法依赖于其他一些数据,你可以通过调用 来告诉 React 组件需要重新渲染。
render()
forceUpdate()
component.forceUpdate(callback);
建议避免所有使用,而只从 和 中读取。
forceUpdate()
this.props
this.state
render()
-
使用 ES6 类的 React 和 有什么区别?
super()
super(props)
当你想进入时,你应该把道具传递给方法。
this.props
constructor()
super()
使用
super(props):class MyComponent extends React.Component { constructor(props) { super(props); console.log(this.props); // { name: 'John', ... } } }
使用
super():class MyComponent extends React.Component { constructor(props) { super(); console.log(this.props); // undefined } }
在外部,两者将显示相同的值。
constructor()
this.props
-
如何在JSX内部循环?
你可以简单地使用 ES6 箭头函数语法。
Array.prototype.map
例如,对象数组映射到组件数组中:
items
<tbody>
  {items.map((item) => (
    <SomeComponent key={item.id} name={item.name} />
  ))}
</tbody>
但是你不能使用循环进行迭代:
for
<tbody>
  for (let i = 0; i < items.length; i++) {
    <SomeComponent key={items[i].id} name={items[i].name} />
  }
</tbody>
这是因为 JSX 标记被转译为函数调用,并且不能在表达式中使用语句。由于第 1 阶段提案的表达方式,这可能会改变。
do
-
你如何访问属性引号中的道具?
React(或 JSX)不支持属性值内的变量插值。以下表示形式不起作用:
<img className="image" src="images/{this.props.image}" />
但是你可以将任何 JS 表达式放在大括号内作为整个属性值。所以下面的表达式有效:
<img className="image" src={"images/" + this.props.image} />
使用模板字符串也可行:
<img className="image" src={`images/${this.props.image}`} />
-
什么是带有形状的 React proptype 数组?
如果要将对象数组传递给具有特定形状的组件,则用作 的参数。
React.PropTypes.shape()
React.PropTypes.arrayOf()
ReactComponent.propTypes = {
  arrayWithShape: React.PropTypes.arrayOf(
    React.PropTypes.shape({
      color: React.PropTypes.string.isRequired,
      fontSize: React.PropTypes.number.isRequired,
    })
  ).isRequired,
};
-
如何有条件地应用类属性?
你不应该在引号内使用大括号,因为它将被计算为字符串。
<div className="btn-panel {this.props.visible ? 'show' : 'hidden'}">
相反,你需要将大括号移到外面(不要忘记在类名之间包含空格):
<div className={'btn-panel ' + (this.props.visible ? 'show' : 'hidden')}>
模板字符串也适用:
<div className={`btn-panel ${this.props.visible ? 'show' : 'hidden'}`}>
-
React 和 ReactDOM 有什么区别?
该包包含 、 、 以及与元素和组件类相关的其他帮助程序。你可以将这些视为构建组件所需的同构或通用帮助程序。该软件包包含 ,并且我们具有 和 的服务器端渲染支持。
react
React.createElement()
React.Component
React.Children
react-dom
ReactDOM.render()
react-dom/server
ReactDOMServer.renderToString()
ReactDOMServer.renderToStaticMarkup()
-
为什么 ReactDOM 与 React 是分开的?
React 团队致力于将所有与 DOM 相关的功能提取到一个名为 ReactDOM 的单独库中。React v0.14 是第一个拆分库的版本。通过查看一些包,、和 ,很明显,React 的美感和本质与浏览器或 DOM 无关。
react-native
react-art
react-canvas
react-three
为了构建更多可以渲染 React 的环境,React 团队计划将主 React 包一分为二:和 。这为编写可以在 Web 版本的 React 和 React Native 之间共享的组件铺平了道路。
react
react-dom
-
如何使用React标签元素?
如果尝试使用 standard 属性呈现绑定到文本输入的元素,则会生成缺少该属性的 HTML,并将警告打印到控制台。
<label>
for
<label for={'user'}>{'User'}</label>
<input type={'text'} id={'user'} />
由于是 JavaScript 中的保留关键字,因此请改用。
for
htmlFor
<label htmlFor={'user'}>{'User'}</label>
<input type={'text'} id={'user'} />
-
如何组合多个内联样式对象?
你可以在常规 React 中使用 spread 运算符:
<button style={{ ...styles.panel.button, ...styles.panel.submitButton }}>
  {"Submit"}
</button>
如果你使用的是 React Native,那么你可以使用数组表示法:
<button style={[styles.panel.button, styles.panel.submitButton]}>
  {"Submit"}
</button>
-
调整浏览器大小时如何重新渲染视图?
你可以使用钩子来管理宽度和高度状态变量,并使用钩子来添加和删除事件侦听器。传递给 useEffect 的依赖项数组可确保效果仅运行一次(在装载时),而不是在每次重新渲染时运行。
useState
useEffect
resize
[]
import React, { useState, useEffect } from "react";
function WindowDimensions() {
  const [dimensions, setDimensions] = useState({
    width: window.innerWidth,
    height: window.innerHeight,
  });

  useEffect(() => {
    function handleResize() {
      setDimensions({
        width: window.innerWidth,
        height: window.innerHeight,
      });
    }
    window.addEventListener("resize", handleResize);
    return () => window.removeEventListener("resize", handleResize);
  }, []);

  return (
    <span>
      {dimensions.width} x {dimensions.height}
    </span>
  );
}
使用类组件
你可以侦听事件,然后更新维度 ( 和 )。你应该删除 in 方法中的侦听器。
resize
componentDidMount()
width
height
componentWillUnmount()
    class WindowDimensions extends React.Component {
      constructor(props) {
        super(props);
        this.updateDimensions = this.updateDimensions.bind(this);
      }

      componentWillMount() {
        this.updateDimensions();
      }

      componentDidMount() {
        window.addEventListener("resize", this.updateDimensions);
      }

      componentWillUnmount() {
        window.removeEventListener("resize", this.updateDimensions);
      }

      updateDimensions() {
        this.setState({
          width: window.innerWidth,
          height: window.innerHeight,
        });
      }

      render() {
        return (
          <span>
            {this.state.width} x {this.state.height}
          </span>
        );
      }
    }
    ```


-
和方法有什么区别?
setState()
replaceState()
使用时,当前状态和以前的状态将合并。 抛出当前状态,并仅将其替换为你提供的内容。通常使用,除非你出于某种原因确实需要删除所有以前的密钥。你也可以将 state 设置为 / in,而不是使用 。
setState()
replaceState()
setState()
false
null
setState()
replaceState()
-
如何监听状态变化?
当状态更改时,将调用生命周期方法。你可以将提供的状态和 props 值与当前状态和 props 进行比较,以确定是否有有意义的更改。
componentDidUpdate
componentDidUpdate(object prevProps, object prevState)
注意:以前版本的 ReactJS 也用于状态更改。它在最新版本中已被弃用。
componentWillUpdate(object nextProps, object nextState)
-
删除处于 React 状态的数组元素的推荐方法是什么?
更好的方法是使用方法。
Array.prototype.filter()
例如,让我们创建一个用于更新状态的方法。
removeItem()
removeItem(index) {
  this.setState({
    data: this.state.data.filter((item, i) => i !== index)
  })
}
-
是否可以在不渲染 HTML 的情况下使用 React?
这是可能的。以下是可能的选项:
render() {
  return false
}
render() {
  return true
}
render() {
  return null
}
React 版本 >=16.0.0:
render() {
  return []
}
render() {
  return ""
}
React 版本 >=16.2.0:
render() {
  return <React.Fragment></React.Fragment>
}
render() {
  return <></>
}
React 版本 >=18.0.0:
render() {
  return undefined
}
-
如何使用 React 漂亮打印 JSON?
我们可以使用标签来保留 的格式:
<pre>
JSON.stringify()
const data = { name: "John", age: 42 };

class User extends React.Component {
  render() {
    return <pre>{JSON.stringify(data, null, 2)}</pre>;
  }
}

React.render(<User />, document.getElementById("container"));
-
为什么你不能在 React 中更新道具?
React 的理念是道具应该是不可变的和自上而下的。这意味着父级可以向子级发送任何道具值,但子级不能修改收到的道具。
-
如何将输入元素集中在页面加载上?
你可以通过为 element 创建 ref 并在 :
input
componentDidMount()
class App extends React.Component {
  componentDidMount() {
    this.nameInput.focus();
  }

  render() {
    return (
      <div>
        <input defaultValue={"Won't focus"} />
        <input
          ref={(input) => (this.nameInput = input)}
          defaultValue={"Will focus"}
        />
      </div>
    );
  }
}

ReactDOM.render(<App />, document.getElementById("app"));
同样在功能组件(react 16.08 及更高版本)中
import React, { useEffect, useRef } from "react";

const App = () => {
  const inputElRef = useRef(null);

  useEffect(() => {
    inputElRef.current.focus();
  }, []);

  return (
    <div>
      <input defaultValue={"Won't focus"} />
      <input ref={inputElRef} defaultValue={"Will focus"} />
    </div>
  );
};

ReactDOM.render(<App />, document.getElementById("app"));
-
更新状态对象的可能方法有哪些?
-
使用对象调用
setState() 以与状态合并:-
用于创建对象的副本:
Object.assign()
const user = Object.assign({}, this.state.user, { age: 42 });
this.setState({ user });
-
使用点差运算符:
const user = { ...this.state.user, age: 42 };
this.setState({ user });
-
-
使用函数调用
setState():this.setState((prevState) => ({ user: { ...prevState.user, age: 42, }, }));
-
-
我们如何在浏览器中找到运行时的 React 版本?
你可以使用来获取版本。
React.version
const REACT_VERSION = React.version;

ReactDOM.render(
  <div>{`React version: ${REACT_VERSION}`}</div>,
  document.getElementById("app")
);
-
有哪些方法可以在你的 polyfills 中包含?
create-react-app
有一些方法可以在 create-react-app 中包含 polyfills,
-
从
core-js 手动导入:创建一个名为(类似)的文件并将其导入到根文件中。运行或导入所需的特定功能。
polyfills.js
index.js
npm install core-js
yarn add core-js
import "core-js/fn/array/find";
import "core-js/fn/array/includes";
import "core-js/fn/number/is-nan";
-
使用 Polyfill 服务:
使用 polyfill.io CDN 检索自定义的、特定于浏览器的 polyfill,方法是将此行添加到:
index.html
<script src="https://cdn.polyfill.io/v2/polyfill.min.js?features=default,Array.prototype.includes"></script>
在上面的脚本中,我们必须显式请求该功能,因为它不包含在默认功能集中。
Array.prototype.includes
-
-
如何在create-react-app中使用https而不是http?
你只需要使用配置即可。你可以编辑脚本部分:
HTTPS=true
package.json
"scripts": {
  "start": "set HTTPS=true && react-scripts start"
}
或者干脆跑
set HTTPS=true && npm start
-
如何避免在create-react-app中使用相对路径导入?
创建一个在项目根目录中调用的文件,并写入导入路径:
.env
NODE_PATH=src/app
之后,重新启动开发服务器。现在,你应该能够在没有相对路径的情况下导入任何内容。
src/app
-
如何为 React Router 添加 Google Analytics?
在对象上添加侦听器以记录每个页面视图:
history
history.listen(function (location) {
  window.ga("set", "page", location.pathname + location.search);
  window.ga("send", "pageview", location.pathname + location.search);
});
-
如何每秒更新一个组件?
你需要使用来触发更改,但还需要在卸载组件时清除计时器,以防止错误和内存泄漏。
setInterval()
componentDidMount() {
  this.interval = setInterval(() => this.setState({ time: Date.now() }), 1000)
}

componentWillUnmount() {
  clearInterval(this.interval)
}
-
如何在 React 中将供应商前缀应用于内联样式?
React 不会自动应用供应商前缀。你需要手动添加供应商前缀。
<div
  style={{
    transform: "rotate(90deg)",
    WebkitTransform: "rotate(90deg)", // note the capital 'W' here
    msTransform: "rotate(90deg)", // 'ms' is the only lowercase vendor prefix
  }}
/>
-
如何使用 React 和 ES6 导入和导出组件?
你应使用 default 导出组件
import React from "react";
import User from "user";

export default class MyProfile extends React.Component {
  render() {
    return <User type="customer">//...</User>;
  }
}
使用 export 说明符,MyProfile 将成为成员并导出到此模块,并且可以导入相同的内容,而无需在其他组件中提及名称。
-
为什么组件构造函数只调用一次?
React 的协调算法假设,在没有任何相反信息的情况下,如果一个自定义组件出现在后续渲染的同一位置,它与之前的组件相同,因此重用以前的实例而不是创建一个新实例。
-
如何在 React 中定义常量?
你可以使用 ES7 字段来定义常量。
static
class MyComponent extends React.Component {
  static DEFAULT_PAGINATION = 10;
}
-
如何在React中以编程方式触发点击事件?
可以使用 ref prop 通过回调获取对基础对象的引用,将引用存储为类属性,然后使用该引用稍后使用该方法从事件处理程序触发单击。
HTMLInputElement
HTMLElement.click
这可以通过两个步骤完成:
-
在 render 方法中创建 ref:
<input ref={(input) => (this.inputElement = input)} />
-
在事件处理程序中应用 click 事件:
this.inputElement.click();
-
-
是否可以在普通的 React 中使用 async/await?
如果你想在 React 中使用 /,你需要 Babel 和 transform-async-to-generator 插件。React Native 附带了 Babel 和一组转换。
async
await
-
React 常见的文件夹结构有哪些?
React 项目文件结构有两种常见做法。
-
按要素或路径分组:
构建项目的一种常见方法是将 CSS、JS 和测试放在一起,按功能或路由分组。
common/
├─ Avatar.js
├─ Avatar.css
├─ APIUtils.js
└─ APIUtils.test.js
feed/
├─ index.js
├─ Feed.js
├─ Feed.css
├─ FeedStory.js
├─ FeedStory.test.js
└─ FeedAPI.js
profile/
├─ index.js
├─ Profile.js
├─ ProfileHeader.js
├─ ProfileHeader.css
└─ ProfileAPI.js
-
按文件类型分组:
构建项目的另一种流行方法是将相似的文件组合在一起。
api/
├─ APIUtils.js
├─ APIUtils.test.js
├─ ProfileAPI.js
└─ UserAPI.js
components/
├─ Avatar.js
├─ Avatar.css
├─ Feed.js
├─ Feed.css
├─ FeedStory.js
├─ FeedStory.test.js
├─ Profile.js
├─ ProfileHeader.js
└─ ProfileHeader.css
-
-
流行的动画包有哪些?
React Transition Group 和 React Motion 是 React 生态系统中流行的动画包。
-
样式模块有什么好处?
建议避免在组件中硬编码样式值。任何可能跨不同 UI 组件使用的值都应提取到它们自己的模块中。
例如,可以将这些样式提取到一个单独的组件中:
export const colors = {
  white,
  black,
  blue,
};

export const space = [0, 8, 16, 32, 64];
然后在其他组件中单独导入:
import { space, colors } from "./styles";
-
什么是流行的 React 专用 linters?
ESLint 是一个流行的 JavaScript linter。有一些插件可以分析特定的代码样式。React 最常见的一个是名为 的 npm 包。默认情况下,它将检查许多最佳实践,规则检查从迭代器中的键到一组完整的道具类型。
eslint-plugin-react
另一个流行的插件是 ,这将有助于解决可访问性的常见问题。由于 JSX 提供的语法与常规 HTML 略有不同,因此文本问题不会被常规插件发现。
eslint-plugin-jsx-a11y
alt
tabindex
-
如何进行 AJAX 调用以及我应该在哪些组件生命周期方法中进行 AJAX 调用?
你可以使用 AJAX 库,例如 Axios、jQuery AJAX 和内置的浏览器。你应该在生命周期方法中提取数据。这样,你就可以在检索数据时更新组件。
fetch
componentDidMount()
setState()
例如,从 API 获取的员工列表并设置本地状态:
class MyComponent extends React.Component {
  constructor(props) {
    super(props);
    this.state = {
      employees: [],
      error: null,
    };
  }

  componentDidMount() {
    fetch("https://api.example.com/items")
      .then((res) => res.json())
      .then(
        (result) => {
          this.setState({
            employees: result.employees,
          });
        },
        (error) => {
          this.setState({ error });
        }
      );
  }

  render() {
    const { error, employees } = this.state;
    if (error) {
      return <div>Error: {error.message}</div>;
    } else {
      return (
        <ul>
          {employees.map((employee) => (
            <li key={employee.name}>
              {employee.name}-{employee.experience}
            </li>
          ))}
        </ul>
      );
    }
  }
}
-
什么是渲染道具?
Render Props 是一种简单的技术,用于使用值为函数的 prop 在组件之间共享代码。下面的组件使用 render prop 返回一个 React 元素。
<DataProvider render={(data) => <h1>{`Hello ${data.target}`}</h1>} />
React Router 和 DownShift 等库正在使用这种模式。
React 路由器
-
什么是 React Router?
React Router 是一个建立在 React 之上的强大路由库,它可以帮助你非常快速地向应用程序添加新的屏幕和流程,同时保持 URL 与页面上显示的内容同步。
-
React Router 与历史库有何不同?
React Router 是库的包装器,它通过浏览器和哈希历史记录处理与浏览器的交互。它还提供内存历史记录,这对于没有全局历史记录的环境很有用,例如移动应用程序开发(React Native)和使用 Node 进行单元测试。
history
window.history
-
React Router v4 有哪些组件?
<Router>
React Router v4 提供以下 3 个组件:
<Router>
<BrowserRouter>
<HashRouter>
<MemoryRouter>
上述组件将创建浏览器、哈希和内存历史记录实例。React Router v4 使与路由器关联的实例的属性和方法可以通过对象中的上下文获得。
history
router
-
的目的是什么,方法是什么?
push()
replace()
history
历史记录实例有两种用于导航的方法。
push()
replace()
如果将历史记录视为访问过的位置数组,则会向数组添加一个新位置,并将数组中的当前位置替换为新位置。
push()
replace()
-
如何使用 React Router v4 以编程方式导航?
有三种不同的方法可以在组件中实现编程路由/导航。
-
使用
withRouter() 高阶函数:高阶函数将注入历史对象作为组件的道具。此对象提供和方法来避免使用上下文。
withRouter()
push()
replace()
import { withRouter } from "react-router-dom"; // this also works with 'react-router-native'

const Button = withRouter(({ history }) => (
  <button
    type="button"
    onClick={() => {
      history.push("/new-location");
    }}
  >
    {"Click Me!"}
  </button>
));
-
使用
<Route> 组件和渲染道具模式:该组件传递与 相同的 props,因此你将能够通过 history prop 访问 history 方法。
<Route>
withRouter()
import { Route } from "react-router-dom";

const Button = () => (
  <Route
    render={({ history }) => (
      <button
        type="button"
        onClick={() => {
          history.push("/new-location");
        }}
      >
        {"Click Me!"}
      </button>
    )}
  />
);
-
使用上下文:
不建议使用此选项,并将其视为不稳定的 API。
const Button = (props, context) => (
  <button
    type="button"
    onClick={() => {
      context.history.push("/new-location");
    }}
  >
    {"Click Me!"}
  </button>
);

Button.contextTypes = {
  history: React.PropTypes.shape({
    push: React.PropTypes.func.isRequired,
  }),
};
-
-
如何在 React Router v4 中获取查询参数?
解析查询字符串的功能已从 React Router v4 中删除,因为多年来一直有用户请求支持不同的实现。因此,决定权已交给用户选择他们喜欢的实现。推荐的方法是使用查询字符串库。
const queryString = require("query-string");
const parsed = queryString.parse(props.location.search);
如果你想要一些原生的东西,你也可以使用:
URLSearchParams
const params = new URLSearchParams(props.location.search);
const foo = params.get("name");
你应该对 IE11 使用 polyfill。
-
为什么你会收到“路由器可能只有一个子元素”警告?
你必须将路由包装在一个块中,因为它的独特之处在于它以独占方式呈现路由。
<Switch>
<Switch>
首先,你需要添加到导入中:
Switch
import { Switch, Router, Route } from "react-router";
然后定义块内的路由:
<Switch>
<Router>
  <Switch>
    <Route {/* ... */} />
    <Route {/* ... */} />
  </Switch>
</Router>
-
如何在 React Router v4 中将参数传递给方法?
history.push
在导航时,你可以将 props 传递给对象:
history
this.props.history.push({
  pathname: "/template",
  search: "?name=sudheer",
  state: { detail: response.data },
});
该属性用于在方法中传递查询参数。
search
push()
-
如何实现默认或NotFound页面?
A 呈现匹配的第一个子项。没有路径的 A 始终匹配。因此,你只需要简单地删除路径属性,如下所示
<Switch>
<Route>
<Route>
<Switch>
  <Route exact path="/" component={Home} />
  <Route path="/user" component={User} />
  <Route component={NotFound} />
</Switch>
-
如何获取 React Router v4 的历史记录?
以下是在 React Router v4 上获取历史对象的步骤列表,
-
创建一个导出对象的模块,并在整个项目中导入此模块。
history
例如,创建文件:
history.js
import { createBrowserHistory } from "history";

export default createBrowserHistory({
  /* pass a configuration object here if needed */
});
-
你应该使用该组件而不是内置路由器。导入上面的内部文件:
<Router>
history.js
index.js
import { Router } from "react-router-dom";
import history from "./history";
import App from "./App";

ReactDOM.render(
  <Router history={history}>
    <App />
  </Router>,
  holder
);
-
也可以使用类似于内置历史对象的 push 方法:
history
// some-other-file.js
import history from "./history";

history.push("/go-here");
-
-
登录后如何执行自动重定向?
该软件包在 React Router 中提供了组件。渲染将导航到新位置。与服务器端重定向一样,新位置将覆盖历史记录堆栈中的当前位置。
react-router
<Redirect>
<Redirect>
import React, { Component } from "react";
import { Redirect } from "react-router";

export default class LoginComponent extends Component {
  render() {
    if (this.state.isLoggedIn === true) {
      return <Redirect to="/your/redirect/page" />;
    } else {
      return <div>{"Login Please"}</div>;
    }
  }
}
React 国际化
-
什么是 React Intl?
React Intl 库使 React 中的国际化变得简单明了,它提供了现成的组件和一个 API,可以处理从格式化字符串、日期和数字到复数的所有内容。React Intl 是 FormatJS 的一部分,它通过其组件和 API 提供与 React 的绑定。
-
React Intl 的主要特点是什么?
以下是 React Intl 的主要功能,
- 显示带分隔符的数字。
- 正确显示日期和时间。
- 显示相对于“现在”的日期。
- 将字符串中的标签复数化。
- 支持150+种语言。
- 在浏览器和 Node 中运行。
- 建立在标准之上。
-
React Intl 中的两种格式化方式是什么?
该库提供了两种设置字符串、数字和日期格式的方法:
-
使用 react 组件:
<FormattedMessage
  id={"account"}
  defaultMessage={"The amount is less than minimum balance."}
/>
-
使用 API:
const messages = defineMessages({
  accountMessage: {
    id: "account",
    defaultMessage: "The amount is less than minimum balance.",
  },
});

formatMessage(messages.accountMessage);
-
-
如何使用 React Intl 用作占位符?
<FormattedMessage>
返回元素中的组件,而不是纯文本,因此它们不能用于占位符、替代文本等。在这种情况下,你应该使用较低级别的 API 。你可以使用高阶组件将对象注入到组件中,然后使用该对象上的可用来格式化消息。
<Formatted... />
react-intl
formatMessage()
intl
injectIntl()
formatMessage()
import React from "react";
import { injectIntl, intlShape } from "react-intl";

const MyComponent = ({ intl }) => {
  const placeholder = intl.formatMessage({ id: "messageId" });
  return <input placeholder={placeholder} />;
};

MyComponent.propTypes = {
  intl: intlShape.isRequired,
};

export default injectIntl(MyComponent);
-
如何使用 React Intl 访问当前语言环境?
你可以使用以下命令获取应用程序的任何组件中的当前区域设置:
injectIntl()
import { injectIntl, intlShape } from "react-intl";

const MyComponent = ({ intl }) => (
  <div>{`The current locale is ${intl.locale}`}</div>
);

MyComponent.propTypes = {
  intl: intlShape.isRequired,
};

export default injectIntl(MyComponent);
-
如何使用 React Intl 格式化日期?
高阶组件将允许你通过组件中的 props 访问该方法。该方法由实例在内部使用,它返回格式化日期的字符串表示形式。
injectIntl()
formatDate()
FormattedDate
import { injectIntl, intlShape } from "react-intl";

const stringDate = this.props.intl.formatDate(date, {
  year: "numeric",
  month: "numeric",
  day: "numeric",
});

const MyComponent = ({ intl }) => (
  <div>{`The formatted date is ${stringDate}`}</div>
);

MyComponent.propTypes = {
  intl: intlShape.isRequired,
};

export default injectIntl(MyComponent);
React 测试
-
什么是 React 测试中的浅层渲染器?
浅层渲染对于在 React 中编写单元测试用例很有用。它允许你将组件呈现一个层次,并断言有关其 render 方法返回的内容的事实,而无需担心未实例化或呈现的子组件的行为。
例如,如果你有以下组件:
function MyComponent() {
  return (
    <div>
      <span className={"heading"}>{"Title"}</span>
      <span className={"description"}>{"Description"}</span>
    </div>
  );
}
然后,你可以按如下方式断言:
import ShallowRenderer from "react-test-renderer/shallow";

// in your test
const renderer = new ShallowRenderer();
renderer.render(<MyComponent />);

const result = renderer.getRenderOutput();

expect(result.type).toBe("div");
expect(result.props.children).toEqual([
  <span className={"heading"}>{"Title"}</span>,
  <span className={"description"}>{"Description"}</span>,
]);
-
React 中的包是什么?
TestRenderer
此包提供了一个渲染器,可用于将组件渲染为纯 JavaScript 对象,而无需依赖 DOM 或本机移动环境。这个包可以很容易地抓取由 ReactDOM 或 React Native 渲染的平台视图层次结构(类似于 DOM 树)的快照,而无需使用浏览器或 .
jsdom
import TestRenderer from "react-test-renderer";

const Link = ({ page, children }) => <a href={page}>{children}</a>;

const testRenderer = TestRenderer.create(
  <Link page={"https://www.facebook.com/"}>{"Facebook"}</Link>
);

console.log(testRenderer.toJSON());
// {
//   type: 'a',
//   props: { href: 'https://www.facebook.com/' },
//   children: [ 'Facebook' ]
// }
-
ReactTestUtils 包的目的是什么?
ReactTestUtils 在包中提供,允许你对模拟的 DOM 执行操作以进行单元测试。
with-addons
-
什么是开玩笑?
Jest 是 Facebook 基于 Jasmine 创建的 JavaScript 单元测试框架,提供自动模拟创建和环境。它通常用于测试组件。
jsdom
-
Jest 比 Jasmine 有什么优势?
与茉莉花相比,有几个优点:
- 自动查找要在源代码中执行的测试。
- 在运行测试时自动模拟依赖项。
- 允许你同步测试异步代码。
- 使用假 DOM 实现(通过 )运行测试,以便可以在命令行上运行测试。
jsdom
- 在并行进程中运行测试,以便更快地完成测试。
-
举一个简单的 Jest 测试用例
让我们为一个函数编写一个测试,该函数在文件中添加了两个数字:
sum.js
const sum = (a, b) => a + b;

export default sum;
创建一个名为包含实际测试的文件:
sum.test.js
import sum from "./sum";

test("adds 1 + 2 to equal 3", () => {
  expect(sum(1, 2)).toBe(3);
});
然后将以下部分添加到你的:
package.json
{
  "scripts": {
    "test": "jest"
  }
}
最后,run or 和 Jest 将打印一个结果:
yarn test
npm test
$ yarn test
PASS ./sum.test.js
✓ adds 1 + 2 to equal 3 (2ms)
React Redux的
-
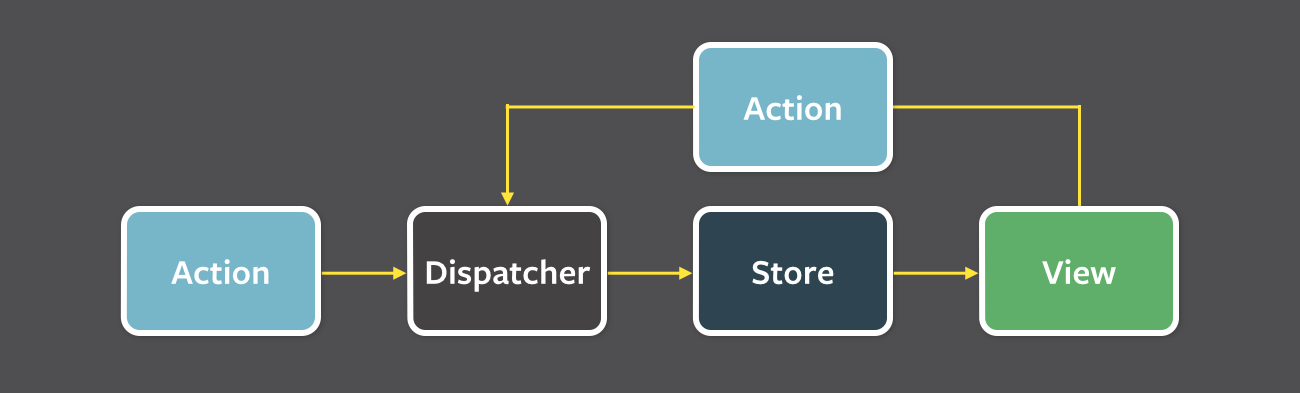
什么是助焊剂?
Flux 是一种应用程序设计范例,用于替代更传统的 MVC 模式。它不是一个框架或库,而是一种新的架构,它补充了 React 和单向数据流的概念。Facebook 在使用 React 时在内部使用这种模式。
调度程序、存储和查看具有不同输入和输出的组件之间的工作流,如下所示:

-
什么是 Redux?
Redux 是基于 Flux 设计模式的 JavaScript 应用的可预测状态容器。Redux 可以与 React 一起使用,也可以与任何其他视图库一起使用。它很小(约2kB),没有依赖关系。
-
Redux 的核心原则是什么?
Redux 遵循三个基本原则:
- 单一事实来源:整个应用程序的状态存储在单个存储区的对象树中。通过单一状态树,可以更轻松地跟踪随时间推移的变化,并调试或检查应用程序。
- 状态是只读的:更改状态的唯一方法是发出一个动作,一个描述所发生事件的对象。这可确保视图和网络回调都不会直接写入状态。
- 使用纯函数进行更改:要指定操作如何转换状态树,请编写 reducers。Reducer 只是将上一个状态和一个动作作为参数,并返回下一个状态的纯函数。
-
与 Flux 相比,Redux 的缺点是什么?
与其说缺点,不如说使用 Redux 而不是 Flux 几乎没有妥协。具体如下:
-
你需要学会避免突变:Flux 对突变数据没有主见,但 Redux 不喜欢突变,许多与 Redux 互补的软件包都假设你永远不会改变状态。你可以使用仅限开发人员的包(如 Immutable.js)强制执行此操作,或者指示你的团队编写非突变代码。
redux-immutable-state-invariant
- 你必须仔细挑选你的包裹:虽然 Flux 没有明确尝试解决撤消/重做、持久性或表单等问题,但 Redux 有中间件和存储增强器等扩展点,它催生了一个丰富的生态系统。
- 目前还没有很好的 Flow 集成:Flux 目前允许你进行非常令人印象深刻的静态类型检查,这是 Redux 还不支持的。
-
你需要学会避免突变:Flux 对突变数据没有主见,但 Redux 不喜欢突变,许多与 Redux 互补的软件包都假设你永远不会改变状态。你可以使用仅限开发人员的包(如 Immutable.js)强制执行此操作,或者指示你的团队编写非突变代码。
-
和 和有什么不一样?
mapStateToProps()
mapDispatchToProps()
mapStateToProps()
是一个实用程序,可帮助你的组件获得更新状态(由其他一些组件更新):const mapStateToProps = (state) => { return { todos: getVisibleTodos(state.todos, state.visibilityFilter), }; };
mapDispatchToProps()
是一个实用程序,它将帮助你的组件触发操作事件(调度可能导致应用程序状态更改的操作):const mapDispatchToProps = (dispatch) => { return { onTodoClick: (id) => { dispatch(toggleTodo(id)); }, }; };
建议始终使用“对象速记”形式。
mapDispatchToProps
Redux 将其包装在另一个函数中,该函数看起来像 (...args) => dispatch(onTodoClick(...args)),并将该包装器函数作为道具传递给你的组件。
const mapDispatchToProps = {
  onTodoClick,
};
-
我可以在 reducer 中调度操作吗?
在 reducer 中调度操作是一种反模式。你的 reducer 应该没有副作用,只需消化操作有效负载并返回一个新的状态对象。在 reducer 中添加侦听器和调度操作可能会导致连锁操作和其他副作用。
-
如何在组件外部访问 Redux 商店?
你只需要从使用 .此外,它不应污染全局窗口对象。
createStore()
store = createStore(myReducer);

export default store;
-
MVW模式的缺点是什么?
- DOM 操作非常昂贵,这会导致应用程序运行缓慢且效率低下。
- 由于循环依赖关系,围绕模型和视图创建了一个复杂的模型。
- 协作应用程序(如 Google Docs)会发生大量数据更改。
- 如果不添加太多额外的代码,就无法轻松撤消(回到过去)。
-
Redux 和 RxJS 之间有什么相似之处吗?
这些库出于非常不同的目的而非常不同,但有一些模糊的相似之处。
Redux 是一个用于管理整个应用程序状态的工具。它通常用作 UI 的体系结构。可以把它看作是 Angular 的(一半)替代品。RxJS 是一个响应式编程库。它通常用作在 JavaScript 中完成异步任务的工具。将其视为 Promise 的替代品。Redux 使用响应式范式,因为 Store 是响应式的。商店从远处观察动作,并自行更改。RxJS 也使用了 Reactive 范式,但它不是一个架构,而是为你提供了基本的构建块 Observables,以实现此模式。
-
如何在负载时调度操作?
你可以在方法中调度操作,在方法中可以验证数据。
componentDidMount()
render()
class App extends Component {
  componentDidMount() {
    this.props.fetchData();
  }

  render() {
    return this.props.isLoaded ? (
      <div>{"Loaded"}</div>
    ) : (
      <div>{"Not Loaded"}</div>
    );
  }
}

const mapStateToProps = (state) => ({
  isLoaded: state.isLoaded,
});

const mapDispatchToProps = { fetchData };

export default connect(mapStateToProps, mapDispatchToProps)(App);
-
如何使用 React Redux?
connect()
你需要执行两个步骤才能在容器中使用存储:
-
使用
mapStateToProps():它将状态变量从你的商店映射到你指定的道具。 -
将上面的道具连接到你的容器:函数返回的对象连接到容器。你可以从 导入。
mapStateToProps
connect()
react-redux
import React from "react";
import { connect } from "react-redux";

class App extends React.Component {
  render() {
    return <div>{this.props.containerData}</div>;
  }
}

function mapStateToProps(state) {
  return { containerData: state.data };
}

export default connect(mapStateToProps)(App);
-
-
如何在 Redux 中重置状态?
你需要在应用程序中编写一个根 reducer,它将处理操作委托给 生成的 reducer。
combineReducers()
例如,让我们在操作后返回初始状态。众所周知,reducer 在被调用时应该返回初始状态 with 作为第一个参数,无论动作如何。
rootReducer()
USER_LOGOUT
undefined
const appReducer = combineReducers({
  /* your app's top-level reducers */
});

const rootReducer = (state, action) => {
  if (action.type === "USER_LOGOUT") {
    state = undefined;
  }

  return appReducer(state, action);
};
在使用 时,你可能还需要清理存储空间。 在存储引擎中保留状态的副本。首先,你需要导入相应的存储引擎,然后,在将其设置为未定义之前解析状态,并清理每个存储状态键。
redux-persist
redux-persist
const appReducer = combineReducers({
  /* your app's top-level reducers */
});

const rootReducer = (state, action) => {
  if (action.type === "USER_LOGOUT") {
    Object.keys(state).forEach((key) => {
      storage.removeItem(`persist:${key}`);
    });

    state = undefined;
  }

  return appReducer(state, action);
};
-
Redux connect 装饰器中符号的用途是什么?
at
@ 符号实际上是用于表示装饰器的 JavaScript 表达式。修饰器可以在设计时批注和修改类和属性。
让我们举一个例子,在没有装饰器的情况下设置 Redux,以及使用装饰器的 Redux。
-
不带装饰器:
import React from "react";
import * as actionCreators from "./actionCreators";
import { bindActionCreators } from "redux";
import { connect } from "react-redux";

function mapStateToProps(state) {
  return { todos: state.todos };
}

function mapDispatchToProps(dispatch) {
  return { actions: bindActionCreators(actionCreators, dispatch) };
}

class MyApp extends React.Component {
  // ...define your main app here
}

export default connect(mapStateToProps, mapDispatchToProps)(MyApp);
-
带装饰器:
import React from "react";
import * as actionCreators from "./actionCreators";
import { bindActionCreators } from "redux";
import { connect } from "react-redux";

function mapStateToProps(state) {
  return { todos: state.todos };
}

function mapDispatchToProps(dispatch) {
  return { actions: bindActionCreators(actionCreators, dispatch) };
}

@connect(mapStateToProps, mapDispatchToProps)
export default class MyApp extends React.Component {
  // ...define your main app here
}
上面的例子几乎相似,只是装饰器的用法不同。装饰器语法尚未内置到任何 JavaScript 运行时中,仍处于实验阶段,可能会发生变化。你可以使用 babel 来支持装饰器。
-
-
React 上下文和 React Redux 有什么区别?
你可以直接在应用程序中使用 Context,并且非常适合将数据传递到深度嵌套的组件,这是它的设计目的。
而 Redux 更强大,提供了大量 Context API 不提供的功能。此外,React Redux 在内部使用上下文,但它不会在公共 API 中公开这一事实。
-
为什么 Redux 状态函数被称为 reducers?
Reducers 始终返回状态的累积(基于所有先前和当前的操作)。因此,它们充当状态的还原器。每次调用 Redux reducer 时,状态和动作都会作为参数传递。然后,根据操作减少(或累积)此状态,然后返回下一个状态。你可以减少操作的集合和(存储的)初始状态,以在其上执行这些操作,以获取生成的最终状态。
-
如何在 Redux 中发出 AJAX 请求?
你可以使用中间件来定义异步操作。
redux-thunk
让我们举一个使用 fetch API 将特定帐户作为 AJAX 调用获取的示例:
export function fetchAccount(id) {
  return (dispatch) => {
    dispatch(setLoadingAccountState()); // Show a loading spinner
    fetch(`/account/${id}`, (response) => {
      dispatch(doneFetchingAccount()); // Hide loading spinner
      if (response.status === 200) {
        dispatch(setAccount(response.json)); // Use a normal function to set the received state
      } else {
        dispatch(someError);
      }
    });
  };
}

function setAccount(data) {
  return { type: "SET_Account", data: data };
}
-
我应该将所有组件的状态保留在 Redux 存储中吗?
将数据保存在 Redux 存储中,并将 UI 相关状态保存在组件内部。
-
访问 Redux 商店的正确方法是什么?
在组件中访问商店的最佳方式是使用该函数,该函数会创建一个围绕现有组件的新组件。这种模式被称为高阶组件,通常是在 React 中扩展组件功能的首选方式。这允许你将状态和操作创建者映射到你的组件,并在你的商店更新时自动传入它们。
connect()
让我们以使用 connect 的组件为例:
<FilterLink>
import { connect } from "react-redux";
import { setVisibilityFilter } from "../actions";
import Link from "../components/Link";

const mapStateToProps = (state, ownProps) => ({
  active: ownProps.filter === state.visibilityFilter,
});

const mapDispatchToProps = (dispatch, ownProps) => ({
  onClick: () => dispatch(setVisibilityFilter(ownProps.filter)),
});

const FilterLink = connect(mapStateToProps, mapDispatchToProps)(Link);

export default FilterLink;
由于它有相当多的性能优化,并且通常不太可能引起错误,Redux 开发人员几乎总是建议使用而不是直接访问商店(使用上下文 API)。
connect()
class MyComponent {
  someMethod() {
    doSomethingWith(this.context.store);
  }
}
-
React Redux 中的组件和容器有什么区别?
组件是一个类或函数组件,用于描述应用程序的表示部分。
容器是连接到 Redux 存储的组件的非正式术语。容器订阅 Redux 状态更新和调度操作,它们通常不渲染 DOM 元素;它们将呈现委托给表示子组件。
-
Redux 中常量的目的是什么?
使用常量可以在使用 IDE 时轻松找到整个项目中该特定功能的所有用法。它还可以防止你引入由拼写错误引起的愚蠢错误——在这种情况下,你将立即得到一个。
ReferenceError
通常我们会将它们保存在单个文件(或 )中。
constants.js
actionTypes.js
export const ADD_TODO = "ADD_TODO";
export const DELETE_TODO = "DELETE_TODO";
export const EDIT_TODO = "EDIT_TODO";
export const COMPLETE_TODO = "COMPLETE_TODO";
export const COMPLETE_ALL = "COMPLETE_ALL";
export const CLEAR_COMPLETED = "CLEAR_COMPLETED";
在 Redux 中,你可以在两个地方使用它们:
-
在操作创建期间:
让我们以:
actions.js
import { ADD_TODO } from "./actionTypes";

export function addTodo(text) {
  return { type: ADD_TODO, text };
}
-
在减速机中:
让我们创建:
reducer.js
import { ADD_TODO } from "./actionTypes";

export default (state = [], action) => {
  switch (action.type) {
    case ADD_TODO:
      return [
        ...state,
        {
          text: action.text,
          completed: false,
        },
      ];
    default:
      return state;
  }
};
-
-
有哪些不同的写作方式?
mapDispatchToProps()
有几种方法可以将操作创建者绑定到 中。
dispatch()
mapDispatchToProps()
以下是可能的选项:
const mapDispatchToProps = (dispatch) => ({
  action: () => dispatch(action()),
});
const mapDispatchToProps = (dispatch) => ({
  action: bindActionCreators(action, dispatch),
});
const mapDispatchToProps = { action };
第三个选项只是第一个选项的简写。
-
和 中的参数有什么用?
ownProps
mapStateToProps()
mapDispatchToProps()
如果指定了参数,React Redux 会将传递给组件的道具传递到你的连接函数中。因此,如果你使用连接的组件:
ownProps
import ConnectedComponent from "./containers/ConnectedComponent";

<ConnectedComponent user={"john"} />;
在 ur 和 functions 内部将是一个对象:
ownProps
mapStateToProps()
mapDispatchToProps()
{
  user: "john";
}
你可以使用此对象来决定从这些函数返回的内容。
-
如何构建 Redux 顶级目录?
大多数应用程序都有几个顶级目录,如下所示:
- 组件:用于不知道 Redux 的哑组件。
- 容器:用于连接到 Redux 的智能组件。
- 操作:用于所有操作创建者,其中文件名对应于应用的一部分。
- Reducers:用于所有 Reducer,其中文件名对应于状态键。
- Store:用于存储初始化。
此结构适用于中小型应用。
-
什么是redux-saga?
redux-saga
是一个库,旨在使 React/Redux 应用程序中的副作用(异步的事情,如数据获取和不纯粹的事情,如访问浏览器缓存)更容易、更好。它在 NPM 中可用:
$ npm install --save redux-saga
-
redux-saga的心智模型是什么?
Saga 就像应用程序中的一个单独线程,它只负责副作用。 是一个 redux 中间件,这意味着这个线程可以通过正常的 Redux 操作从主应用程序启动、暂停和取消,它可以访问完整的 Redux 应用程序状态,它也可以调度 Redux 操作。
redux-saga
-
redux-saga 和 redux-saga 之间有什么区别?
call()
put()
两者都是效果创建者函数。 函数用于创建效果描述,指示中间件调用 Promise。 函数创建一个效果,该效果指示中间件将操作分派到存储。
call()
put()
call()
put()
让我们举个例子,说明这些效果如何用于获取特定的用户数据。
function* fetchUserSaga(action) {
  // `call` function accepts rest arguments, which will be passed to `api.fetchUser` function.
  // Instructing middleware to call promise, it resolved value will be assigned to `userData` variable
  const userData = yield call(api.fetchUser, action.userId);

  // Instructing middleware to dispatch corresponding action.
  yield put({
    type: "FETCH_USER_SUCCESS",
    userData,
  });
}
-
什么是 Redux Thunk?
Redux Thunk 中间件允许你编写返回函数而不是操作的操作创建器。thunk 可用于延迟操作的调度,或仅在满足特定条件时调度。内部函数接收存储方法和参数。
dispatch()
getState()
-
和 和有什么不一样?
redux-saga
redux-thunk
Redux Thunk 和 Redux Saga 都负责处理副作用。在大多数情况下,Thunk 使用 Promise 来处理它们,而 Saga 使用 Generators。Thunk 使用简单,许多开发人员都熟悉 Promises,Sagas/Generators 更强大,但你需要学习它们。但是这两个中间件可以共存,所以你可以从 Thunks 开始,并在需要的时候引入 Sagas。
-
什么是 Redux DevTools?
Redux DevTools 是一个用于 Redux 的实时编辑时间旅行环境,具有热重载、动作回放和可自定义的 UI。如果你不想费心安装 Redux DevTools 并将其集成到你的项目中,请考虑使用适用于 Chrome 和 Firefox 的 Redux DevTools 扩展。
-
Redux DevTools 有哪些功能?
Redux DevTools 的一些主要功能如下:
- 允许你检查每个状态和操作有效负载。
- 允许你通过取消操作回到过去。
- 如果更改 reducer 代码,则将重新评估每个暂存操作。
- 如果减速器抛出,你将看到这是在哪个操作期间发生的,以及错误是什么。
- 使用存储增强器,可以在页面重新加载时保留调试会话。
persistState()
-
什么是 Redux 选择器,为什么要使用它们?
选择器是将 Redux 状态作为参数并返回一些数据以传递给组件的函数。
例如,要从状态中获取用户详细信息,请执行以下操作:
const getUserData = (state) => state.user.data;
这些选择器有两个主要优点,
- 选择器可以计算派生数据,允许 Redux 存储最小可能的状态
- 除非选择器的一个参数发生更改,否则不会重新计算选择器
-
什么是 Redux Form?
Redux Form 与 React 和 Redux 配合使用,使 React 中的表单能够使用 Redux 来存储其所有状态。Redux Form 可以与原始 HTML5 输入一起使用,但它也可以很好地与常见的 UI 框架一起使用,如 Material UI、React Widgets 和 React Bootstrap。
-
Redux Form 的主要特点是什么?
Redux Form 的一些主要功能是:
- 通过 Redux 存储的字段值持久性。
- 验证(同步/异步)和提交。
- 字段值的格式化、解析和规范化。
-
如何在 Redux 中添加多个中间件?
你可以使用 .
applyMiddleware()
例如,你可以将它们作为参数添加并传递给:
redux-thunk
logger
applyMiddleware()
import { createStore, applyMiddleware } from "redux";
const createStoreWithMiddleware = applyMiddleware(
  ReduxThunk,
  logger
)(createStore);
-
如何在 Redux 中设置初始状态?
你需要将初始状态作为第二个参数传递给 createStore:
const rootReducer = combineReducers({
  todos: todos,
  visibilityFilter: visibilityFilter,
});

const initialState = {
  todos: [{ id: 123, name: "example", completed: false }],
};

const store = createStore(rootReducer, initialState);
-
Relay 与 Redux 有何不同?
Relay 与 Redux 类似,因为它们都使用一个存储。主要区别在于中继仅管理源自服务器的状态,并且对状态的所有访问都通过 GraphQL 查询(用于读取数据)和突变(用于更改数据)使用。Relay 为你缓存数据并为你优化数据获取,仅获取更改的数据,仅此而已。
-
Redux 中的操作是什么?
操作是将数据从应用程序发送到存储的纯 JavaScript 对象或信息有效负载。它们是商店的唯一信息来源。操作必须具有指示正在执行的操作类型的 type 属性。
例如,让我们执行一个表示添加新待办事项的操作:
{
  type: ADD_TODO,
  text: 'Add todo item'
}
React 原生
-
React Native 和 React 有什么区别?
React 是一个 JavaScript 库,既支持前端 Web 又支持在服务器上运行,用于构建用户界面和 Web 应用程序。
React Native 是一个可编译为原生应用组件的移动框架,允许你使用 JavaScript 构建原生移动应用程序(iOS、Android 和 Windows),允许你使用 React 构建组件,并在后台实现 React。
-
如何测试 React Native 应用程序?
React Native 只能在 iOS 和 Android 等移动模拟器中进行测试。你可以使用世博会应用程序在你的手机中运行该应用程序 (https://expo.io) 如果使用二维码同步,你的手机和计算机应位于同一无线网络中。
-
如何在 React Native 中进行日志记录?
可以使用 、 等。从 React Native v0.29 开始,你只需运行以下命令即可在控制台中查看日志:
console.log
console.warn
$ react-native log-ios
$ react-native log-android
-
如何调试你的 React Native?
按照以下步骤调试 React Native 应用程序:
- 在 iOS 模拟器中运行应用程序。
- 按 和 网页应在 打开。
Command + D
http://localhost:8081/debugger-ui
- 启用“捕获异常时暂停”以获得更好的调试体验。
- 按 可打开 Chrome 开发者工具,或通过 -> -> 打开它。
Command + Option + I
View
Developer
Developer Tools
- 现在,你应该能够像往常一样进行调试。
React 支持的库和集成
-
什么是重新选择及其工作原理?
Reselect 是一个选择器库(用于 Redux),它使用记忆概念。它最初是为了计算来自类似 Redux 的应用程序状态的派生数据而编写的,但它不能绑定到任何架构或库。
重新选择保留上次调用的最后一个输入/输出的副本,并仅在其中一个输入发生更改时重新计算结果。如果连续两次提供相同的输入,则“重新选择”将返回缓存的输出。它的记忆和缓存是完全可定制的。
-
什么是流量?
Flow 是一个静态类型检查器,旨在查找 JavaScript 中的类型错误。与传统类型系统相比,流类型可以表达更细粒度的区别。例如,与大多数类型系统不同,Flow 可帮助你捕获涉及 的错误。
null
-
Flow 和 PropTypes 有什么区别?
Flow 是一个静态分析工具(静态检查器),它使用语言的超集,允许你为所有代码添加类型注释,并在编译时捕获整个类别的 bug。
PropTypes 是一个基本的类型检查器(运行时检查器),它已经修补到 React 上。除了传递给给定组件的道具类型外,它无法检查其他任何内容。如果你希望对整个项目进行更灵活的类型检查,Flow/TypeScript 是合适的选择。
-
如何在 React 中使用 Font Awesome 图标?
遵循以下步骤在 React 中包含 Font Awesome:
-
安装:
font-awesome
$ npm install --save font-awesome -
在文件中导入:
font-awesome
index.js
import "font-awesome/css/font-awesome.min.css";
-
在以下位置添加 Font Awesome 类:
className
render() {
  return <div><i className={'fa fa-spinner'} /></div>
}
-
-
什么是 React Dev Tools?
React 开发者工具允许你检查组件层次结构,包括组件属性和状态。它既可以作为浏览器扩展(适用于 Chrome 和 Firefox)存在,也可以作为独立应用程序(适用于其他环境,包括 Safari、IE 和 React Native)。
可用于不同浏览器或环境的官方扩展。
- Chrome 扩展程序
- Firefox扩展
- 独立应用程序(Safari、React Native 等)
-
为什么 DevTools 无法在 Chrome 中加载本地文件?
如果你在浏览器中打开了本地 HTML 文件(),则必须先打开 Chrome 扩展程序并选中 .
file://...
Allow access to file URLs
-
如何在 React 中使用 Polymer?
你需要按照以下步骤在React中使用Polymer,
-
创建聚合物元素:
<link
  rel="import"
  href="../../bower_components/polymer/polymer.html"
/>;
Polymer({
  is: "calendar-element",
  ready: function () {
    this.textContent = "I am a calendar";
  },
});
-
通过在 HTML 文档中导入 Polymer 组件 HTML 标签来创建它,例如将其导入 React 应用程序中:
index.html
<link
  rel="import"
  href="./src/polymer-components/calendar-element.html"
/>
-
在 JSX 文件中使用该元素:
import React from "react";

class MyComponent extends React.Component {
  render() {
    return <calendar-element />;
  }
}

export default MyComponent;
-
-
React 与 Vue.js 相比有什么优势?
与 Vue.js 相比,React 具有以下优势:
- 在大型应用开发中提供更大的灵活性。
- 更易于测试。
- 适用于移动应用程序创建。
- 提供更多信息和解决方案。
注意:上面的优势列表纯粹是固执己见的,并且根据专业经验而有所不同。但它们作为基本参数很有帮助。
-
React 和 Angular 有什么区别?
让我们以表格格式查看 React 和 Angular 之间的区别。
React 角 React 是一个库,只有 View 层 Angular 是一个框架,具有完整的 MVC 功能 React 处理服务器端的渲染 AngularJS 仅在客户端渲染,但 Angular 2 及更高版本在服务器端渲染 React 使用的 JSX 看起来像 JS 中的 HTML,这可能会令人困惑 Angular 遵循 HTML 的模板方法,这使得代码更短且易于理解 React Native,这是一种用于构建移动应用程序的 React 类型,速度更快、更稳定 Angular 的移动原生应用程序 Ionic 相对不太稳定且速度较慢 在 React 中,数据仅以一种方式流动,因此调试很容易 在 Angular 中,数据是双向流动的,即它在子级和父级之间具有双向数据绑定,因此调试通常很困难
注意:上面的差异列表纯粹是自以为是的,它因专业经验而异。但它们作为基本参数很有帮助。
-
为什么 React 选项卡没有显示在 DevTools 中?
当页面加载时,React DevTools 会设置一个名为 的全局,然后 React 在初始化期间与该钩子进行通信。如果网站未使用 React,或者 React 无法与 DevTools 通信,则它不会显示选项卡。
__REACT_DEVTOOLS_GLOBAL_HOOK__
-
什么是样式化组件?
styled-components
是一个用于设置 React 应用程序样式的 JavaScript 库。它删除了样式和组件之间的映射,并允许你编写使用 JavaScript 增强的实际 CSS。
-
举个样式化组件的例子?
让我们为每个组件创建具有特定样式的组件。
<Title>
<Wrapper>
import React from "react";
import styled from "styled-components";

// Create a <Title> component that renders an <h1> which is centered, red and sized at 1.5em
const Title = styled.h1`
  font-size: 1.5em;
  text-align: center;
  color: palevioletred;
`;

// Create a <Wrapper> component that renders a <section> with some padding and a papayawhip background
const Wrapper = styled.section`
  padding: 4em;
  background: papayawhip;
`;
这两个变量和 现在是组件,你可以像渲染任何其他 react 组件一样渲染它们。
Title
Wrapper
<Wrapper>
  <Title>{"Lets start first styled component!"}</Title>
</Wrapper>
-
什么是继电器?
Relay 是一个 JavaScript 框架,用于使用 React 视图层向 Web 应用程序提供数据层和客户端-服务器通信。
-
如何在应用程序中使用 TypeScript?
create-react-app
从 react-scripts@2.1.0 或更高版本开始,内置了对 typescript 的支持。即,现在原生支持 TypeScript。你可以按如下方式传递选项
create-react-app
--typescript
npx create-react-app my-app --typescript

# or

yarn create react-app my-app --typescript
但是对于较低版本的 react 脚本,只需在创建新项目时提供选项即可。 是一组调整,用于采用标准项目管道并将 TypeScript 引入其中。
--scripts-version
react-scripts-ts
react-scripts-ts
create-react-app
现在,项目布局应如下所示:
my-app/
├─ .gitignore
├─ images.d.ts
├─ node_modules/
├─ public/
├─ src/
│  └─ ...
├─ package.json
├─ tsconfig.json
├─ tsconfig.prod.json
├─ tsconfig.test.json
└─ tslint.json
杂项
-
Reselect 库的主要功能是什么?
让我们看看Reselect库的主要功能,
- 选择器可以计算派生数据,允许 Redux 存储最小的可能状态。
- 选择器非常高效。除非选择器的一个参数发生更改,否则不会重新计算选择器。
- 选择器是可组合的。它们可以用作其他选择器的输入。
-
举个例子 重新选择用法?
让我们通过简化的 Reselect 用法来计算装运订单的不同数量:
import { createSelector } from "reselect";

const shopItemsSelector = (state) => state.shop.items;
const taxPercentSelector = (state) => state.shop.taxPercent;

const subtotalSelector = createSelector(shopItemsSelector, (items) =>
  items.reduce((acc, item) => acc + item.value, 0)
);

const taxSelector = createSelector(
  subtotalSelector,
  taxPercentSelector,
  (subtotal, taxPercent) => subtotal * (taxPercent / 100)
);

export const totalSelector = createSelector(
  subtotalSelector,
  taxSelector,
  (subtotal, tax) => ({ total: subtotal + tax })
);

let exampleState = {
  shop: {
    taxPercent: 8,
    items: [
      { name: "apple", value: 1.2 },
      { name: "orange", value: 0.95 },
    ],
  },
};

console.log(subtotalSelector(exampleState)); // 2.15
console.log(taxSelector(exampleState)); // 0.172
console.log(totalSelector(exampleState)); // { total: 2.322 }
-
statics 对象是否适用于 React 中的 ES6 类?
不可以,仅适用于:
statics
React.createClass()
someComponent = React.createClass({
  statics: {
    someMethod: function () {
      // ..
    },
  },
});
但是你可以在 ES6+ 类中编写静态,如下所示,
class Component extends React.Component {
  static propTypes = {
    // ...
  };

  static someMethod() {
    // ...
  }
}
或在课外写下如下:
class Component extends React.Component {
   ....
}

Component.propTypes = {...}
Component.someMethod = function(){....}
-
Redux 只能与 React 一起使用吗?
Redux 可以用作任何 UI 层的数据存储。最常见的用法是 React 和 React Native,但也有可用于 Angular、Angular 2、Vue、Mithril 等的绑定。Redux 只是提供了一种订阅机制,可以被任何其他代码使用。
-
你需要有一个特定的构建工具来使用 Redux 吗?
Redux 最初是用 ES6 编写的,然后用 Webpack 和 Babel 转译到 ES5 中。无论你的 JavaScript 构建过程如何,你都应该能够使用它。Redux 还提供了一个 UMD 构建,可以直接使用,无需任何构建过程。
-
Redux Form 如何从状态更新?
initialValues
你需要添加设置。
enableReinitialize : true
const InitializeFromStateForm = reduxForm({
  form: "initializeFromState",
  enableReinitialize: true,
})(UserEdit);
如果你的道具更新了,你的表单也会更新。
initialValues
-
React PropTypes 如何允许一个 prop 使用不同的类型?
你可以使用 的方法。
oneOfType()
PropTypes
例如,height 属性可以使用 or 类型定义,如下所示:
string
number
Component.propTypes = {
  size: PropTypes.oneOfType([PropTypes.string, PropTypes.number]),
};
-
我可以导入 SVG 文件作为 react 组件吗?
你可以直接将 SVG 作为组件导入,而不是将其加载为文件。此功能适用于及更高版本。
react-scripts@2.0.0
import { ReactComponent as Logo } from "./logo.svg";

const App = () => (
  <div>
    {/* Logo is an actual react component */}
    <Logo />
  </div>
);
注意:不要忘记导入中的大括号。
-
为什么不推荐使用内联 ref 回调或函数?
如果 ref 回调定义为内联函数,它将在更新期间被调用两次,第一次是 null,然后是 DOM 元素。这是因为每次渲染都会创建一个函数的新实例,因此 React 需要清除旧的引用并设置新的引用。
class UserForm extends Component {
  handleSubmit = () => {
    console.log("Input Value is: ", this.input.value);
  };

  render() {
    return (
      <form onSubmit={this.handleSubmit}>
        <input type="text" ref={(input) => (this.input = input)} /> //
        Access DOM input in handle submit
        <button type="submit">Submit</button>
      </form>
    );
  }
}
但我们的期望是,当组件挂载时,ref 回调被调用一次。一个快速的解决方法是使用 ES7 类属性语法来定义函数
class UserForm extends Component {
  handleSubmit = () => {
    console.log("Input Value is: ", this.input.value);
  };

  setSearchInput = (input) => {
    this.input = input;
  };

  render() {
    return (
      <form onSubmit={this.handleSubmit}>
        <input type="text" ref={this.setSearchInput} /> // Access DOM input
        in handle submit
        <button type="submit">Submit</button>
      </form>
    );
  }
}
注意:在 React v16.3 中,⬆返回顶部
-
什么是 react 中的渲染劫持?
渲染劫持的概念是控制一个组件将从另一个组件输出的内容的能力。这意味着你可以通过将组件包装成高阶组件来装饰组件。通过换行,可以注入额外的道具或进行其他更改,这可能会导致渲染逻辑发生变化。它实际上并不启用劫持,但通过使用 HOC,你可以使组件的行为有所不同。
-
什么是 HOC 工厂实现?
在 React 中实现 HOC 主要有两种方法。
- 道具代理 (PP) 和
- 继承反转(II)。
但是它们遵循不同的方法来操作 WrappedComponent。
道具代理
在这种方法中,HOC 的 render 方法返回 WrappedComponent 类型的 React Element。我们还通过 HOC 接收的道具,因此得名道具代理。
function ppHOC(WrappedComponent) {
  return class PP extends React.Component {
    render() {
      return <WrappedComponent {...this.props} />;
    }
  };
}
继承反转
在此方法中,返回的 HOC 类 (Enhancer) 扩展了 WrappedComponent。它之所以被称为继承反转,是因为它不是 WrappedComponent 扩展某些 Enhancer 类,而是由 Enhancer 被动扩展。这样一来,它们之间的关系似乎是相反的。
function iiHOC(WrappedComponent) {
  return class Enhancer extends WrappedComponent {
    render() {
      return super.render();
    }
  };
}
-
如何将数字传递给 React 组件?
你应该通过大括号({})将数字作为引号中的字符串传递
React.render(
  <User age={30} department={"IT"} />,
  document.getElementById("container")
);
-
我需要将我的所有状态都保存到 Redux 中吗?我应该使用 react 内部状态吗?
这取决于开发人员的决定,即开发人员的工作是确定构成应用程序的状态类型,以及每个状态应该位于何处。一些用户更喜欢将每一条数据都保存在 Redux 中,以便始终保持其应用程序的完全可序列化和受控版本。其他人则喜欢将非关键或 UI 状态(例如“此下拉列表当前是否打开”)保留在组件的内部状态中。
以下是确定应该将哪种数据放入 Redux 的经验法则
- 应用程序的其他部分是否关心这些数据?
- 你是否需要能够基于这些原始数据创建进一步的派生数据?
- 是否使用相同的数据来驱动多个组件?
- 能够将此状态还原到给定的时间点(即时间旅行调试)对你有价值吗?
- 是否要缓存数据(即,如果数据已经存在,则使用状态,而不是重新请求它)?
-
React 中 registerServiceWorker 的目的是什么?
默认情况下,React 会在没有任何配置的情况下为你创建一个 Service Worker。Service Worker 是一个 Web API,可帮助你缓存资产和其他文件,以便当用户离线或网络速度较慢时,他/她仍然可以在屏幕上看到结果,因此,它可以帮助你构建更好的用户体验,这就是你现在应该了解的有关 Service Worker 的信息。这一切都是为了向你的网站添加离线功能。
import React from "react";
import ReactDOM from "react-dom";
import App from "./App";
import registerServiceWorker from "./registerServiceWorker";

ReactDOM.render(<App />, document.getElementById("root"));
registerServiceWorker();
-
什么是 React 备忘录功能?
当类组件的输入属性相同时,可以使用 PureComponent 或 shouldComponentUpdate 限制类组件重新呈现。现在,你可以通过将函数组件包装在 React.memo 中来对它们做同样的事情。
const MyComponent = React.memo(function MyComponent(props) {
  /* only rerenders if props change */
});
-
什么是 React 懒惰函数?
该函数允许你将动态导入呈现为常规组件。当组件被渲染时,它会自动加载包含 的捆绑包。这必须返回一个 Promise,该 Promise 解析为一个模块,该模块具有包含 React 组件的默认导出。
React.lazy
OtherComponent
const OtherComponent = React.lazy(() => import("./OtherComponent"));

function MyComponent() {
  return (
    <div>
      <OtherComponent />
    </div>
  );
}
注意:并且尚不可用于服务器端渲染。如果你想在服务器渲染的应用程序中进行代码拆分,我们仍然推荐 React Loadable。
React.lazy
Suspense
-
如何使用 setState 防止不必要的更新?
你可以将状态的当前值与现有状态值进行比较,并决定是否重新呈现页面。如果值相同,则需要返回 null 以停止重新渲染,否则返回最新的状态值。
例如,用户配置文件信息有条件地呈现如下:
getUserProfile = (user) => { const latestAddress = user.address; this.setState((state) => { if (state.address === latestAddress) { return null; } else { return { title: latestAddress }; } }); };
-
如何在 React 16 版本中渲染数组、字符串和数字?
数组:与旧版本不同,你不需要确保 render 方法在 React16 中返回单个元素。通过返回数组,你可以返回多个没有换行元素的同级元素。
例如,让我们以下面的开发人员列表为例,
const ReactJSDevs = () => { return [ <li key="1">John</li>, <li key="2">Jackie</li>, <li key="3">Jordan</li>, ]; };
还可以将此项数组合并到另一个数组组件中。
const JSDevs = () => { return ( <ul> <li>Brad</li> <li>Brodge</li> <ReactJSDevs /> <li>Brandon</li> </ul> ); };
字符串和数字:还可以从 render 方法返回字符串和数字类型。
render() { return 'Welcome to ReactJS questions'; } // Number render() { return 2018; }
-
如何在 React 类中使用类字段声明语法?
使用类字段声明可以使 React 类组件更加简洁。你可以在不使用构造函数的情况下初始化本地状态,并使用箭头函数声明类方法,而无需额外绑定它们。
让我们举一个反例来演示不使用构造函数和不使用绑定的方法的状态的类字段声明,
class Counter extends Component { state = { value: 0 }; handleIncrement = () => { this.setState((prevState) => ({ value: prevState.value + 1, })); }; handleDecrement = () => { this.setState((prevState) => ({ value: prevState.value - 1, })); }; render() { return ( <div> {this.state.value} <button onClick={this.handleIncrement}>+</button> <button onClick={this.handleDecrement}>-</button> </div> ); } }
-
什么是钩子?
Hooks 是一个特殊的 JavaScript 函数,它允许你使用状态和其他 React 功能,而无需编写类。此模式已作为 React 16.8 中的一项新功能引入,有助于将有状态逻辑与组件隔离开来。
让我们看一个 useState hook 的例子:
import { useState } from "react"; function Example() { // Declare a new state variable, which we'll call "count" const [count, setCount] = useState(0); return ( <> <p>You clicked {count} times</p> <button onClick={() => setCount(count + 1)}>Click me</button> </> ); }
注意:钩子可以在现有函数组件中使用,而无需重写组件。
-
钩子需要遵循哪些规则?
你需要遵循两个规则才能使用钩子,
- 仅在 react 函数的顶层调用 Hooks:不应在循环、条件或嵌套函数中调用 Hook。这将确保每次组件渲染时都以相同的顺序调用 Hook,并在多个 useState 和 useEffect 调用之间保留 Hooks 的状态。
- 仅从 React Functions 调用 Hooks:你不应该从常规 JavaScript 函数调用 Hooks。相反,你应该从函数组件或自定义钩子调用它们。
名为 eslint-plugin-react-hooks 的 eslint 插件可用于强制执行这两个规则。
-
如何确保钩子遵循项目中的规则?
React 团队发布了一个名为 eslint-plugin-react-hooks 的 ESLint 插件来执行这两个规则。你可以使用以下命令将此插件添加到你的项目中,
npm install eslint-plugin-react-hooks@next
并在你的 ESLint 配置文件中应用以下配置,
// Your ESLint configuration { "plugins": [ // ... "react-hooks" ], "rules": { // ... "react-hooks/rules-of-hooks": "error" } }
例如,linter 强制执行钩子的正确命名约定。如果你将自定义钩子重命名为前缀“use”,则 linter 将不再允许你在自定义钩子中调用内置钩子,例如 useState、useEffect 等。
注意:默认情况下,此插件旨在用于创建 React 应用程序。
-
Flux 和 Redux 有什么区别?
以下是 Flux 和 Redux 之间的主要区别
通量 Redux的 状态是可变的 状态是不可变的 存储包含状态和更改逻辑 存储和更改逻辑是分开的 存在多个商店 只有一家商店存在 所有的商店都是断开的和扁平的 带分层减速器的单店 它有一个单例调度程序 没有调度员的概念 React 组件订阅商店 容器组件使用连接功能
-
React Router V4 有什么好处?
以下是 React Router V4 模块的主要优点,
- 在 React Router v4(版本 4)中,API 完全是关于组件的。路由器可以可视化为包装特定子路由器组件()的单个组件()。
<BrowserRouter>
<Route>
- 你无需手动设置历史记录。路由器模块将通过用组件包装路由来处理历史记录。
<BrowserRouter>
- 通过仅添加特定的路由器模块(Web、核心或本机)来减小应用程序大小
- 在 React Router v4(版本 4)中,API 完全是关于组件的。路由器可以可视化为包装特定子路由器组件()的单个组件()。
-
你能描述一下componentDidCatch生命周期方法签名吗?
componentDidCatch 生命周期方法在后代组件引发错误后调用。该方法接收两个参数,
- error: - 抛出的错误对象
- info: - 带有 componentStack 键的对象包含有关哪个组件引发错误的信息。
方法结构如下
componentDidCatch(error, info);
-
在哪些情况下,错误边界不会捕获错误?
以下是误差边界不起作用的情况,
- 事件处理程序内部
- 使用 setTimeout 或 requestAnimationFrame 回调的异步代码
- 在服务器端渲染期间
- 当错误边界代码本身抛出错误时
-
为什么不需要事件处理程序的错误边界?
错误边界不会捕获事件处理程序中的错误。
React 不需要错误边界来从事件处理程序中的错误中恢复。与 render 方法和生命周期方法不同,事件处理程序在呈现过程中不会发生。因此,如果他们抛出,React 仍然知道在屏幕上显示什么。
如果需要在事件处理程序中捕获错误,请使用常规的 JavaScript try / catch 语句:
class MyComponent extends React.Component { constructor(props) { super(props); this.state = { error: null }; this.handleClick = this.handleClick.bind(this); } handleClick() { try { // Do something that could throw } catch (error) { this.setState({ error }); } } render() { if (this.state.error) { return <h1>Caught an error.</h1>; } return <button onClick={this.handleClick}>Click Me</button>; } }
请注意,上面的示例演示的是常规 JavaScript 行为,并且不使用错误边界。
-
try catch 块和错误边界之间有什么区别?
Try catch 块适用于命令式代码,而错误边界用于在屏幕上呈现声明性代码。
例如,用于以下命令性代码的 try catch 块
try { showButton(); } catch (error) { // ... }
而错误边界包装声明性代码如下,
<ErrorBoundary> <MyComponent /> </ErrorBoundary>
因此,如果 componentDidUpdate 方法中发生错误,该错误是由树深处某处的 setState 引起的,它仍将正确地传播到最近的错误边界。
-
react 16 中未捕获的错误的行为是什么?
在 React 16 中,没有被任何错误边界捕获的错误将导致卸载整个 React 组件树。此决定背后的原因是,将损坏的 UI 留在原地比完全删除它更糟糕。例如,对于支付应用来说,显示错误的金额比什么都不呈现更糟糕。
-
误差边界的正确位置是什么?
错误边界使用的粒度由开发人员根据项目需求决定。你可以遵循以下任一方法:- 你可以包装顶级路由组件,以显示整个应用程序的一般错误消息。
- 你还可以将单个组件包装在错误边界中,以保护它们不会使应用程序的其余部分崩溃。
-
从错误边界进行组件堆栈跟踪有什么好处?
除了错误消息和 javascript 堆栈之外,React16 还会使用错误边界概念显示带有文件名和行号的组件堆栈跟踪。
例如,BuggyCounter 组件显示组件堆栈跟踪,如下所示:


-
为类组件定义所需的方法是什么?
该方法是类组件中唯一必需的方法。即,除 render 方法之外的所有方法对于类组件都是可选的。render()
-
render 方法有哪些可能的返回类型?
下面是以下使用的类型列表,并从 render 方法返回,
-
React 元素:指示 React 渲染 DOM 节点的元素。它包括 html 元素,例如和用户定义的元素。
<div/>
- 数组和片段:返回多个元素以呈现为数组和片段以包装多个元素
- 门户:将子级渲染到不同的 DOM 子树中。
- 字符串和数字:在 DOM 中将 String 和 Numbers 呈现为文本节点
- 布尔值或 null:不呈现任何内容,但这些类型用于有条件地呈现内容。
-
React 元素:指示 React 渲染 DOM 节点的元素。它包括 html 元素,例如和用户定义的元素。
-
构造函数的主要用途是什么?
构造函数主要用于两个目的,
- 通过将对象分配给 this.state 来初始化本地状态
- 用于将事件处理程序方法绑定到实例 例如,下面的代码涵盖了上述两种情况,
constructor(props) { super(props); // Don't call this.setState() here! this.state = { counter: 0 }; this.handleClick = this.handleClick.bind(this); }
-
是否必须为 React 组件定义构造函数?
不,这不是强制性的。也就是说,如果你不初始化状态,也不绑定方法,你就不需要为你的 React 组件实现构造函数。
-
什么是默认道具?
defaultProps 可以定义为组件上的属性,用于设置 props 的默认值。这些默认道具在未提供道具(即未定义的道具)时使用,但不适用于空道具。这意味着,如果你提供 null 值,则它仍然是 null 值。
例如,让我们为按钮组件创建颜色默认道具,
function MyButton { // ... } MyButton.defaultProps = { color: "red", };
如果未提供,则会将默认值设置为“red”。即,每当你尝试访问颜色道具时,它都会使用默认值
props.color
render() { return <MyButton /> ; // props.color will contain red value }
-
为什么不应该在 componentWillUnmount 中调用 setState?
你不应调用,因为一旦卸载组件实例,它就永远不会再次挂载。setState()
componentWillUnmount()
-
getDerivedStateFromError 的目的是什么?
此生命周期方法在后代组件引发错误后调用。它接收作为参数引发的错误,并应返回一个值以更新状态。
生命周期方法的签名如下:
static getDerivedStateFromError(error)
让我们以上述生命周期方法的误差边界用例为例进行演示,
class ErrorBoundary extends React.Component { constructor(props) { super(props); this.state = { hasError: false }; } static getDerivedStateFromError(error) { // Update state so the next render will show the fallback UI. return { hasError: true }; } render() { if (this.state.hasError) { // You can render any custom fallback UI return <h1>Something went wrong.</h1>; } return this.props.children; } }
-
组件重新渲染时的方法顺序是什么?
更新可能是由对道具或状态的更改引起的。重新呈现组件时,将按以下顺序调用以下方法。
- 静态 getDerivedStateFromProps()
- shouldComponentUpdate()
- render() 的
- getSnapshotBeforeUpdate()
- componentDidUpdate()
-
在错误处理过程中调用了哪些方法?
当呈现过程中、生命周期方法或任何子组件的构造函数中出现错误时,将调用以下方法。
- 静态 getDerivedStateFromError()
- componentDidCatch()
-
displayName 类属性的用途是什么?
displayName 字符串用于调试消息。通常,不需要显式设置它,因为它是从定义组件的函数或类的名称推断出来的。如果要显示其他名称以进行调试或创建高阶组件时,则可能需要显式设置它。
例如,为了便于调试,请选择一个显示名称,以传达它是 withSubscription HOC 的结果。
function withSubscription(WrappedComponent) { class WithSubscription extends React.Component { /* ... */ } WithSubscription.displayName = `WithSubscription(${getDisplayName( WrappedComponent )})`; return WithSubscription; } function getDisplayName(WrappedComponent) { return ( WrappedComponent.displayName || WrappedComponent.name || "Component" ); }
-
react 应用程序的浏览器支持是什么?
React 支持所有流行的浏览器,包括 Internet Explorer 9 及更高版本,尽管 IE 9 和 IE 10 等旧浏览器需要一些 polyfill。如果你使用 es5-shim 和 es5-sham polyfill,那么它甚至支持不支持 ES5 方法的旧浏览器。
-
unmountComponentAtNode 方法的目的是什么?
此方法可从 react-dom 包中获得,它从 DOM 中删除挂载的 React 组件并清理其事件处理程序和状态。如果容器中未装载任何组件,则调用此函数不执行任何操作。如果组件已卸载,则返回 true;如果没有要卸载的组件,则返回 false。
方法签名如下:
ReactDOM.unmountComponentAtNode(container);
-
什么是代码拆分?
代码拆分是 Webpack 和 Browserify 等捆绑器支持的一项功能,它可以创建多个可以在运行时动态加载的捆绑包。react 项目支持通过动态 import() 功能进行代码拆分。
例如,在下面的代码片段中,它会将 moduleA.js 及其所有唯一依赖项作为一个单独的块,仅在用户单击“加载”按钮后加载。模块A.js
const moduleA = "Hello"; export { moduleA };
应用.js
import React, { Component } from "react"; class App extends Component { handleClick = () => { import("./moduleA") .then(({ moduleA }) => { // Use moduleA }) .catch((err) => { // Handle failure }); }; render() { return ( <div> <button onClick={this.handleClick}>Load</button> </div> ); } } export default App;
-
什么是键控片段?
使用显式 <React.Fragment> 语法声明的 Fragment 可能具有键。一般用例是将集合映射到片段数组,如下所示,
function Glossary(props) { return ( <dl> {props.items.map((item) => ( // Without the `key`, React will fire a key warning <React.Fragment key={item.id}> <dt>{item.term}</dt> <dd>{item.description}</dd> </React.Fragment> ))} </dl> ); }
注意:key 是唯一可以传递给 Fragment 的属性。将来,可能会支持其他属性,例如事件处理程序。
-
React 是否支持所有 HTML 属性?
从 React 16 开始,完全支持标准或自定义 DOM 属性。由于 React 组件通常同时采用自定义和 DOM 相关的 prop,因此 React 像 DOM API 一样使用 camelCase 约定。
让我们对标准 HTML 属性进行一些道具,
<div tabIndex="-1" /> // Just like node.tabIndex DOM API <div className="Button" /> // Just like node.className DOM API <input readOnly={true} /> // Just like node.readOnly DOM API
这些道具的工作方式与相应的 HTML 属性类似,但特殊情况除外。它还支持所有 SVG 属性。
-
HOC 有哪些限制?
除了优点之外,高阶组件还有一些注意事项。以下是订单中列出的几个,
-
不要在 render 方法中使用 HOC:不建议在组件的 render 方法中将 HOC 应用于组件。
render() { // A new version of EnhancedComponent is created on every render // EnhancedComponent1 !== EnhancedComponent2 const EnhancedComponent = enhance(MyComponent); // That causes the entire subtree to unmount/remount each time! return <EnhancedComponent />; }
上述代码通过重新挂载组件来影响性能,该组件会导致该组件及其所有子组件的状态丢失。相反,应在组件定义外部应用 HOC,以便生成的组件仅创建一次。
-
静态方法必须复制到:将 HOC 应用于组件时,新组件不具有原始组件的任何静态方法
// Define a static method WrappedComponent.staticMethod = function () { /*...*/ }; // Now apply a HOC const EnhancedComponent = enhance(WrappedComponent); // The enhanced component has no static method typeof EnhancedComponent.staticMethod === "undefined"; // true
你可以通过在返回容器之前将方法复制到容器上来克服这个问题,
function enhance(WrappedComponent) { class Enhance extends React.Component { /*...*/ } // Must know exactly which method(s) to copy :( Enhance.staticMethod = WrappedComponent.staticMethod; return Enhance; }
-
引用不会传递:对于 HOC,你需要将所有 props 传递到包装组件,但这不适用于 refs。这是因为 ref 并不是一个类似于 key 的道具。在这种情况下,你需要使用 React.forwardRef API
-
-
如何在 DevTools 中调试 forwardRefs?
React.forwardRef 接受渲染函数作为参数,DevTools 使用此函数来确定要为 ref 转发组件显示的内容。
例如,如果未命名 render 函数或未使用 displayName 属性,则它将在 DevTools 中显示为“ForwardRef”,
const WrappedComponent = React.forwardRef((props, ref) => { return <LogProps {...props} forwardedRef={ref} />; });
但是,如果你命名 render 函数,那么它将显示为“ForwardRef(myFunction)”
const WrappedComponent = React.forwardRef(function myFunction(props, ref) { return <LogProps {...props} forwardedRef={ref} />; });
或者,你还可以为 forwardRef 函数设置 displayName 属性,
function logProps(Component) { class LogProps extends React.Component { // ... } function forwardRef(props, ref) { return <LogProps {...props} forwardedRef={ref} />; } // Give this component a more helpful display name in DevTools. // e.g. "ForwardRef(logProps(MyComponent))" const name = Component.displayName || Component.name; forwardRef.displayName = `logProps(${name})`; return React.forwardRef(forwardRef); }
-
当组件 props 默认为 true 时?
如果不传递 prop 的值,则默认为 true。此行为可用,以便它与 HTML 的行为匹配。
例如,下面的表达式是等效的,
<MyInput autocomplete /> <MyInput autocomplete={true} />
注意:不建议使用这种方法,因为它可能会与 ES6 对象简写(例如,它是
{name}{name: name})
-
NextJS是什么,它的主要特点是什么?
Next.js是一个流行的轻量级框架,用于使用React构建的静态和服务器渲染应用程序。它还提供样式和布线解决方案。以下是NextJS提供的主要功能,
- 默认呈现的服务器
- 自动代码拆分,加快页面加载速度
- 简单的客户端路由(基于页面)
- 基于 Webpack 的开发环境,支持 (HMR)
- 能够使用 Express 或任何其他 Node.js HTTP 服务器实现
- 可使用你自己的 Babel 和 Webpack 配置进行定制
-
如何将事件处理程序传递给组件?
你可以将事件处理程序和其他函数作为 prop 传递给子组件。它可以在子组件中使用,如下所示,
<button onClick="{this.handleClick}"></button>
-
在渲染方法中使用箭头函数好吗?
是的,你可以使用。这通常是将参数传递给回调函数的最简单方法。但是你需要在使用它时优化性能。
class Foo extends Component { handleClick() { console.log("Click happened"); } render() { return <button onClick={() => this.handleClick()}>Click Me</button>; } }
注意:在 render 方法中使用箭头函数会在每次组件渲染时创建一个新函数,这可能会影响性能
-
如何防止一个函数被多次调用?
如果你使用 onClick 或 onScroll 等事件处理程序,并且希望防止回调触发速度过快,则可以限制回调的执行速率。这可以通过以下可能的方式实现,
- 节流:基于时间的频率的变化。例如,它可以使用 _.throttle lodash 函数
- 去抖动:在一段时间不活动后发布更改。例如,它可以使用 _.debounce lodash 函数
- RequestAnimation帧限制:基于 requestAnimationFrame 的更改。例如,它可以使用 raf-schd lodash 函数
-
JSX 如何防止注入攻击?
React DOM 在渲染 JSX 中嵌入的任何值之前对其进行转义。因此,它确保你永远无法注入任何未显式写入应用程序的内容。在呈现之前,所有内容都会转换为字符串。
例如,你可以嵌入用户输入,如下所示:
const name = response.potentiallyMaliciousInput; const element = <h1>{name}</h1>;
这样,你可以防止应用程序中的 XSS(跨站点脚本)攻击。
-
如何更新渲染元素?
你可以通过将新创建的元素传递给 ReactDOM 的 render 方法来更新 UI(由 render 元素表示)。
例如,让我们以滴答作响的时钟为例,它通过多次调用 render 方法来更新时间,
function tick() { const element = ( <div> <h1>Hello, world!</h1> <h2>It is {new Date().toLocaleTimeString()}.</h2> </div> ); ReactDOM.render(element, document.getElementById("root")); } setInterval(tick, 1000);
-
你怎么说道具是只读的?
当你将组件声明为函数或类时,它绝不能修改自己的 props。
让我们取一个下面的大写函数,
function capital(amount, interest) { return amount + interest; }
上面的函数被称为“纯”,因为它不会尝试更改它们的输入,并且总是为相同的输入返回相同的结果。因此,React 有一条规则,即“所有 React 组件在它们的道具方面都必须像纯函数一样运行。
-
你怎么说状态更新是合并的?
当你在组件中调用 setState() 时,React 会将你提供的对象合并到当前状态中。
例如,让我们以一个 facebook 用户为例,将帖子和评论详细信息作为状态变量,
constructor(props) { super(props); this.state = { posts: [], comments: [] }; }
现在,你可以通过单独的调用独立更新它们,如下所示,
setState()
componentDidMount() { fetchPosts().then(response => { this.setState({ posts: response.posts }); }); fetchComments().then(response => { this.setState({ comments: response.comments }); }); }
如上面的代码片段所述,仅更新注释变量,而不修改或替换变量。
this.setState({comments})posts
-
如何将参数传递给事件处理程序?
在迭代或循环期间,通常会将额外的参数传递给事件处理程序。这可以通过箭头函数或绑定方法实现。
让我们以网格中更新的用户详细信息为例,
<button onClick={(e) => this.updateUser(userId, e)}>Update User details</button> <button onClick={this.updateUser.bind(this, userId)}>Update User details</button>
在这两种方法中,综合参数都作为第二个参数传递。你需要为箭头函数显式传递它,它将自动传递给方法。
e
bind
-
如何防止组件渲染?
你可以通过根据特定条件返回 null 来防止组件呈现。这样它就可以有条件地渲染组件。
function Greeting(props) { if (!props.loggedIn) { return null; } return <div className="greeting">welcome, {props.name}</div>; }
class User extends React.Component { constructor(props) { super(props); this.state = {loggedIn: false, name: 'John'}; } render() { return ( <div> //Prevent component render if it is not loggedIn <Greeting loggedIn={this.state.loggedIn} /> <UserDetails name={this.state.name}> </div> ); }
在上面的示例中,组件通过应用条件并返回 null 值来跳过其渲染部分。
greeting
-
安全使用索引作为密钥的条件是什么?
有三个条件可以确保,使用索引作为键是安全的。
- 列表和项目是静态的 - 它们不会计算,也不会更改
- 列表中的项目没有 ID
- 该列表永远不会重新排序或筛选。
-
密钥是否应该全局唯一?
数组中使用的键在其同级中应该是唯一的,但它们不需要是全局唯一的。即,你可以将相同的键用于两个不同的数组。
例如,下面的组件使用两个具有不同数组的数组,
Book
function Book(props) { const index = ( <ul> {props.pages.map((page) => ( <li key={page.id}>{page.title}</li> ))} </ul> ); const content = props.pages.map((page) => ( <div key={page.id}> <h3>{page.title}</h3> <p>{page.content}</p> <p>{page.pageNumber}</p> </div> )); return ( <div> {index} <hr /> {content} </div> ); }
-
表单处理的热门选择是什么?
Formik
是 React 的表单库,提供验证、跟踪访问字段和处理表单提交等解决方案。具体来说,你可以将它们分类如下:
- 获取值进入和退出窗体状态
- 验证和错误消息
- 处理表格提交
它用于创建一个可扩展的、高性能的、表单帮助程序,只需一个最小的 API 来解决烦人的问题。
-
formik 与 redux 表单库相比有哪些优势?
以下是推荐 formik 而不是 redux 表单库的主要原因,
- 表单状态本质上是短期的和局部的,因此没有必要在 Redux(或任何类型的 Flux 库)中跟踪它。
- Redux-Form 在每次击键时多次调用你的整个顶级 Redux reducer。这样,它会增加大型应用的输入延迟。
- Redux-Form 的压缩速度为 22.5 kB,而 Formik 为 12.7 kB
-
为什么不需要使用继承?
在 React 中,建议使用组合而不是继承来重用组件之间的代码。道具和合成都为你提供了明确且安全地自定义组件外观和行为所需的所有灵活性。 然而,如果你想在组件之间重用非 UI 功能,建议将其提取到单独的 JavaScript 模块中。后续组件导入它并使用该函数、对象或类,而不扩展它。
-
我可以在 react 应用程序中使用 Web 组件吗?
是的,你可以在 react 应用程序中使用 Web 组件。尽管许多开发人员不会使用此组合,但可能需要使用使用 Web 组件编写的第三方 UI 组件。
例如,让我们使用日期选择器 Web 组件,如下所示,
Vaadin
import React, { Component } from "react"; import "./App.css"; import "@vaadin/vaadin-date-picker"; class App extends Component { render() { return ( <div className="App"> <vaadin-date-picker label="When were you born?"></vaadin-date-picker> </div> ); } } export default App;
-
什么是动态导入?
你可以使用动态导入在应用中实现代码拆分。
让我们举一个加法的例子,
- 正常导入
import { add } from "./math"; console.log(add(10, 20));
- 动态导入
import("./math").then((math) => { console.log(math.add(10, 20)); });
-
什么是可加载组件?
如果要在服务器渲染的应用程序中进行代码拆分,建议使用可加载组件,因为 React.lazy 和 Suspense 尚不可用于服务器端渲染。Loadable 允许你将动态导入呈现为常规组件。
让我们举个例子,
import loadable from "@loadable/component"; const OtherComponent = loadable(() => import("./OtherComponent")); function MyComponent() { return ( <div> <OtherComponent /> </div> ); }
现在 OtherComponent 将加载到一个单独的捆绑包中
-
什么是悬念成分?
如果包含动态导入的模块在父组件呈现时尚未加载,则必须在使用加载指示器等待加载时显示一些回退内容。这可以使用悬念组件来完成。
例如,下面的代码使用了悬念组件,
const OtherComponent = React.lazy(() => import("./OtherComponent")); function MyComponent() { return ( <div> <Suspense fallback={<div>Loading...</div>}> <OtherComponent /> </Suspense> </div> ); }
如上面的代码所述,Suspense 被包装在惰性组件之上。
-
什么是基于路由的代码拆分?
进行代码拆分的最佳位置之一是使用路由。整个页面将立即重新呈现,因此用户不太可能同时与页面中的其他元素进行交互。因此,用户体验不会受到干扰。
让我们以基于路由的网站为例,使用像 React Router 和 React.lazy 这样的库,
import { BrowserRouter as Router, Route, Switch } from "react-router-dom"; import React, { Suspense, lazy } from "react"; const Home = lazy(() => import("./routes/Home")); const About = lazy(() => import("./routes/About")); const App = () => ( <Router> <Suspense fallback={<div>Loading...</div>}> <Switch> <Route exact path="/" component={Home} /> <Route path="/about" component={About} /> </Switch> </Suspense> </Router> );
在上面的代码中,代码拆分将发生在每个路由级别。
-
举个例子 如何使用上下文?
Context 旨在共享 React 组件树的全局数据。
例如,在下面的代码中,让我们手动线程遍历一个“主题”属性,以便设置 Button 组件的样式。
//Lets create a context with a default theme value "luna" const ThemeContext = React.createContext("luna"); // Create App component where it uses provider to pass theme value in the tree class App extends React.Component { render() { return ( <ThemeContext.Provider value="nova"> <Toolbar /> </ThemeContext.Provider> ); } } // A middle component where you don't need to pass theme prop anymore function Toolbar(props) { return ( <div> <ThemedButton /> </div> ); } // Lets read theme value in the button component to use class ThemedButton extends React.Component { static contextType = ThemeContext; render() { return <Button theme={this.context} />; } }
-
默认值在上下文中的目的是什么?
仅当组件在树中上方没有匹配的 Provider 时,才使用 defaultValue 参数。这有助于在不包装组件的情况下单独测试组件。
下面的代码片段提供了默认的主题值 Luna。
const MyContext = React.createContext(defaultValue);
-
如何使用 contextType?
ContextType 用于使用 context 对象。contextType 属性可以通过两种方式使用:
-
contextType 作为类的属性:类的 contextType 属性可以分配给由 React.createContext() 创建的 Context 对象。之后,你可以在任何生命周期方法和 render 函数中使用 this.context 使用该 Context 类型的最接近的当前值。
让我们在 MyClass 上分配 contextType 属性,如下所示,
class MyClass extends React.Component { componentDidMount() { let value = this.context; /* perform a side-effect at mount using the value of MyContext */ } componentDidUpdate() { let value = this.context; /* ... */ } componentWillUnmount() { let value = this.context; /* ... */ } render() { let value = this.context; /* render something based on the value of MyContext */ } } MyClass.contextType = MyContext;
-
静态字段你可以使用静态类字段通过公共类字段语法初始化 contextType。
class MyClass extends React.Component { static contextType = MyContext; render() { let value = this.context; /* render something based on the value */ } }
-
-
什么是消费者?
Consumer 是一个订阅上下文更改的 React 组件。它需要一个函数作为子函数,该函数接收当前上下文值作为参数并返回一个 react 节点。传递给函数的 value 参数将等于树中此上下文的最接近 Provider 的 value prop。
让我们举一个简单的例子,
<MyContext.Consumer> {value => /* render something based on the context value */} </MyContext.Consumer>
-
如何在使用上下文时解决性能极端情况?
上下文使用引用标识来确定何时重新呈现,当提供程序的父级重新呈现时,存在一些陷阱可能会在使用者中触发无意的呈现。
例如,下面的代码将在每次 Provider 重新呈现时重新呈现所有使用者,因为始终会为值创建一个新对象。
class App extends React.Component { render() { return ( <Provider value={{ something: "something" }}> <Toolbar /> </Provider> ); } }
这可以通过将值提升到父状态来解决,
class App extends React.Component { constructor(props) { super(props); this.state = { value: { something: "something" }, }; } render() { return ( <Provider value={this.state.value}> <Toolbar /> </Provider> ); } }
-
HOC 中正向引用的目的是什么?
Refs 不会被传递,因为 ref 不是道具。React 的处理方式与 key 不同。如果将 ref 添加到 HOC,则 ref 将引用最外层的容器组件,而不是包装的组件。在这种情况下,你可以使用 Forward Ref API。例如,我们可以使用 React.forwardRef API 显式将 refs 转发到内部 FancyButton 组件。
下面的HOC记录了所有道具,
function logProps(Component) { class LogProps extends React.Component { componentDidUpdate(prevProps) { console.log("old props:", prevProps); console.log("new props:", this.props); } render() { const { forwardedRef, ...rest } = this.props; // Assign the custom prop "forwardedRef" as a ref return <Component ref={forwardedRef} {...rest} />; } } return React.forwardRef((props, ref) => { return <LogProps {...props} forwardedRef={ref} />; }); }
让我们使用这个 HOC 来记录传递给我们的“花哨按钮”组件的所有道具,
class FancyButton extends React.Component { focus() { // ... } // ... } export default logProps(FancyButton);
现在让我们创建一个 ref 并将其传递给 FancyButton 组件。在这种情况下,你可以将焦点设置为按钮元素。
import FancyButton from "./FancyButton"; const ref = React.createRef(); ref.current.focus(); <FancyButton label="Click Me" handleClick={handleClick} ref={ref} />;
-
ref 参数是否可用于所有函数或类组件?
常规函数或类组件不接收 ref 参数,ref 在 props 中也不可用。第二个 ref 参数仅在使用 React.forwardRef 调用定义组件时存在。
-
为什么在使用正向引用时需要额外注意组件库?
当你开始在组件库中使用 forwardRef 时,你应该将其视为重大更改,并发布库的新主要版本。这是因为你的库可能具有不同的行为,例如将 refs 分配给哪些类型以及导出哪些类型。这些更改可能会破坏依赖于旧行为的应用和其他库。
-
如何在没有 ES6 的情况下创建 react 类组件?
如果你不使用 ES6,那么你可能需要改用 create-react-class 模块。对于默认 props,你需要将 getDefaultProps() 定义为传递对象上的函数。而对于初始状态,你必须提供一个单独的 getInitialState 方法来返回初始状态。
var Greeting = createReactClass({ getDefaultProps: function () { return { name: "Jhohn", }; }, getInitialState: function () { return { message: this.props.message }; }, handleClick: function () { console.log(this.state.message); }, render: function () { return <h1>Hello, {this.props.name}</h1>; }, });
注意:如果使用 createReactClass,则自动绑定可用于所有方法。即,你不需要将 with 用于事件处理程序的构造函数。
.bind(this)
-
是否可以在没有 JSX 的情况下使用 react?
是的,JSX 对于使用 React 不是强制性的。实际上,当你不想在构建环境中设置编译时,这很方便。每个 JSX 元素都只是用于调用的语法糖。
React.createElement(component, props, ...children)
例如,让我们以 JSX 为例,
class Greeting extends React.Component { render() { return <div>Hello {this.props.message}</div>; } } ReactDOM.render( <Greeting message="World" />, document.getElementById("root") );
你可以在没有 JSX 的情况下编写相同的代码,如下所示,
class Greeting extends React.Component { render() { return React.createElement("div", null, `Hello ${this.props.message}`); } } ReactDOM.render( React.createElement(Greeting, { message: "World" }, null), document.getElementById("root") );
-
什么是差分算法?
React 需要使用算法来找出如何有效地更新 UI 以匹配最新的树。差异算法是生成将一棵树转换为另一棵树的最少数量的操作。然而,这些算法的复杂度约为 O(n³),其中 n 是树中的元素数。
在这种情况下,显示 1000 个元素将需要 10 亿次比较。这太贵了。相反,React 基于两个假设实现了启发式 O(n) 算法:
- 两种不同类型的元素将产生不同的树。
- 开发人员可以使用关键道具提示哪些子元素在不同的渲染中可能稳定。
-
差异算法涵盖哪些规则?
当比较两棵树时,React 首先比较两个根元素。根据根元素的类型,行为会有所不同。它涵盖了对账算法期间的以下规则,
-
不同类型的元素:每当根元素具有不同的类型时,React 就会拆除旧树并从头开始构建新树。例如,元素 to
对不同类型的人进行全面重建。或 from
-
相同类型的 DOM 元素:在比较两个相同类型的 React DOM 元素时,React 会查看两者的属性,保持相同的底层 DOM 节点,并且只更新更改后的属性。让我们举一个具有相同 DOM 元素的例子,除了 className 属性,
<div className="show" title="ReactJS" /> <div className="hide" title="ReactJS" />
-
相同类型的组件元素:当组件更新时,实例将保持不变,因此在渲染过程中保持状态。React 更新底层组件实例的 props 以匹配新元素,并在底层实例上调用 componentWillReceiveProps() 和 componentWillUpdate()。之后,调用 render() 方法,diff 算法在上一个结果和新结果上递归。
-
递归子节点:当递归 DOM 节点的子节点时,React 只是同时遍历两个子列表,并在存在差异时生成突变。例如,在子树的末尾添加元素时,在这两个树之间转换效果很好。
<ul> <li>first</li> <li>second</li> </ul> <ul> <li>first</li> <li>second</li> <li>third</li> </ul>
-
处理键:React 支持一个 key 属性。当子项有键时,React 使用键将原始树中的孩子与后续树中的孩子进行匹配。例如,添加一个键可以使树转换高效,
<ul> <li key="2015">Duke</li> <li key="2016">Villanova</li> </ul> <ul> <li key="2014">Connecticut</li> <li key="2015">Duke</li> <li key="2016">Villanova</li> </ul>
-
-
什么时候需要使用 refs?
refs 的用例很少,
- 管理焦点、文本选择或媒体播放。
- 触发命令式动画。
- 与第三方 DOM 库集成。
-
prop 必须命名为 render props 的 render 吗?
即使名为 render props 的模式,你也不必使用名为 render 的 prop 即可使用此模式。也就是说,任何作为组件用来知道要渲染什么的函数的 prop 在技术上都是“渲染 prop”。让我们以渲染道具的 children 道具为例,
<Mouse children={(mouse) => ( <p> The mouse position is {mouse.x}, {mouse.y} </p> )} />
实际上,children prop 不需要在 JSX 元素的“属性”列表中命名。相反,你可以将其直接保存在元素中,
<Mouse> {(mouse) => ( <p> The mouse position is {mouse.x}, {mouse.y} </p> )} </Mouse>
在使用上述技术(不带任何名称)时,明确指出 children 应该是 propTypes 中的函数。
Mouse.propTypes = { children: PropTypes.func.isRequired, };
-
使用纯组件的渲染道具存在哪些问题?
如果在 render 方法中创建一个函数,则否定了纯组件的目的。因为对于新道具,浅层道具比较将始终返回 false,并且在这种情况下,每次渲染都会为渲染道具生成一个新值。你可以通过将 render 函数定义为实例方法来解决此问题。
-
如何使用渲染道具创建 HOC?
你可以使用带有渲染道具的常规组件来实现大多数高阶组件 (HOC)。例如,如果你希望拥有 withMouse HOC 而不是组件,则可以使用带有渲染道具的常规轻松创建一个。
function withMouse(Component) { return class extends React.Component { render() { return ( <Mouse render={(mouse) => <Component {...this.props} mouse={mouse} />} /> ); } }; }
通过这种方式,渲染道具提供了使用任一模式的灵活性。
-
什么是窗口化技术?
窗口化是一种在任何给定时间仅呈现一小部分行的技术,并且可以显着减少重新渲染组件所需的时间以及创建的 DOM 节点数量。如果应用程序呈现一长串数据,则建议使用此方法。react-window 和 react-virtualized 都是流行的窗口库,它提供了几个可重用的组件来显示列表、网格和表格数据。
-
如何在 JSX 中打印虚假值?
false、null、undefined 和 true 等虚假值是有效的子值,但它们不呈现任何内容。如果你仍想显示它们,则需要将其转换为字符串。让我们举一个如何转换为字符串的例子,
<div>My JavaScript variable is {String(myVariable)}.</div>
-
门户的典型用例是什么?
当父组件溢出时,React 门户非常有用:隐藏或具有影响堆叠上下文的属性(例如 z-index、position、opacity),并且你需要直观地“突破”其容器。
例如,对话框、全局消息通知、悬停卡和工具提示。
-
如何为不受控制的组件设置默认值?
在 React 中,表单元素的 value 属性将覆盖 DOM 中的值。对于不受控制的组件,你可能希望 React 指定初始值,但让后续更新不受控制。若要处理这种情况,可以指定 defaultValue 属性而不是 value。
render() { return ( <form onSubmit={this.handleSubmit}> <label> User Name: <input defaultValue="John" type="text" ref={this.input} /> </label> <input type="submit" value="Submit" /> </form> ); }
这同样适用于和输入。但是你需要使用 defaultChecked for 和 inputs。
select
textArea
checkbox
radio
-
你最喜欢的 React 堆栈是什么?
尽管技术堆栈因开发人员而异,但最流行的堆栈用于 react 样板项目代码。它主要使用 Redux 和 redux-saga 进行状态管理和异步副作用,使用 react-router 进行路由,styled-components 用于设置 react 组件的样式,使用 axios 调用 REST api,以及其他支持的堆栈,如 webpack、reselect、ESNext、Babel。 你可以克隆项目 https://github.com/react-boilerplate/react-boilerplate 并开始处理任何新的 react 项目。
-
Real DOM 和 Virtual DOM 有什么区别?
以下是 Real DOM 和 Virtual DOM 之间的主要区别,
真正的DOM 虚拟DOM 更新速度很慢 更新速度很快 DOM 操作非常昂贵。 DOM操作非常简单 你可以直接更新 HTML。 你无法直接更新 HTML 它会导致过多的内存浪费 没有内存浪费 如果元素更新,则创建新的 DOM 如果元素更新,它会更新 JSX
-
如何将 Bootstrap 添加到 react 应用程序?
Bootstrap 可以通过三种可能的方式添加到你的 React 应用中,
- 使用 Bootstrap CDN: 这是添加引导程序的最简单方法。在 head 标签中添加 bootstrap CSS 和 JS 资源。
- Bootstrap 作为依赖项:
如果你使用的是构建工具或模块打包器(如 Webpack),那么这是将 Bootstrap 添加到 React 应用程序的首选选项
npm install bootstrap
- React Bootstrap 包:
在这种情况下,你可以将 Bootstrap 添加到我们的 React 应用程序中,方法是使用一个重新构建了 Bootstrap 组件的包,特别是作为 React 组件工作。以下软件包在此类别中很受欢迎,
- React 引导程序
- React 带
-
你能列出使用 react 作为前端框架的顶级网站或应用程序吗?
下面是使用 React 作为他们的前端框架,
top 10 websites
- 脸书
- 优步
- Instagram的
- WhatsApp的
- 可汗学院
- Airbnb
- Dropbox的
- 翻板
- Netflix公司
- PayPal
-
是否建议在 React 中使用 CSS In JS 技术?
React 对如何定义样式没有任何意见,但如果你是初学者,那么好的起点是像往常一样在单独的 *.css 文件中定义你的样式,并使用 className 引用它们。此功能不是 React 的一部分,而是来自第三方库。但是如果你想尝试不同的方法(CSS-In-JS),那么styled-components库是一个不错的选择。
-
我需要用钩子重写我所有的类组件吗?
不。但是你可以在一些组件(或新组件)中尝试 Hooks,而无需重写任何现有代码。因为没有计划在 ReactJS 中删除类。
-
如何使用 React Hooks 获取数据?
调用的效果钩子可用于从 API 获取数据,并使用 useState 钩子的 update 函数将数据设置为组件的本地状态。
useEffect
下面是一个使用 fetch 从 API 获取 react 文章列表的示例。
import React from "react"; function App() { const [data, setData] = React.useState({ hits: [] }); React.useEffect(() => { fetch("http://hn.algolia.com/api/v1/search?query=react") .then(response => response.json()) .then(data => setData(data)) }, []); return ( <ul> {data.hits.map((item) => ( <li key={item.objectID}> <a href={item.url}>{item.title}</a> </li> ))} </ul> ); } export default App;
简化此操作的一种流行方法是使用库公理。
我们提供了一个空数组作为 useEffect 钩子的第二个参数,以避免在组件更新时激活它。这样,它只在组件挂载时获取。
-
Hooks 是否涵盖类的所有用例?
Hooks 并没有涵盖类的所有用例,但有计划很快添加它们。目前还没有与不常见的 getSnapshotBeforeUpdate 和 componentDidCatch 生命周期等效的 Hook 等效项。
-
钩子支持的稳定版本是什么?
React 在 16.8 版本中为以下软件包提供了 React Hooks 的稳定实现
- React DOM
- React DOM 服务器
- React 测试渲染器
- React 浅层渲染器
-
为什么我们在 ?
useState
当我们用 声明一个状态变量时,它会返回一对——一个包含两个项的数组。第一项是当前值,第二项是更新值的函数。使用 [0] 和 [1] 访问它们有点令人困惑,因为它们具有特定的含义。这就是我们改用数组解构的原因。
useState
例如,数组索引访问如下所示:
var userStateVariable = useState("userProfile"); // Returns an array pair var user = userStateVariable[0]; // Access first item var setUser = userStateVariable[1]; // Access second item
而使用数组解构,可以按如下方式访问变量:
const [user, setUser] = useState("userProfile");
-
引入钩子的来源是什么?
Hooks 从几个不同的来源获得了这些想法。以下是其中的一些,
- 以前在 react-future 存储库中对函数式 API 的实验
- 使用 render prop API(如 Reactions Component)进行社区实验
- DisplayScript 中的状态变量和状态单元格。
- Rx 中的订阅。
- ReasonReact 中的 Reducer 组件。
-
如何访问 Web 组件的命令式 API?
Web 组件通常公开命令式 API 来实现其功能。如果你想访问 Web 组件的命令式 API,则需要使用 ref 直接与 DOM 节点交互。但是,如果你使用的是第三方 Web 组件,最好的解决方案是编写一个充当 Web 组件包装器的 React 组件。
-
什么是formik?
Formik 是一个小型的 react 表单库,可以帮助你解决三个主要问题,
- 获取值进入和退出窗体状态
- 验证和错误消息
- 处理表格提交
-
在 Redux 中处理异步调用的典型中间件选择是什么?
在 Redux 生态系统中处理异步调用的一些常用中间件选择是 。Redux Thunk, Redux Promise, Redux Saga
-
浏览器能理解 JSX 代码吗?
不可以,浏览器无法理解 JSX 代码。你需要一个转译器来将你的 JSX 转换为浏览器可以理解的常规 Javascript。目前使用最广泛的转译器是 Babel。
-
描述一下 react 中的数据流?
React 使用 props 实现了单向 React 式数据流,减少了样板,并且比传统的双向数据绑定更容易理解。
-
什么是 react 脚本?
该包是 create-react-app 入门包中的一组脚本,可帮助你在不进行配置的情况下启动项目。该命令设置开发环境并启动服务器,以及热模块重新加载。react-scripts
react-scripts start
-
创建 react 应用程序有什么特点?
以下是 create react app 提供的一些功能列表。
- React、JSX、ES6、Typescript 和 Flow 语法支持。
- 自动前缀 CSS
- CSS 重置/规范化
- 实时开发服务器
- 一个快速的交互式单元测试运行程序,内置了对覆盖率报告的支持
- 一个构建脚本,用于捆绑 JS、CSS 和用于生产的图像,以及哈希和源映射
- 脱机优先服务辅助角色和 Web 应用清单,满足所有渐进式 Web 应用条件。
-
renderToNodeStream 方法的目的是什么?
该方法用于在服务器上生成 HTML,并在初始请求上向下发送标记,以加快页面加载速度。它还可以帮助搜索引擎轻松抓取你的页面以达到 SEO 目的。注意:请记住,此方法在浏览器中不可用,而仅在服务器中可用。ReactDOMServer#renderToNodeStream
-
什么是MobX?
MobX 是一种简单、可扩展且经过实战考验的状态管理解决方案,用于应用功能响应式编程 (TFRP)。对于 reactJs 应用程序,你需要安装以下软件包,npm install mobx --save npm install mobx-react --save
-
Redux 和 MobX 有什么区别?
以下是 Redux 和 MobX 之间的主要区别,
主题 Redux的 暴民 定义 它是一个用于管理应用程序状态的 javascript 库 它是一个用于被动管理应用程序状态的库 编程 它主要用 ES6 编写 它是用JavaScript(ES5)编写的 数据存储 只有一个大型存储用于数据存储 有多个存储存储 用法 主要用于大型和复杂的应用 用于简单的应用 性能 需要改进 提供更好的性能 它是如何存储的 使用 JS 对象存储 使用 observable 存储数据
-
我应该在学习 ReactJS 之前学习 ES6 吗?
不,你不必学习 es2015/es6 来学习 react。但是你可能会发现很多资源或 React 生态系统广泛使用 ES6。让我们来看看一些常用的 ES6 特性,
-
解构:获取道具并在组件中使用它们
// in es 5 var someData = this.props.someData; var dispatch = this.props.dispatch; // in es6 const { someData, dispatch } = this.props;
-
传播运算符:帮助将道具向下传递到组件中
// in es 5 <SomeComponent someData={this.props.someData} dispatch={this.props.dispatch} /> // in es6 <SomeComponent {...this.props} />
-
箭头函数:使语法紧凑
// es 5 var users = usersList.map(function (user) { return <li>{user.name}</li>; }); // es 6 const users = usersList.map((user) => <li>{user.name}</li>);
-
-
什么是并发渲染?
并发渲染通过渲染组件树而不阻塞主 UI 线程,使 React 应用程序的响应速度更快。它允许 React 中断长时间运行的渲染以处理高优先级事件。也就是说,当你启用并发模式时,React 会密切关注其他需要完成的任务,如果有更高优先级的任务,它会暂停当前渲染的内容,让另一个任务先完成。你可以通过两种方式启用此功能:
// 1. Part of an app by wrapping with ConcurrentMode <React.unstable_ConcurrentMode> <Something /> </React.unstable_ConcurrentMode>; // 2. Whole app using createRoot ReactDOM.unstable_createRoot(domNode).render(<App />);
-
异步模式和并发模式有什么区别?
两者都指的是同一件事。以前的并发模式被 React 团队称为“异步模式”。名称已更改,以突出 React 在不同优先级上执行工作的能力。因此,它避免了其他异步渲染方法的混淆。
-
我可以在 react16.9 中使用 javascript url 吗?
是的,你可以使用 javascript: URL,但它会在控制台中记录警告。因为以 javascript: 开头的 URL 很危险,因为它在标签中包含未经清理的输出,例如并创建一个安全漏洞。
<a href>
const companyProfile = { website: "javascript: alert('Your website is hacked')", }; // It will log a warning <a href={companyProfile.website}>More details</a>;
请记住,未来的版本将为 javascript URL 抛出错误。
-
钩子的 eslint 插件的目的是什么?
ESLint 插件强制执行 Hooks 规则以避免错误。它假定任何以“use”开头的函数和紧跟其后的大写字母都是 Hook。具体而言,该规则强制执行:
- 对 Hook 的调用要么位于 PascalCase 函数(假设为组件)内部,要么位于另一个 useSomething 函数(假设为自定义 Hook)中。
- 钩子在每次渲染时都以相同的顺序调用。
-
React 中的命令式和声明式有什么区别?
想象一个简单的 UI 组件,例如“喜欢”按钮。当你点击它时,如果它以前是灰色的,它会变成蓝色,如果以前是蓝色,它会变成灰色。
这样做的当务之急是:
if (user.likes()) { if (hasBlue()) { removeBlue(); addGrey(); } else { removeGrey(); addBlue(); } }
基本上来说,你需要检查屏幕上当前的内容,并处理所有必要的更改,用当前状态重新绘制它,包括撤消之前状态的更改。你可以想象这在现实世界的场景中有多复杂。
相比之下,声明性方法是:
if (this.state.liked) { return <blueLike />; } else { return <greyLike />; }
由于声明式方法将关注点分开,因此这部分只需要处理 UI 在独立状态下的外观,因此更容易理解。
-
将 typescript 与 reactjs 一起使用有什么好处?
以下是在 Reactjs 中使用 typescript 的一些好处,
- 可以使用最新的 JavaScript 功能
- 使用接口进行复杂类型定义
- VS Code 等 IDE 是为 TypeScript 制作的
- 通过易读性和验证性避免错误
-
在使用 Context API 状态管理时,如何确保用户在页面刷新时保持身份验证?
当用户登录并重新加载时,为了保持状态,通常我们在主 App.js 的 useEffect 钩子中添加加载用户操作。使用 Redux 时,可以轻松访问 loadUser 操作。
应用.js
import { loadUser } from "../actions/auth";
store.dispatch(loadUser());- 但是,在使用上下文 API 时,要访问 App.js 中的上下文,请将 AuthState 包装在索引 .js 中,以便 App.js 可以访问身份验证上下文。现在,每当页面重新加载时,无论你在哪个路由上,用户都会被验证为每次重新呈现时都会触发 loadUser 操作。
索引 .js
import React from "react";
import ReactDOM from "react-dom";
import App from "./App";
import AuthState from "./context/auth/AuthState";
ReactDOM.render(
<React.StrictMode>
<AuthState>
<App />
</AuthState>
</React.StrictMode>,
document.getElementById("root")
);应用.js
const authContext = useContext(AuthContext);
const { loadUser } = authContext;
useEffect(() => {
loadUser();
}, []);加载用户
const loadUser = async () => {
const token = sessionStorage.getItem("token");
if (!token) {
dispatch({
type: ERROR,
});
}
setAuthToken(token);
try {
const res = await axios("/api/auth");
dispatch({
type: USER_LOADED,
payload: res.data.data,
});
} catch (err) {
console.error(err);
}
};-
新的 JSX 转换有什么好处?
新的 JSX 转换有三个主要好处,
- 可以在不导入 React 包的情况下使用 JSX
- 编译后的输出可能会少量地改进捆绑包大小
- 未来的改进提供了灵活性,可以减少学习 React 的概念数量。
-
新的 JSX 转换与旧的转换有何不同?
新的 JSX 转换不需要 React 在范围内。也就是说,对于简单的场景,你不需要导入 React 包。
让我们举个例子来看看新旧变换之间的主要区别,
旧转换:
import React from "react"; function App() { return <h1>Good morning!!</h1>; }
现在 JSX transform 将上面的代码转换为常规 JavaScript,如下所示,
import React from "react"; function App() { return React.createElement("h1", null, "Good morning!!"); }
新转换:
新的 JSX 转换不需要任何 React 导入
function App() { return <h1>Good morning!!</h1>; }
在后台,JSX 转换编译为以下代码
import { jsx as _jsx } from "react/jsx-runtime"; function App() { return _jsx("h1", { children: "Good morning!!" }); }
注意:你仍然需要导入 React 才能使用 Hooks。
-
如何使用 create-react-app 获得 redux 脚手架?
Redux 团队为 create-react-app 项目提供了官方的 redux+js 或 redux+typescript 模板。生成的项目设置包括:
- Redux Toolkit 和 React-Redux 依赖
- 创建和配置 Redux 存储
- React-Redux 将存储传递给 React 组件
<Provider>
- 小的“计数器”示例,演示如何添加 redux 逻辑和 React-Redux 钩子 API 以从组件与商店交互 以下命令需要与模板选项一起执行,如下所示,
- Javascript 模板:
npx create-react-app my-app --template redux
- 打字稿模板:
npx create-react-app my-app --template redux-typescript
-
什么是 React Server 组件?
React 服务器组件是一种编写 React 组件的方法,该组件在服务器端呈现,目的是提高 React 应用程序的性能。这些组件允许我们从后端加载组件。
注意:React Server Components 仍在开发中,不建议用于生产。
-
什么是螺旋钻井?
Prop Drilling 是一个过程,通过其他不需要数据但仅帮助传递数据的组件,将数据从 React 组件树的一个组件传递到另一个组件。
-
什么是状态突变以及如何预防它?
State mutation
当你尝试在不实际使用函数的情况下更新组件的状态时发生。当你尝试使用状态变量进行某些计算并在不知不觉中将结果保存在同一状态变量中时,可能会发生这种情况。这就是为什么建议使用 Object.assign({}, ...) 或 spread 语法从 reducer 返回状态变量的新实例的主要原因。setState
这可能会导致 UI 出现未知问题,因为状态变量的值在没有告诉 React 检查所有组件受到此更新影响的情况下进行了更新,这可能会导致 UI 错误。
前任:
class A extends React.component { constructor(props) { super(props); this.state = { loading: false } } componentDidMount() { let { loading } = this.state; loading = (() => true)(); // Trying to perform an operation and directly saving in a state variable }
如何预防:通过使用 Immutable.js 等插件强制执行不可变性,始终用于进行更新,并在发送更新的状态值时在 reducers 中返回新实例,确保你的状态变量是不可变的。
setState
-
useState 和 useRef 钩子有什么区别?
- useState 会导致组件在状态更新后重新呈现,而 useRef 不会在值或状态更改时导致组件重新呈现。 从本质上讲,useRef 就像一个“盒子”,可以在其 (.current) 属性中保存可变值。
- useState 允许我们更新组件内部的状态。而 useRef 允许引用 DOM 元素。
-
什么是包装组件?
React 中的包装器是包装或包围另一个组件或组件组的组件。它可用于多种用途,例如为包装的组件添加其他功能、样式或布局。
例如,考虑一个显示消息的简单组件:
const Message = ({ text }) => { return <p>{text}</p>; };
我们可以创建一个包装器组件,它将为消息组件添加边框:
const MessageWrapper = (props) => { return ( <div style={{ border: "1px solid black" }}> <Message {...props} /> </div> ); };
现在我们可以使用 MessageWrapper 组件而不是 Message 组件,消息将带有边框:
<MessageWrapper text="Hello World" />
包装组件也可以接受自己的 props 并将它们传递给包装组件,例如,我们可以创建一个包装组件,它将为消息组件添加一个标题:
const MessageWrapperWithTitle = ({title, ...props}) => { return ( <div> <h3>{title}</h3> <Message {...props} /> </div> ); };
现在我们可以使用 MessageWrapperWithTitle 组件并传递 title props:
<MessageWrapperWithTitle title="My Message" text="Hello World" />
这样,包装组件可以向包装组件添加额外的功能、样式或布局,同时保持包装组件的简单性和可重用性。
-
useEffect 和 useLayoutEffect 钩子有什么区别?
useEffect 和 useLayoutEffect 都是 React 钩子,可用于将组件与外部系统(例如浏览器 API 或第三方库)同步。但是,两者之间存在一些关键区别:
-
计时:useEffect 在浏览器完成绘制后运行,而 useLayoutEffect 在浏览器绘制之前同步运行。这意味着 useLayoutEffect 可用于以对用户来说更同步的方式测量和更新布局。
-
浏览器画图:useEffect 允许浏览器在运行效果之前绘制更改,因此可能会导致一些视觉闪烁。useLayoutEffect 在浏览器绘制之前同步运行效果,因此可以避免视觉闪烁。
-
执行顺序:多个useEffect钩子的执行顺序由React决定,可能无法预测。但是,执行多个 useLayoutEffect 挂钩的顺序由调用它们的顺序决定。
-
错误处理:useEffect 内置了处理效果执行过程中发生的错误的机制,使其不会使整个应用程序崩溃。useLayoutEffect 没有这种机制,在效果执行过程中发生的错误会使整个应用程序崩溃。
通常,建议尽可能使用 useEffect,因为它性能更高,更不容易出错。useLayoutEffect 应仅在需要测量或更新布局时使用,并且使用 useEffect 无法获得相同的结果。
-
-
函数组件和类组件之间有什么区别?
在 ReactJS 中创建组件有两种不同的方法。主要区别如下:
1. 语法:
类组件使用 ES6 类来创建组件。它使用函数在网页中显示 HTML 内容。
render
类组件的语法如下所示。
class App extends Reacts.Component { render(){ return <h1>This is a class component</h1>} }
注意:Pascal Case 是为组件提供命名的推荐方法。
多年来,功能组件得到了改进,增加了一些功能,如钩子。这是功能组件的语法。
function App(){ return <div className="App"> <h1>Hello, I'm a function component</h1> </div> }
2. 状态:
状态包含有关组件的信息或数据,这些信息或数据可能会随时间而变化。
在类组件中,你可以在用户与其交互或服务器使用该方法更新数据时更新状态。初始状态将使用对象在方法中分配,并且可以在对象中分配不同的数据类型,例如字符串、布尔值、数字等。 一个简单的例子,展示了我们如何使用 setState() 和 constructor()
setState()
Constructor( )
this.state
this.state
class App extends Component { constructor() { super(); this.state = { message: "This is a class component", }; } updateMessage() { this.setState({t message: "Updating the class component", }); } render() { return ( <> <h1>{this.state.message}</h1> <button onClick={() => { this.updateMessage(); }}> Click!! </button> </> ); } }
不要在功能组件中使用状态,因为它仅在类组件中受支持。但是多年来,钩子已经在功能组件中实现,这也可以在功能组件中使用状态。
钩子可用于在功能组件中实现状态。它返回一个包含两个项的数组:第一项是当前状态,下一项是更新当前状态值的函数 (setState)。
useState()
让我们看一个示例来演示功能组件中的状态,
function App() { const [message, setMessage] = useState("This is a functional component"); const updateMessage = () => { setMessage("Updating the functional component"); }; return ( <div className="App"> <h1>{message} </h1> <button onClick={updateMessage}>Click me!!</button> </div> ); }
4.道具:
道具被称为“属性”。道具被传递到react组件中,就像传递给函数的参数一样。换句话说,它们类似于 HTML 属性。
这些 props 可以在子类组件中使用,如下例所示,
this.props
class Child extends React.Component { render() { return <h1> This is a functional component and component name is {this.props.name} </h1>; } } class Parent extends React.Component { render() { return ( <div className="Parent"> <Child name="First child component" /> <Child name="Second child component" /> </div> ); } }
功能组件中的 props 与类组件中的 props 相似,但区别在于没有 'this' 关键字。
function Child(props) { return <h1>This is a child component and the component name is{props.name}</h1>; } function Parent() { return ( <div className="Parent"> <Child name="First child component" /> <Child name="Second child component" /> </div> ); }
-
React 中的严格模式是什么?
`React.StrictMode` is a useful component for highlighting potential problems in an application. Just like `<Fragment>`, `<StrictMode>` does not render any extra DOM elements. It activates additional checks and warnings for its descendants. These checks apply for _development mode_ only.
```jsx harmony
import React from "react";
function ExampleApplication() {
return (
<div>
<Header />
<React.StrictMode>
<div>
<ComponentOne />
<ComponentTwo />
</div>
</React.StrictMode>
<Header />
</div>
);
}
```
In the example above, the _strict mode_ checks apply to `<ComponentOne>` and `<ComponentTwo>` components only. i.e., Part of the application only.
**[⬆ Back to Top](#table-of-contents)**
-
严格模式有什么好处?
在以下情况下会有所帮助,
-
每当组件
-
使用不安全的生命周期方法识别组件。
-
有关旧版字符串引用 API 用法的警告。
-
检测意想不到的副作用。
-
检测旧版上下文 API。
-
有关已弃用的 findDOMNode 用法的警告
-
-
为什么严格模式在 React 中渲染两次?
StrictMode 在开发模式(非生产模式)中渲染组件两次,以检测代码的任何问题并警告你这些问题。这用于检测渲染阶段的意外副作用。如果你使用了开发工具,则默认情况下它会自动启用 StrictMode。
create-react-app
ReactDOM.render( <React.StrictMode> {App} </React.StrictMode>, document.getElementById('root') );
如果要禁用此行为,则可以删除模式。
strict
ReactDOM.render( {App}, document.getElementById('root') );
为了检测副作用,以下函数被调用两次:
- 类组件构造函数、render 和 shouldComponentUpdate 方法
- 类组件静态 getDerivedStateFromProps 方法
- 功能组件体
- 状态更新程序函数
- 传递给 useState、useMemo 或 useReducer(任何 Hook)的函数
免責聲明
此存储库中提供的问题汇总了众多公司的常见问题。我们不能保证这些问题会在你的面试过程中被问到,你也不应该专注于记住所有问题。主要目的是让你了解某些公司可能会问的问题——如果你不知道所有这些问题的答案,请不要气馁——没关系!
祝你的面试😊好运
