discoart - 在一行中创建迪斯科扩散艺术品

在一行中创建引人注目的迪斯科扩散艺术品


DiscoArt是为生成艺术家,AI爱好者和铁杆开发人员创建引人注目的Disco Diffusion[*]艺术品的优雅方式。DiscoArt拥有现代专业的API,具有漂亮的代码库,可确保高可用性和可维护性。它引入了方便的功能,例如结果恢复和持久性,gRPC / HTTP服务,没有TLS,后期分析,简化了与更大的跨模态或多模态应用程序的集成。
[*]Disco Diffusion是一款Google Colab笔记本,它利用CLIP引导的扩散功能,允许人们从文本提示中创建引人注目且美丽的图像。
create()
python -m discoart serve
带提示的图库
你在每条推文中看到了吗?要获取配置和提示,只需:
discoart-id
from discoart import show_config

show_config('discoart-id')
安装
Python 3.7+和支持CUDA的PyTorch是必需的。
pip install discoart这适用于自托管,Google Colab,系统集成,非GUI环境。
- 自托管 Jupyter:要在你自己的 GPU 机器上运行 Jupyter Notebook,最简单的方法是使用我们预构建的 Docker 映像。
-
从CLI使用它:
python -m discoart创建并且是CLI命令。python -m discoart config
-
将其用作服务:
python -m discoart serve允许将其作为gRPC / HTTP / websockets服务运行。
图形用户界面
DiscoArt是创建Disco Diffusion艺术品的基础设施。内置的Jupyter Notebook支持为你提供基本但有限的用户体验,例如,它不提供任何直观的GUI用于提示计划。请注意,DiscoArt以开发人员为中心,以API为先,因此改善面向消费者的体验超出了范围。有些服务,平台和产品(不是Jina AI附属公司)已经将DiscoArt集成为一项服务,并在其上提供漂亮的GUI,例如Fever Dreams,Replicate,RunPod和Renderflux。
点击查看第三方 GUI
- Fever Dreams:一个免费的社区服务,具有漂亮的GUI和画廊,人们可以在其中生成和共享他们的DiscoArt艺术品,提示和配置。
- 复制:DiscoArt基于自由形式的GUI,具有沙盒用户体验和可视化效果。
- RunPod:一个付费的GPU云提供商,运行DiscoArt容器,具有简单干净的GUI,以可视化配置和创作。
- Renderflux:一个付费的创意艺术平台,包装DiscoArt并提供端到端的GUI用于创作管理。
请注意,这些平台、产品或公司不隶属于Jina AI。他们定义自己的服务条款,付费墙和数据以及隐私政策,这些不在DiscoArt MIT许可证的范围内。
立即开始
创建图稿
from discoart import create

da = create()就是这样!它将使用默认文本提示和参数进行创建。

设置提示和参数
此处列出了支持的参数。你可以在中指定它们:
create()
from discoart import create

da = create(
    text_prompts='A painting of sea cliffs in a tumultuous storm, Trending on ArtStation.',
    init_image='https://d2vyhzeko0lke5.cloudfront.net/2f4f6dfa5a05e078469ebe57e77b72f0.png',
    skip_steps=100,
)
如果你忘记了参数,请随时查找备忘单:
from discoart import cheatsheet

cheatsheet()这里解释了DiscoArt和DD5.6之间参数的差异。
可视化结果
最终结果和中间结果在当前工作目录下创建,即
./{name-docarray}/{i}-done.png
./{name-docarray}/{i}-step-{j}.png
./{name-docarray}/{i}-progress.png
./{name-docarray}/{i}-progress.gif
./{name-docarray}/da.protobuf.lz4
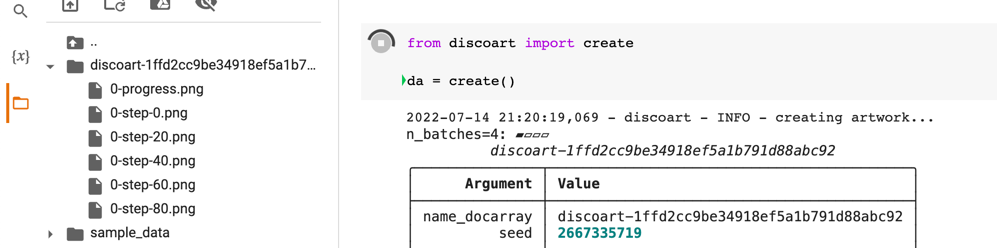
where:

-
name-docarray
is the name of the run, you can specify it otherwise it is a random name. -
i-*
is up to the value ofn_batches
. -
*-done-*
is the final image on done. -
*-step-*
is the intermediate image at certain step, updated in real-time. -
*-progress.png
is the sprite image of all intermediate results so far, updated in real-time. -
*-progress.gif
is the animated gif of all intermediate results so far, updated in real-time. -
da.protobuf.lz4
is the compressed protobuf of all intermediate results so far, updated in real-time.
The save frequency is controlled by
save_rate.
Moreover,
create()returns
da, a DocumentArray-type object. It contains the following information:
- All arguments passed to
create()
function, including seed, text prompts and model parameters. - 4 generated image and its intermediate steps' images, where
4
is determined byn_batches
and is the default value.
This allows you to further post-process, analyze, export the results with powerful DocArray API.
Images are stored as Data URI in
.uri, to save the first image as a local file:
da[0].save_uri_to_file('discoart-result.png')To save all final images:
for idx, d in enumerate(da):
    d.save_uri_to_file(f'discoart-result-{idx}.png')
You can also display all four final images in a grid:
da.plot_image_sprites(skip_empty=True, show_index=True, keep_aspect_ratio=True)
Or display them one by one:
for d in da:
    d.display()
Or take one particular run:
da[0].display()
Visualize intermediate steps
You can also zoom into a run (say the first run) and check out intermediate steps:
da[0].chunks.plot_image_sprites(
    skip_empty=True, show_index=True, keep_aspect_ratio=True
)
You can
.display()the chunks one by one, or save one via
.save_uri_to_file(), or save all intermediate steps as a GIF:
da[0].chunks.save_gif(
    'lighthouse.gif', show_index=True, inline_display=True, size_ratio=0.5
)
Note that >=0.7.14, a 20FPS gif is generated which includes all intermedidate steps.
Show/save/load configs
To show the config of a Document/DocumentArray,
from discoart import show_config

show_config(da)  # show the config of the first run
show_config(da[3])  # show the config of the fourth run
show_config(
    'discoart-06030a0198843332edc554ffebfbf288'
)  # show the config of the run with a known DocArray ID
To save the config of a Document/DocumentArray,
from discoart import save_config

save_config(da, 'my.yml')  # save the config of the first run
save_config(da[3], 'my.yml')  # save the config of the fourth run
To run
createfrom a YAML config of Document/DocumentArray,
from discoart import create, load_config

config = load_config('my.yml')
create(**config)
You can also export the config as an SVG image:
from discoart.config import save_config_svg

save_config_svg(da)
One can also generate runnable Python code directly from the config:
from discoart.config import export_python

export_python(da)
Pull results anywhere anytime
If you are a free-tier Google Colab user, one annoy thing is the lost of sessions from time to time. Or sometimes you just early stop the run as the first image is not good enough, and a keyboard interrupt will prevent
.create()to return any result. Either case, you can easily recover the results by pulling the last session ID.
-
Find the session ID. It appears on top of the image.

-
Pull the result via that ID on any machine at any time, not necessarily on Google Colab:
from docarray import DocumentArray

da = DocumentArray.pull('discoart-3205998582')

Reuse a Document as initial state
Consider a Document as a self-contained data with config and image, one can use it as the initial state for the future run. Its
.tagswill be used as the initial parameters;
.uriif presented will be used as the initial image.
from discoart import create
from docarray import DocumentArray

da = DocumentArray.pull('discoart-3205998582')

create(
    init_document=da[0],
    cut_ic_pow=0.5,
    tv_scale=600,
    cut_overview='[12]*1000',
    cut_innercut='[12]*1000',
    use_secondary_model=False,
)
If you just want to initialize from a known DocArray ID, then simply:
from discoart import create

create(init_document='discoart-3205998582')
Environment variables
You can set environment variables to control the meta-behavior of DiscoArt. The environment variables must be set before importing DiscoArt, either in Bash or in Python via
os.environ.
DISCOART_LOG_LEVEL='DEBUG' # more verbose logs
DISCOART_OPTOUT_CLOUD_BACKUP='1' # opt-out from cloud backup
DISCOART_DISABLE_IPYTHON='1' # disable ipython dependency
DISCOART_DISABLE_RESULT_SUMMARY='1' # disable result summary after the run ends
DISCOART_DEFAULT_PARAMETERS_YAML='path/to/your-default.yml' # use a custom default parameters file
DISCOART_CUT_SCHEDULES_YAML='path/to/your-schedules.yml' # use a custom cut schedules file
DISCOART_MODELS_YAML='path/to/your-models.yml' # use a custom list of models file
DISCOART_OUTPUT_DIR='path/to/your-output-dir' # use a custom output directory for all images and results
DISCOART_CACHE_DIR='path/to/your-cache-dir' # use a custom cache directory for models and downloads
DISCOART_DISABLE_REMOTE_MODELS='1' # disable the listing of diffusion models on Github, remote diffusion models allows user to use latest models without updating the codebase.
DISCOART_REMOTE_MODELS_URL='https://yourdomain/models.yml' # use a custom remote URL for fetching models list
DISCOART_DISABLE_CHECK_MODEL_SHA='1' # disable checking local model SHA matches the remote model SHA
DISCOART_DISABLE_TQDM='1' # disable tqdm progress bar on diffusion
CLI
DiscoArt provides two commands
createand
configthat allows you to run DiscoArt from CLI.
python -m discoart create my.ymlwhich creates artworks from the YAML config file
my.yml. You can also do:
cat config.yml | python -m discoart createSo how can I have my own
my.ymland what does it look like? That's the second command:
python -m discoart config my.ymlwhich forks the default YAML config and export them to
my.yml. Now you can modify it and run it with
python -m discoart createcommand.
If no output path is specified, then
python -m discoart configwill print the default config to stdout.
To get help on a command, add
--helpat the end, e.g.:
python -m discoart create --helpusage: python -m discoart create [-h] [YAML_CONFIG_FILE]
positional arguments:
YAML_CONFIG_FILE The YAML config file to use, default is stdin.
optional arguments:
-h, --help show this help message and exit
Serving
Serving DiscoArt is super easy. Simply run the following command:
python -m discoart serve
You shall see:

Now send request to the server via curl/Javascript, e.g.
curl \
-X POST http://0.0.0.0:51001/post \
-H 'Content-Type: application/json' \
-d '{"execEndpoint":"/create", "parameters": {"text_prompts": ["A beautiful painting of a singular lighthouse", "yellow color scheme"]}}'
That's it.
You can of course pass all parameters that accepted by
create()
function in the JSON.
Polling intermediate results
We already know that
create
function is slow even on GPU it could take 10 minutes to finish an artwork. This means the after sending the above request, the client will have to wait 10 minutes for the response. There is nothing wrong with this behavior given that everything runs synchronously. However, in practice, client may expect a progress or intermediate results in the middle instead of waiting for the end.
/result
endpoint is designed for this purpose. It will return the intermediate results as soon as they are available. All you need is to specify name_docarray
in the request parameters as you specified in /create
endpoint. Here is an example:
Let's create
mydisco-123
by sending the following request to /create
endpoint:
curl \
-X POST http://0.0.0.0:51001/post \
-H 'Content-Type: application/json' \
-d '{"execEndpoint":"/create", "parameters": {"name_docarray": "mydisco-123", "text_prompts": ["A beautiful painting of a singular lighthouse", "yellow color scheme"]}}'
Now that the above request is being processed on the server, you can periodically check
mydisco-123
progress by sending the following request to /result
endpoint:
curl \
-X POST http://0.0.0.0:51001/post \
-H 'Content-Type: application/json' \
-d '{"execEndpoint":"/result", "parameters": {"name_docarray": "mydisco-123"}}'
A JSON will be returned with up-to-date progress, with image as DataURI, loss, steps etc. The JSON Schema of Document/DocumentArray is described here.
Note,
/result
won't be blocked by /create
thanks to the smart routing of Jina Gateway. To learn/play more about those endpoints, you can check ReDoc or the Swagger UI embedded in the server.
Skip & Cancel
Send to
/skip
, to skip the current run and move to the next run as defined in n_batches
:
curl \
-X POST http://0.0.0.0:51001/post \
-H 'Content-Type: application/json' \
-d '{"execEndpoint":"/skip"}'
Send to
/stop
, to stop the current run cancel all runs n_batches
:
curl \
-X POST http://0.0.0.0:51001/post \
-H 'Content-Type: application/json' \
-d '{"execEndpoint":"/stop"}'
Unblocking /create
request
It is possible to have an unblocked
/create
endpoint: the client request to /create
will be immediately returned, without waiting for the results to be finished. You now have to fully rely on /result
to poll the result.
To enable this feature:
- Copy-paste the default
flow.yml
file to myflow.yml
;
- Change
floating: false
to floating: true
under discoart
executor section;
- Run the following command:
python -m discoart serve myflow.yml
Beware that the request velocity is now under your control. That is, if the client sends 10
/create
requests in a second, then the server will start 10 create()
in parallel! This can easily lead to OOM. Hence, the suggestion is only enabling this feature if you are sure that the client is not sending too many requests, e.g. you control the client request rate; or you are using DiscoArt behind a BFF (backend for frontend).
Scaling out
If you have multiple GPUs and you want to run multiple DiscoArt instances in parallel by leveraging GPUs in a time-multiplexed fashion, you can copy-paste the default flow.yml
file and modify it as follows:
jtype: Flow
with:
protocol: http
monitoring: true
port: 51001
port_monitoring: 51002 # prometheus monitoring port
env:
JINA_LOG_LEVEL: debug
DISCOART_DISABLE_IPYTHON: 1
DISCOART_DISABLE_RESULT_SUMMARY: 1
executors:
- name: discoart
uses: DiscoArtExecutor
env:
CUDA_VISIBLE_DEVICES: RR0:3 # change this if you have multiple GPU
replicas: 3 # change this if you have larger VRAM
- name: poller
uses: ResultPoller
Here
replicas: 3
says spawning three DiscoArt instances, CUDA_VISIBLE_DEVICES: RR0:3
makes sure they use the first three GPUs in a round-robin fashion.
Name it as
myflow.yml
and then run
python -m discoart serve myflow.yml
Customization
Thanks to Jina, there are tons of things you can customize! You can change the port number; change protocol to gRPC/Websockets; add TLS encryption; enable/disable Prometheus monitoring; you can also export it to Kubernetes deployment bundle simply via:
jina export kubernetes myflow.yml
For more features and YAML configs, please check out Jina docs.
Use gRPC gateway
To switch from HTTP to gRPC gateway is simple:
jtype: Flow
with:
protocol: grpc
...
and then restart the server.
There are multiple advantages of using gRPC gateway:

- Much faster and smaller network overhead.
- Feature-rich, like compression, status monitoring, etc.
In general, if you are using the DiscoArt server behind a BFF (backend for frontend), or your DiscoArt server does not directly serve HTTP traffic from end-users, then you should use gRPC protocol.
To communicate with a gRPC DiscoArt server, one can use a Jina Client:
# !pip install jina
from jina import Client

c = Client(host='grpc://0.0.0.0:51001')

da = c.post(
    '/create',
    parameters={
        'name_docarray': 'mydisco-123',
        'text_prompts': [
            'A beautiful painting of a singular lighthouse',
            'yellow color scheme',
        ],
    },
)

# check intermediate results
da = c.post('/result', parameters={'name_docarray': 'mydisco-123'})
To use an existing Document/DocumentArray as init Document for
create:
from jina import Client

c = Client(host='grpc://0.0.0.0:51001')

old_da = create(...)

da = c.post(
    '/create',
    old_da,  # this can be a DocumentArray or a single Document
    parameters={
        'width_height': [1024, 768],
    },
)
This equals to run
create(init_document=old_da, width_height=[1024, 768])on the server. Note:
- follow-up parameters have higher priorities than the parameters in
init_document
. - if
init_document
is a DocumentArray, then the first Document in the array will be used as the init Document. - there is no need to do any serialization before sending, Jina automatically handles it.
Hosting on Google Colab
Though not recommended, it is also possible to use Google Colab to host DiscoArt server. Please check out the following tutorials:
Run in Docker

We provide a prebuilt Docker image for running DiscoArt out of the box. To update Docker image to latest version:
docker pull jinaai/discoart:latestUse Jupyter notebook
The default entrypoint is starting a Jupyter notebook
# docker build . -t jinaai/discoart  # if you want to build yourself
docker run -p 51000:8888 -v $(pwd):/home/jovyan/ -v $HOME/.cache:/root/.cache --gpus all jinaai/discoart
Now you can visit
http://127.0.0.1:51000to access the notebook
Use as a service
# docker build . -t jinaai/discoart  # if you want to build yourself
docker run --entrypoint "python" -p 51001:51001 -v $(pwd):/home/jovyan/ -v $HOME/.cache:/root/.cache --gpus all jinaai/discoart -m discoart serve
Your DiscoArt server is now running at
http://127.0.0.1:51001.
Release cycle
Docker images are built on every release, so one can lock it to a specific version, say
0.5.1:
docker run -p 51000:8888 -v $(pwd):/home/jovyan/ -v $HOME/.cache:/root/.cache --gpus all jinaai/discoart:0.5.1What's next?
You can always do
from discoart import cheatsheet; cheatsheet()to check all new/modified parameters.
"armchair avocado"will give you nothing but confusion and frustration. I highly recommend you to check out the following resources before trying your own prompt:
- Zippy's Disco Diffusion Cheatsheet v0.3
- EZ Charts - Diffusion Parameter Studies
- Disco Diffusion 70+ Artist Studies
- A Traveler’s Guide to the Latent Space
- Disco Diffusion Illustrated Settings
- Coar’s Disco Diffusion Guide
Support
- Join our Slack community and chat with other community members about ideas.
- Join our Engineering All Hands meet-up to discuss your use case and learn Jina's new features.
- When? The second Tuesday of every month
- Where? Zoom (see our public events calendar/.ical) and live stream on YouTube
- Subscribe to the latest video tutorials on our YouTube channel
Join Us
DiscoArt is backed by Jina AI and licensed under MIT License. We are actively hiring AI engineers, solution engineers to build the next neural search ecosystem in open-source.
