stablediffusion - 具有潜在扩散模型的高分辨率图像合成
稳定扩散版本 2


该存储库包含从头开始训练的稳定扩散模型,并将使用新的检查点不断更新。以下列表概述了所有当前可用的模型。更多即将推出。
新闻
12月 7, 2022
2.1 版
- 新的稳定扩散模型(稳定扩散2.1-v,HuggingFace)分辨率为768x768,分辨率为512x512(稳定扩散2.1-base,HuggingFace),两者都基于与2.0相同数量的参数和架构,并在LAION-5B的限制较少的NSFW滤波上进行了微调 数据。默认情况下,如果未安装,将以全精度评估模型的注意操作。要启用 fp16(这可能会导致 v2.1 模型上的原版注意力模块出现数值不稳定),请使用
xformers
ATTN_PRECISION=fp16 python <thescript.py>
11月 24, 2022
2.0 版
-
分辨率为 768x768 的新稳定扩散模型(稳定扩散 2.0-v)。U-Net 中的参数数量与 1.5 相同,但使用 OpenCLIP-ViT/H 作为文本编码器,并从头开始训练。SD 2.0-v是一种所谓的v预测模型。
-
上述模型是从SD 2.0-base进行微调的,SD 2.0-base在512x512图像上作为标准噪声预测模型进行了训练,并且也可用。
-
添加了 x4 放大潜在文本引导扩散模型。
-
新的深度引导稳定扩散模型,从SD 2.0基础进行微调。该模型以通过MiDaS推断的单眼深度估计为条件,可用于结构保留img2img和形状条件合成。

-
文本引导的修复模型,从 SD 2.0 基础进行微调。

我们遵循原始存储库,并提供基本的推理脚本来从模型中采样。
最初的稳定扩散模型是与CompVis和RunwayML合作创建的,并建立在这项工作的基础上:
具有潜在扩散模型
的高分辨率图像合成 罗宾·罗姆巴赫*, 安德烈亚斯·布拉特曼*, 多米尼克·洛伦茨, 帕特里克·埃瑟, 比约恩·奥默
CVPR '22 口服 |GitHub |arXiv|项目页面
稳定扩散是一种潜在的文本到图像扩散模型。
要求
conda install pytorch==1.12.1 torchvision==0.13.1 -c pytorch
pip install transformers==4.19.2 diffusers invisible-watermark
pip install -e .
高效关注
为了提高 GPU 的效率和速度,我们强烈建议安装 xformers 库。
在带有 CUDA 100 的 A11.4 上进行测试。安装需要最新版本的 nvcc 和 gcc/g++,例如通过
export CUDA_HOME=/usr/local/cuda-11.4
conda install -c nvidia/label/cuda-11.4.0 cuda-nvcc
conda install -c conda-forge gcc
conda install -c conda-forge gxx_linux-64==9.5.0
Then, run the following (compiling takes up to 30 min).
cd ..
git clone https://github.com/facebookresearch/xformers.git
cd xformers
git submodule update --init --recursive
pip install -r requirements.txt
pip install -e .
cd ../stablediffusion
Upon successful installation, the code will automatically default to memory efficient attention
for the self- and cross-attention layers in the U-Net and autoencoder.
General Disclaimer
Stable Diffusion models are general text-to-image diffusion models and therefore mirror biases and (mis-)conceptions that are present
in their training data. Although efforts were made to reduce the inclusion of explicit pornographic material, we do not recommend using the provided weights for services or products without additional safety mechanisms and considerations.
The weights are research artifacts and should be treated as such.
Details on the training procedure and data, as well as the intended use of the model can be found in the corresponding model card.
The weights are available via the StabilityAI organization at Hugging Face under the CreativeML Open RAIL++-M License.
Stable Diffusion v2
Stable Diffusion v2 refers to a specific configuration of the model
architecture that uses a downsampling-factor 8 autoencoder with an 865M UNet
and OpenCLIP ViT-H/14 text encoder for the diffusion model. The SD 2-v model produces 768x768 px outputs.
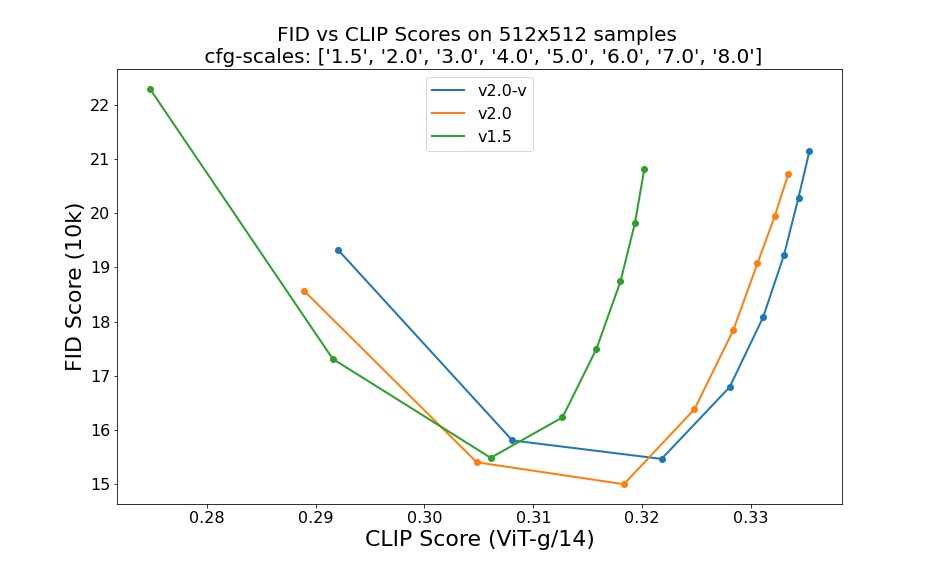
Evaluations with different classifier-free guidance scales (1.5, 2.0, 3.0, 4.0,
5.0, 6.0, 7.0, 8.0) and 50 DDIM sampling steps show the relative improvements of the checkpoints:
Text-to-Image

Stable Diffusion 2 is a latent diffusion model conditioned on the penultimate text embeddings of a CLIP ViT-H/14 text encoder.
We provide a reference script for sampling.
Reference Sampling Script
This script incorporates an invisible watermarking of the outputs, to help viewers identify the images as machine-generated.
We provide the configs for the SD2-v (768px) and SD2-base (512px) model.
First, download the weights for SD2.1-v and SD2.1-base.
To sample from the SD2.1-v model, run the following:
python scripts/txt2img.py --prompt "a professional photograph of an astronaut riding a horse" --ckpt <path/to/768model.ckpt/> --config configs/stable-diffusion/v2-inference-v.yaml --H 768 --W 768
or try out the Web Demo:  .
.
To sample from the base model, use
python scripts/txt2img.py --prompt "a professional photograph of an astronaut riding a horse" --ckpt <path/to/model.ckpt/> --config <path/to/config.yaml/>
By default, this uses the DDIM sampler, and renders images of size 768x768 (which it was trained on) in 50 steps.
Empirically, the v-models can be sampled with higher guidance scales.
Note: The inference config for all model versions is designed to be used with EMA-only checkpoints.
For this reason
use_ema=False
is set in the configuration, otherwise the code will try to switch from
non-EMA to EMA weights.
Enable Intel® Extension for PyTorch* optimizations in Text-to-Image script
If you're planning on running Text-to-Image on Intel® CPU, try to sample an image with TorchScript and Intel® Extension for PyTorch* optimizations. Intel® Extension for PyTorch* extends PyTorch by enabling up-to-date features optimizations for an extra performance boost on Intel® hardware. It can optimize memory layout of the operators to Channel Last memory format, which is generally beneficial for Intel CPUs, take advantage of the most advanced instruction set available on a machine, optimize operators and many more.
Prerequisites
Before running the script, make sure you have all needed libraries installed. (the optimization was checked on
Ubuntu 20.04
). Install jemalloc, numactl, Intel® OpenMP and Intel® Extension for PyTorch*.
apt-get install numactl libjemalloc-dev
pip install intel-openmp
pip install intel_extension_for_pytorch -f https://software.intel.com/ipex-whl-stable
To sample from the SD2.1-v model with TorchScript+IPEX optimizations, run the following. Remember to specify desired number of instances you want to run the program on (more).
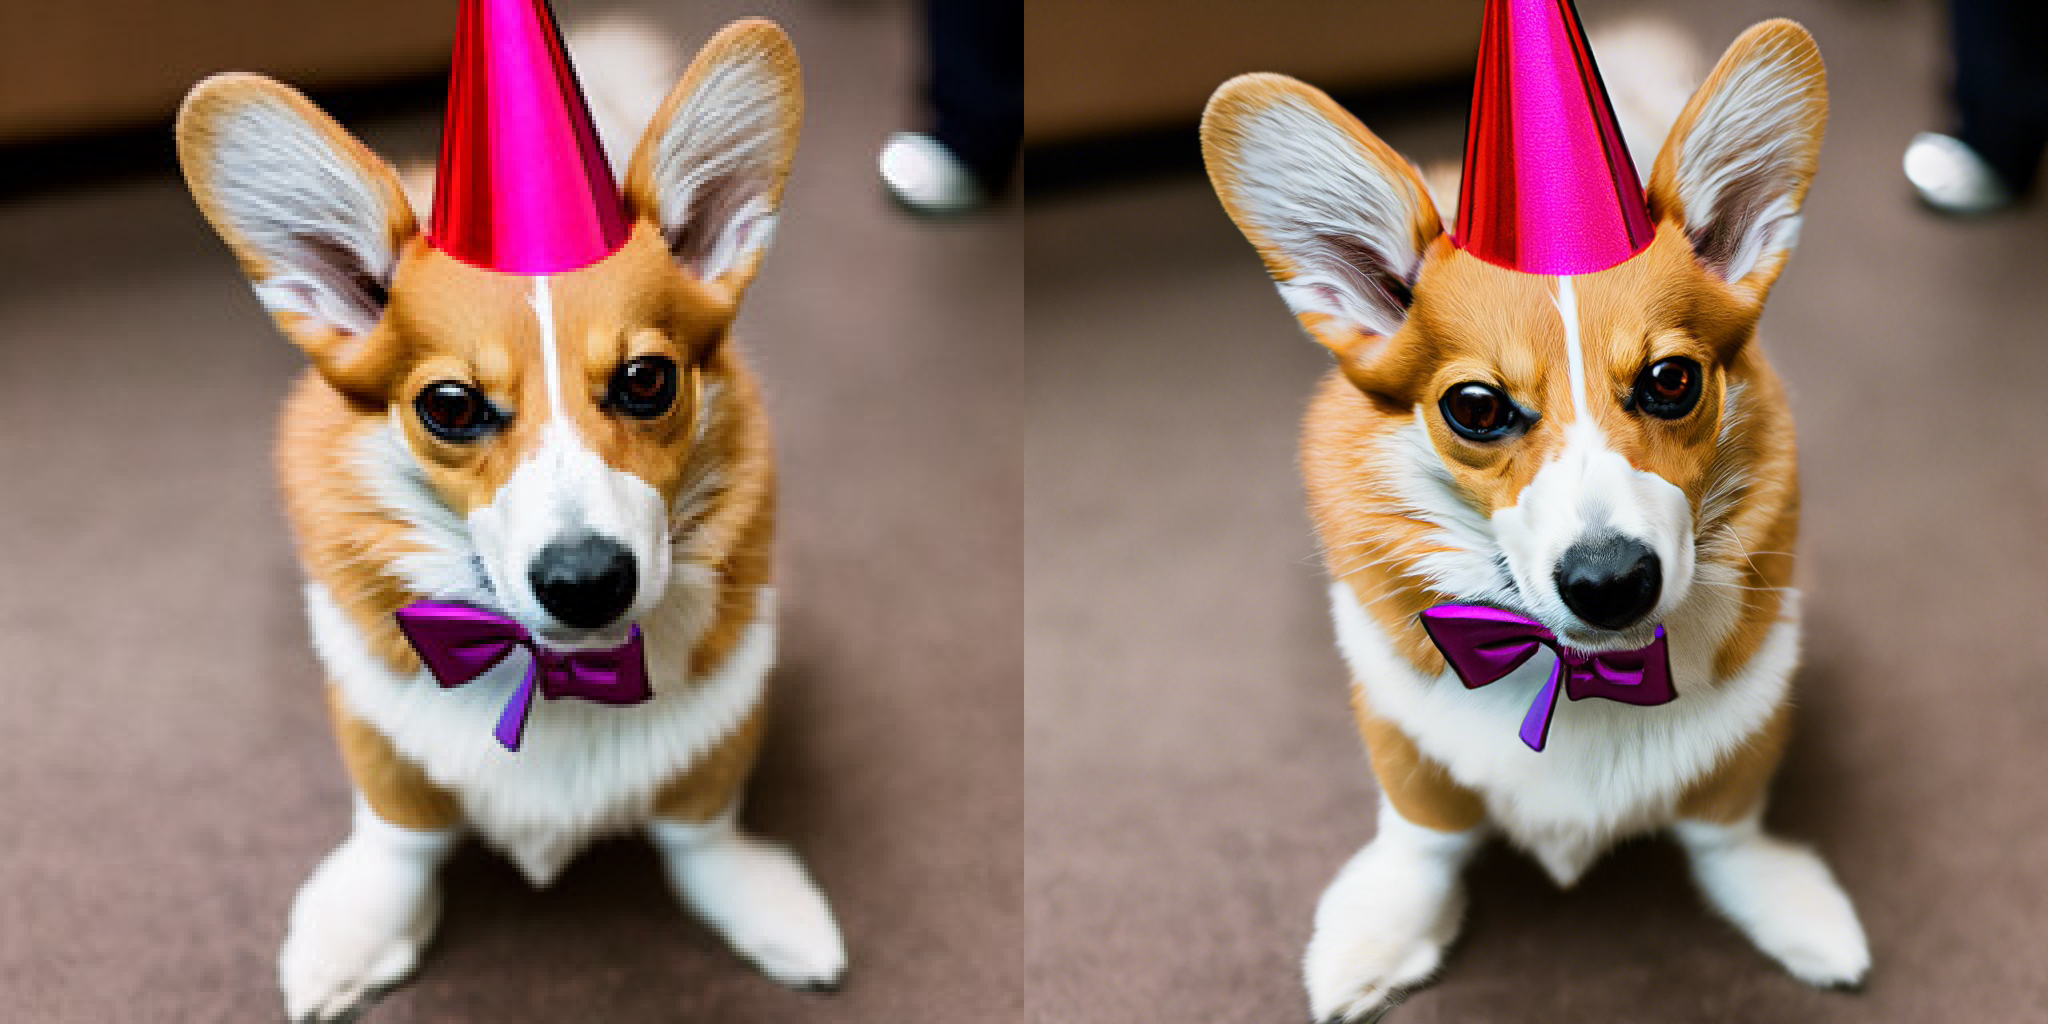
MALLOC_CONF=oversize_threshold:1,background_thread:true,metadata_thp:auto,dirty_decay_ms:9000000000,muzzy_decay_ms:9000000000 python -m intel_extension_for_pytorch.cpu.launch --ninstance <number of an instance> --enable_jemalloc scripts/txt2img.py --prompt \"a corgi is playing guitar, oil on canvas\" --ckpt <path/to/768model.ckpt/> --config configs/stable-diffusion/intel/v2-inference-v-fp32.yaml --H 768 --W 768 --precision full --device cpu --torchscript --ipex
To sample from the base model with IPEX optimizations, use
MALLOC_CONF=oversize_threshold:1,background_thread:true,metadata_thp:auto,dirty_decay_ms:9000000000,muzzy_decay_ms:9000000000 python -m intel_extension_for_pytorch.cpu.launch --ninstance <number of an instance> --enable_jemalloc scripts/txt2img.py --prompt \"a corgi is playing guitar, oil on canvas\" --ckpt <path/to/model.ckpt/> --config configs/stable-diffusion/intel/v2-inference-fp32.yaml --n_samples 1 --n_iter 4 --precision full --device cpu --torchscript --ipex
If you're using a CPU that supports
bfloat16
, consider sample from the model with bfloat16 enabled for a performance boost, like so
# SD2.1-v
MALLOC_CONF=oversize_threshold:1,background_thread:true,metadata_thp:auto,dirty_decay_ms:9000000000,muzzy_decay_ms:9000000000 python -m intel_extension_for_pytorch.cpu.launch --ninstance <number of an instance> --enable_jemalloc scripts/txt2img.py --prompt \"a corgi is playing guitar, oil on canvas\" --ckpt <path/to/768model.ckpt/> --config configs/stable-diffusion/intel/v2-inference-v-bf16.yaml --H 768 --W 768 --precision full --device cpu --torchscript --ipex --bf16
# SD2.1-base
MALLOC_CONF=oversize_threshold:1,background_thread:true,metadata_thp:auto,dirty_decay_ms:9000000000,muzzy_decay_ms:9000000000 python -m intel_extension_for_pytorch.cpu.launch --ninstance <number of an instance> --enable_jemalloc scripts/txt2img.py --prompt \"a corgi is playing guitar, oil on canvas\" --ckpt <path/to/model.ckpt/> --config configs/stable-diffusion/intel/v2-inference-bf16.yaml --precision full --device cpu --torchscript --ipex --bf16
Image Modification with Stable Diffusion

Depth-Conditional Stable Diffusion
To augment the well-established img2img functionality of Stable Diffusion, we provide a shape-preserving stable diffusion model.
Note that the original method for image modification introduces significant semantic changes w.r.t. the initial image.
If that is not desired, download our depth-conditional stable diffusion model and the
dpt_hybrid
MiDaS model weights, place the latter in a folder midas_models
and sample via
python scripts/gradio/depth2img.py configs/stable-diffusion/v2-midas-inference.yaml <path-to-ckpt>
or
streamlit run scripts/streamlit/depth2img.py configs/stable-diffusion/v2-midas-inference.yaml <path-to-ckpt>
This method can be used on the samples of the base model itself.
For example, take this sample generated by an anonymous discord user.
Using the gradio or streamlit script
depth2img.py
, the MiDaS model first infers a monocular depth estimate given this input,
and the diffusion model is then conditioned on the (relative) depth output.
depth2image
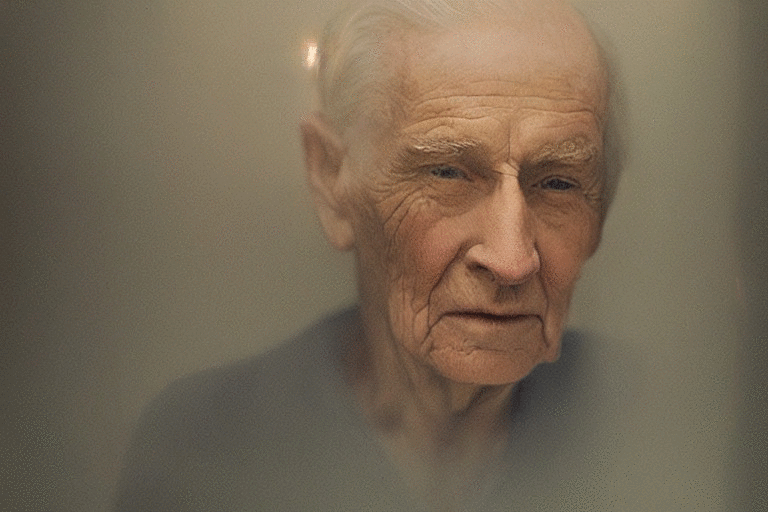
This model is particularly useful for a photorealistic style; see the examples.
For a maximum strength of 1.0, the model removes all pixel-based information and only relies on the text prompt and the inferred monocular depth estimate.

Classic Img2Img
For running the "classic" img2img, use
python scripts/img2img.py --prompt "A fantasy landscape, trending on artstation" --init-img <path-to-img.jpg> --strength 0.8 --ckpt <path/to/model.ckpt>
and adapt the checkpoint and config paths accordingly.
Image Upscaling with Stable Diffusion
 After downloading the weights, run
python scripts/gradio/superresolution.py configs/stable-diffusion/x4-upscaling.yaml <path-to-checkpoint>
or
streamlit run scripts/streamlit/superresolution.py -- configs/stable-diffusion/x4-upscaling.yaml <path-to-checkpoint>
for a Gradio or Streamlit demo of the text-guided x4 superresolution model.
This model can be used both on real inputs and on synthesized examples. For the latter, we recommend setting a higher
noise_level
, e.g. noise_level=100
.
Image Inpainting with Stable Diffusion
Download the SD 2.0-inpainting checkpoint and run
python scripts/gradio/inpainting.py configs/stable-diffusion/v2-inpainting-inference.yaml <path-to-checkpoint>
or
streamlit run scripts/streamlit/inpainting.py -- configs/stable-diffusion/v2-inpainting-inference.yaml <path-to-checkpoint>
for a Gradio or Streamlit demo of the inpainting model.
This scripts adds invisible watermarking to the demo in the RunwayML repository, but both should work interchangeably with the checkpoints/configs.
Shout-Outs


- Thanks to Hugging Face and in particular Apolinário for support with our model releases!
- Stable Diffusion would not be possible without LAION and their efforts to create open, large-scale datasets.
- The DeepFloyd team at Stability AI, for creating the subset of LAION-5B dataset used to train the model.
- Stable Diffusion 2.0 uses OpenCLIP, trained by Romain Beaumont.
- Our codebase for the diffusion models builds heavily on OpenAI's ADM codebase and https://github.com/lucidrains/denoising-diffusion-pytorch. Thanks for open-sourcing!
- CompVis initial stable diffusion release
- Patrick's implementation of the streamlit demo for inpainting.
-
img2img
is an application of SDEdit by Chenlin Meng from the Stanford AI Lab. - Kat's implementation of the PLMS sampler, and more.
- DPMSolver integration by Cheng Lu.
- Facebook's xformers for efficient attention computation.
- MiDaS for monocular depth estimation.
License
The code in this repository is released under the MIT License.
The weights are available via the StabilityAI organization at Hugging Face, and released under the CreativeML Open RAIL++-M License License.
BibTeX
@misc{rombach2021highresolution,
      title={High-Resolution Image Synthesis with Latent Diffusion Models},
      author={Robin Rombach and Andreas Blattmann and Dominik Lorenz and Patrick Esser and Björn Ommer},
      year={2021},
      eprint={2112.10752},
      archivePrefix={arXiv},
      primaryClass={cs.CV}
}
About
